Showing posts with label Layering Stems. Show all posts

Thursday, October 15, 2015

A Layout Featuring Vintage Christmas with Debbie

Hi everyone!  Debbie here with you today sharing a layout I created with the new paper collection Vintage Christmas along with some of the new Imagine Ink products; mists, embossing powder and glitter.
I love the paper collection!  Gorgeous colors and details!  For my background I used the Wonderland paper and did some fussy cutting with the Magical paper and used the Calling Cards for some layers behind my picture, which by the way is me as a child.  I primed the background paper with some clear gesso and added some stenciling.  Once the stenciling was dry I added some of the Imagine Ink Mica Color Mist in Cotton Candy along with some pink microbeads from my stash and some Imagine Ink Glitter in Pyrite.


I primed the chipboard words Sparkle and Merry with some white gesso.  After it dried I sprayed it with the new Imagaine Ink Mist Jingle Bells and added some Pyrite Glitter.

Tucked beneath my flower cluster I used the chipboard piece Dresden Corsage which I primed with white gesso, sprayed with the Imagine Ink Mist Cotton Candy and applied some of the new Petal embossing powder.  I then embossed a layering stem chipboard piece with the new Lucky embossing powder.

So excited about all of the new products and can't wait to share more projects with you.  You can find all of the new products here in the store.

Thanks for stopping by!
. . . Debbie

Thursday, September 24, 2015

Summer snapshots

Hello BFS fans!
I hope you've all been great! I'm happy to be back and share with you some of the colorful snapshots from my summer.

'Bloom and grow'
It's all about the soft, white washed colors, with just a hint of teal and pink. The chipboards treatment is simple - I'm using either plain or just covered with a layer of gesso.
Chipboards: Deja vu border, Blue Fern frame (piece), Layering stems


'Totally love you'
This is one of my favorite BFS papers and I've been saving it for long! It's so decorative that it needs just a small amount of embellishments. I used piecec of old lace and chipboards to frame my story.
Some messy stamping is just added to get more contrast in the pastel backgrund.
Chipboards:Radiant suns, Blue Fern frame, Dot grid panel, Quaterfoil panel


'Remember (Krakow marketsquare)'
A selfie with my daughter while visiting Krakow marketsquare! A quick vacation layout, if you don't count the time for fussy cutting the roses ;)
Chipboards: Mixed chains, Grunge frames, Memory frames, Blue Fern frame (yes! again - this giant piece lasts forever)


I have about 1000 photos from this summer, so I might be sharing some more next time :)
Have a great day everybody!
DT Zanka

Wednesday, May 13, 2015

Two mixed media projects by Marie-Josée

 Hello all,

I hope you are doing fine today. In this blog post, I will show you two mixed media projects I created using some of my favorite pieces of Blue Fern Studios chipboard, which are perfect for mixed media projects.

"Adorable" kitty canvas

This is my beautiful kitty, Pretzel. She passed away on April 20 at the age of 16. I wanted to create something in her memory and I thought a canvas would be perfect.


First, I chose a 6" x 12" canvas. I cut a piece of the Mini Rings Panel and glued it to my canvas. Then, I applied gesso all over my canvas. I also applied gesso to the heart (from the Frilly Hearts set) and the circles (from the Graduated Circles set).

The word Adorable (from the French Words set) was heat embossed with black embossing powder.

Then, I painted the whole thing using various ColourArte products : paints, gels and mists. I mainly used teal, but I also added touches of gold and purple here and there. I finished with black and white ink splatters.

Here's a close-up view of the Frilly Heart and the Graduated Circles...


... and here's a closeup view of the background!


Blue Fern Studios products used:
Graduated Circles
Frilly Hearts
Mini Rings Panel
French Words

Angel canvas


For this canvas, I used the colors of the Déjà Vu collection as my inspiration. I used of piece of the Friperies paper as my starting point. I cut it to fit a piece of the Graduated Squares set.

Here's a closeup view of the Déjà Vu paper and a piece of the Graduated squares set.


I worked exactly the same way I worked for the previous canvas, using similar products. I just used different colors and different chipboards. Here you see a close-up view of a piece of the Turkish Bits set as well as of a piece of the Layering Stems set.


Finally, I also used a stamp from the Halftone Stamps set, which matches the Déjà Vu collection, with black ink.


Blue Fern Studios products used:
Graduated Squares
Turkish Bits
Layering Stems
Déjà Vu collection (Friperies paper and Halftone stamps)


Thursday, April 16, 2015

A Love Story - Mixed Media Layout Tutorial

Hello Blue Fern Studios fans!

I'm a little late for my share this month but here it is finally! Using the gorgeous Love Story collection, stamps and BFS' intricately designed chipboards, I created the following layout for a girlfriend who got married recently. 


Some closeups of the project:


The Rose Medley and Layering Stems chipboards which I have altered.


Another piece from the Layering Stems set which is just perfect for the flowers I like to use on my projects.


Creating lots of texture on the Rose Medley.

Here is the start to finish video of how I put this layout together. I hope you enjoy what I have to share today!


Blue Fern Studios products used:


Love Story collection papers - The Grand Ball, Sweet Song, True Harmony, Amazing Hearts
Love Story Stamp Set 1
Rose Medley
Layering Stems

love,

Sunday, March 22, 2015

Love Story Layouts

Hey crafty friends! I'm so excited to share with you the layouts I created with the Love Story collection. For my first layout I decided to use the Marrakesh panel chipboard and create a collage of photos.


It is so striking the page hardly needs anymore embellishments. But I couldn't help myself and just had to ass a few more pieces cut from another beautiful Love Story paper.


Check out the step by step video tutorial to see the entire process and create it for your own photos!


BFS supplies used:
Papers: Love Story collection: Twenty One, True harmony
Chipboard: Marrakesh Panel, This Moment title

My second layout has a story behind it. at first glance it's a beautiful scene with flowers in a garden and a teenager boy sits among them. however when you look closely you see he's kind of mad and the title explains why...


I colored all the chipboard flowers with aquarelle pencils and a water brush. Then I sprayed a cheese cloth and used it to create the grass. I added all the flowers and the photo of my son. The title was sprayed with the sprays inks as well.

BFS supplies used:
Papers: Love Story collection: The Grand Ball
Chipboard: Garden Daisies, Pretty Weeds, Layering Stems

Have fun creating!
Einat

Tuesday, February 24, 2015

Love Story projects by Zanka

Hello!
It's my turn to share some more project which I created in February using BFS elegant Love Story collection. This is just a small share of the wonderful possibilities which this collection can be used for.
For my first project I picked Grand Ball, my absolute favourite paper in the whole collection! I worked both with the front and the back side, and I can't make up my mind-which one do I like more ;)

This  layout's colour scheme was entirely inspired by the colours of the paper pattern.


I have used some plain chipboards which I think match perfectly for the colours here. The branch is randomly dabbed with gesso. The heart is primed with gesso and covered with glossy accents and embossed with a distress powder.
Chipboards used:
Spring Branch, Lace Heart Border, word set Laughter, Happy , Smile, Layering Stems

My second project is also inspired by the base paper colours but as you see, the palette and style are completely different here.

I used Love Story stamp sets 1 & 2 to fill up the background with the stamp collage.
Chipboards: Circle Vine, Mixed Chains. The framed is primed with gesso and painted with crackle paste.

Thank you for spending a moment with me today, have a fantastic creative day!
Zaneta aka Zanka

Wednesday, February 4, 2015

An Altered Paint Palette and A Layout by Kim Price

Hi everyone, it's Kim here today with a few of my latest creations for Blue Fern Studios. I've really been feeling the love lately and with Valentine's Day just around the corner I've been creating a lot of love themed projects.


My first project is an altered piece which is sized just right to mount onto a 12"x12" page if you wish. I've used a traditional style wooden artists palette, altering it with some gorgeous Montage patterned papers and Valentine's Day themed chipboard.


Here I've taken one of the pieces from the Valentine Cupids Set and painted it up to look like a traditional vintage style cherub using acrylic paints, colored pencils and a fine Sharpie. I'm just loving how this little babe turned out and it looks so gorgeous against the stunningly romantic Montage Invitation patterned paper - perfect for Valentines Day.


In a similar way I've added color to my chipboard title using the word "love" from "Adore, Love, Cherish", coloring it with watered down acrylic paint to resemble watercolor and adding definition with a fine black Sharpie to really make it pop.


Here's a last photograph taken from the side to highlight the dimensional look to the piece.

Blue Fern Studios patterned papers: Montage Invitation
Blue Fern Studios chipboard: Adore Love Cherish, Invitation, Valentine Cupids


My second project today is a layout created using patterned papers from the beautiful Blue Fern Studios Sanctuary collection.

I've created this piece using one of the stunning dark papers from the collection - Bountiful


I then began to add some fussy cut layers using the floral images found on Garden Plaza patterned paper as well as the butterfly images and some leaves. To these layers I've included my "Natural Beauty" title from the All Natural set, coloring it with a coordinating shade of watercolor.


I've also gone ahead and added a few floral chipboard pieces from both the All Natural Set as well as the Layering Stems Set, again adding watercolor for an instant hit of color and texture. The results are stunning.


Blue Fern Studios patterned paper: Sanctuary Bountiful and Garden Plaza
Blue Fern Studios chipboard: All Natural Set and Layering Stems


Thanks for dropping by today, I hope you've enjoyed my projects for this month featuring Blue Fern patterned papers and chipboard.


Wednesday, November 12, 2014

November inspiration with Maja

Hi all Blue Fern lovers I´m here today to share two layouts and a card made with Blue Fern Studios products. First up is a layout made with papers from Montage paper collection.


Blue Fern Studios products used:

Papers: Montage - Invitation & Mercantile
Chipboard: Treasured floral frame, Picture perfect,Vereanda cage set, Roman clock set small and Bohemian flowers.


My next layout is made with Ombré Dreams paper collection and the lovely Techno Rings.


Blue Fern Studios products used:

Papers: Ombré Dreams- Dream Cards, Susan´s Dream & Ginger´s Dream
chipboard: Directions & Techno rings 


My last project is a little layerd card made with Montage papers and BFS chipboard pieces. 


Blue Fern Studios products used:
Papers: Montage - Mercantile & Bouquet
Chipboard: layering Steams & Veranda Cages.


Thanks for stopping by =)  

Wednesday, September 10, 2014

Jackie's September Projects - A Layout and An Upcycled Box

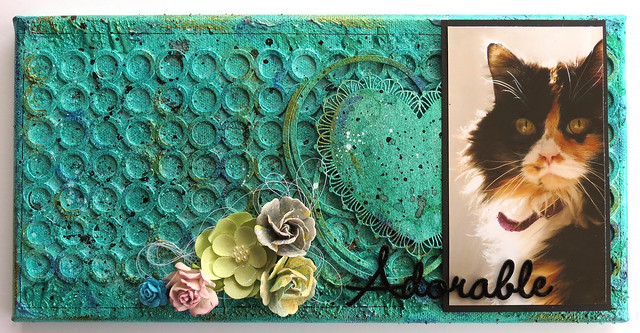
Hello there Blue Fern Studios fans! I have two new projects to share with you today - one shabby layout and an upcycled project.

For my first project, I wanted to create a bit of whimsy for this photo of my youngest wearing a crown of daisies (vey begrudgingly!). Blue Fern Studios papers are so thick that they are gorgeous for tearing and distressing.


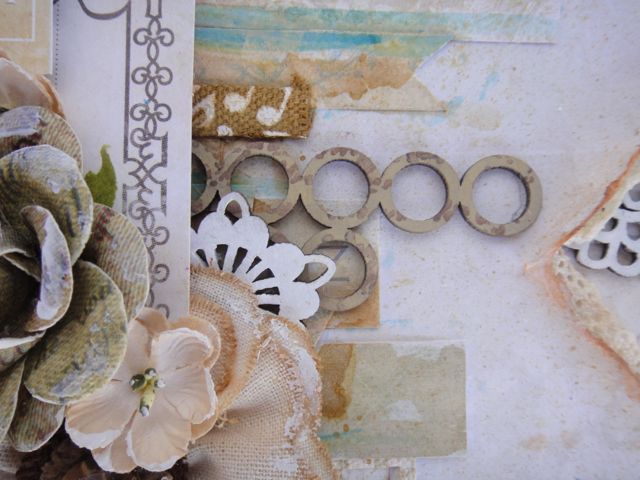
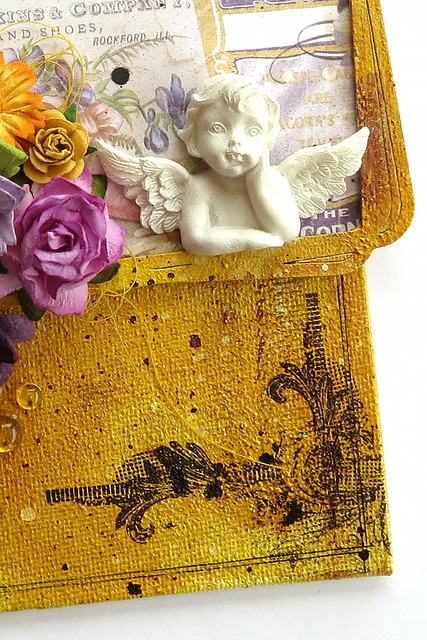
I began by tearing a diagonal strip out of the In Bloom sheet, then tore additional pieces off and layered them between the Love Letters and In Bloom papers, along with some lace. I also distressed and inked the edges, tucking in some lace and pieces of Bohemian Flowers chippies painted white.


I tucked additional Bohemian Flowers into the flower cluster - the stark white helps them to stand out against the busy mixed media background.


I cut the word Dream and the layers for my photo from the Calling Cards paper.


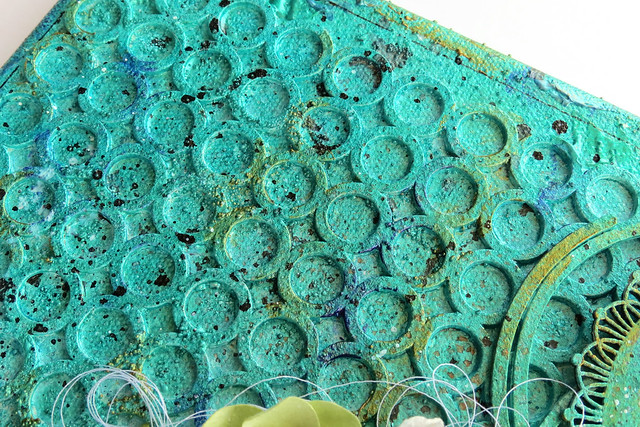
I love using the Mini Ring Things chippies for dimension in my background. Here I've coated them in a light brown chalk ink and then stamped them with a darker ink.


A little close-up of all the layers of media, chipboard, paper and embellies.


Blue Fern Studios Products

Blue Fern Garden papers:
- Love Letters
- Timeless
- In Bloom
- Calling Cards
- Parlour

Blue Fern Studios Chipboard:
- Bohemian Flowers
- Mini Ring Things

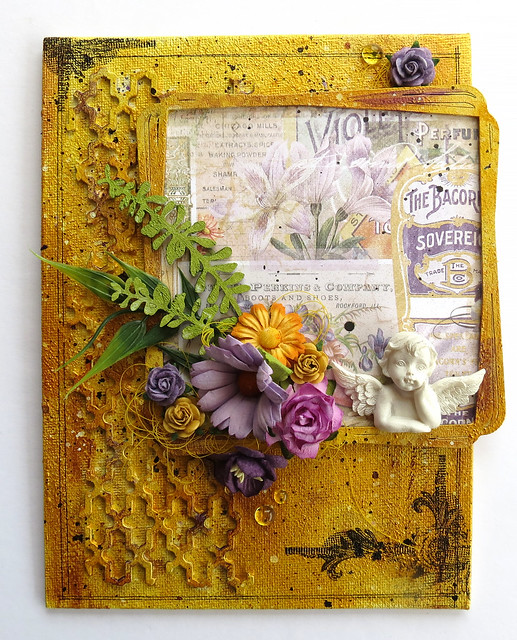
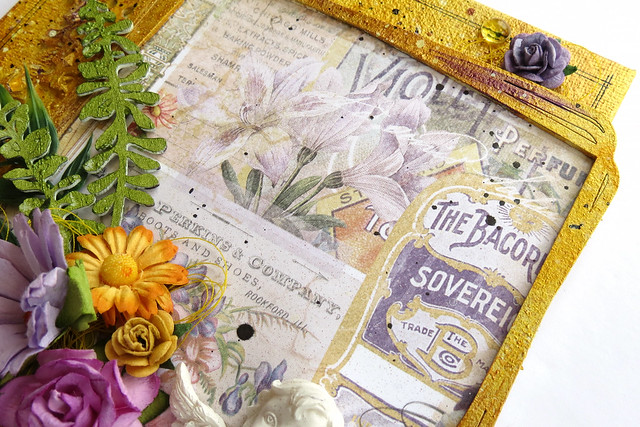
Are you a crafty hoarder? I am, which is how my second project came about. I have problems throwing out alterable items that might be able to be repurposed as something else, even if I have no idea what that might be. Such was the case with this little blue plastic box. Originally it housed a science experiment from the kids. Since it was a one-time-use experiment, the little box was destined for the recycling box. But I loved the size and the way it closed so snugly, so I salvaged it and tucked it away in a corner of my scraproom. This month I've given it new life - to store my resin pieces - with some gorgeous Blue Fern Studios products.


The Joyce's Dream paper from the Ombre Dreams collection is full of beautiful, subtle details. I added a little modelling paste through a script stencil and tinted it slightly with grey chalk ink, then added some splatters of purple to the background before adding my chipboard and other elements.


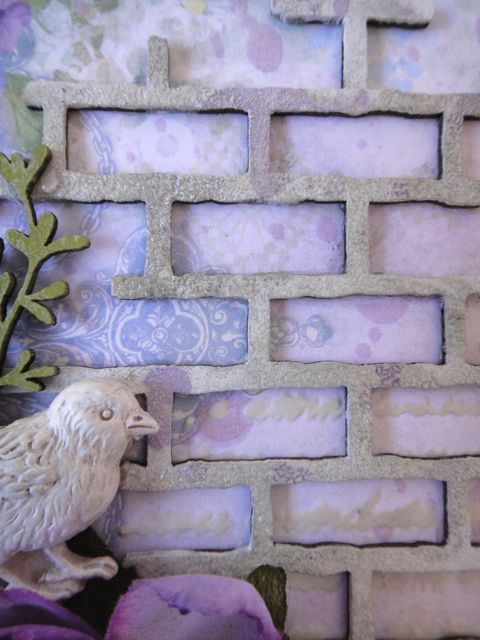
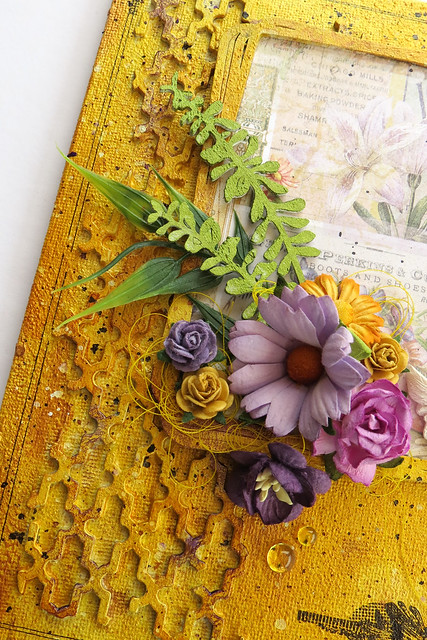
For the top of the container I used some of the Shabby Brick Bits coated with paint, embossing powder and chalk ink for a textured appearance.


To round out the cluster of embellishments I tucked in one of the Layering Stems coloured with chalk ink and then touched with gesso for a weathered appearance. I love these pieces of chipboard for tucking in here and there!


I finished the front of the box with one of the Spring Trinkets, coloured with various chalk inks and weathered with gesso.


Blue Fern Studios Products

Paper:

- Ombre Dreams: Joyce's Dream

Chipboard:

- Shabby Brick Bits
- Spring Trinkets
- Layering Stems

Thank you so much for joining me today! Remember, there is still plenty of time to play along with our September Sketch Challenge for your chance to win some gorgeous Blue Fern Studios products!