Showing posts with label Chickenwire Panel. Show all posts

Wednesday, January 3, 2018

January Inspiration by France Ringuette

Good morning bloggers,

Today is an exciting day for me, as I am getting the opportunity to share with you my very first projects for Blue Fern Studios.

First, let me introduce myself.

My name is France, I am a french Canadian living in the Montreal area of Canada. I am blessed to have 2 young adult boys and a loving husband. You'll see thru my 2018 projects that my family and our passion for traveling are often the focus points of my projects. I also work in Marketing in the Medical device field. Crafting is my relaxation. I enjoy mainly making scrapbook pages, but you will also see me making cards, tag, art journals and mixed media canvases.


Please come say hi, it's always fun to meet new crafty friends.

***********************

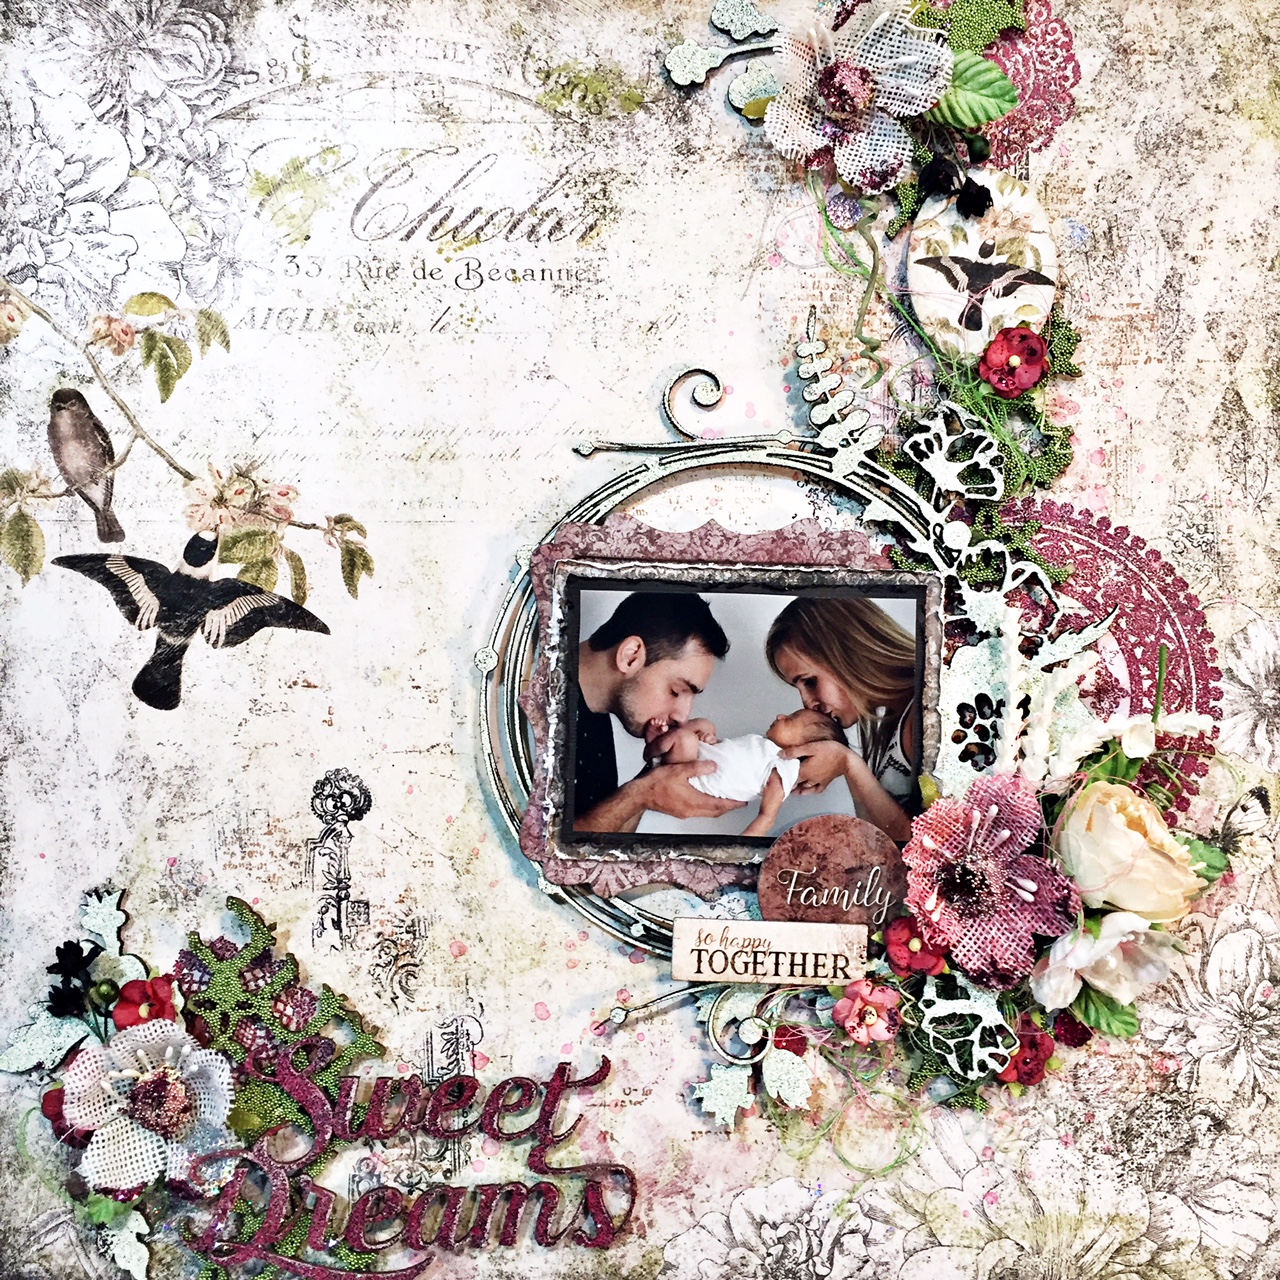
Sweet Dreams (Layout #1)


 The inspiration from this page started with this amazing paper in the Remnants collection called Devonshire. I fell in love with the printed flowers and birds on this particular page.

I started playing with my chipboards by adding seedlings to cover them, I have to say that I was very pleased with the results and love the dimension this brings to the layout. I used Meadow seedlings.

The title, oh what color to chose is always a challenge I find. I was intrigued by this new embossing powder called Night Sky, at first, I wasn't certain it would have a fit on a boy's page but at the end I enjoy the contrast that it has with the Meadow seedlings, so I opted for this color.


The center of the Remnants bloom flowers has a slight yellow highlight that I covered in white gesso, then glued a mix of mauve seedlings and red wine glitter. The results are amazing.


Around my picture I used night sky embossing powder with weathered doilies stamp set. On my chipboard circle flourish small frame, I used one of the new colors green ivory


Once my layout is done, then I added touches of red wine and icicle glitter to my flowers and some on the paper.


Blue Fern Products used:

Paper: Remnants Devonshire & Callaway (6x6)

Glitter: Red Wine & Icicle

Chipboard:
Floral Lattice Bits
Sweet Dreams
Circle Flourish small
Thistle Spray

Flowers:
Remnants Bloom & Florals
Wanderlust vine


Seedlings: Mauve and Meadow

Embossing Powder: Night Sky & Green Ivory

Stamps:
Weathered Doilies
Tattered Newsprint
Vintage Edges

***********************


Remember this Day : Sintra Portugal (Layout #2)


If you enjoy traveling and you've never ben to Portugal, trust that this needs to be added to your bucket list. Sintra is a beautiful city that has amazing Unesco sites that are spectacular to visit. When I looked at the stunning paper from the REMNANTS collection, I knew it was perfect for this picture. This paper is Bloomsbury, I loved the old books look at the detailed printing of the flower and clock.
The title is part of the Remnants chipboard series and so perfect for a capturing any precious moment.


I wanted to add a bit more red to the page, so I chose to work with a stencil, light molding past and this amazing Garnet embossing powder. Once the embossing was done, I wanted to add more stamping to the background. I chose to use the Vintage Edges stamp set.

I love adding flowers to my projects, on this layout I added some from the Remnants Bloom and Floral Collections. I also cut out some flowers from the amazing lace 4 set.


For the chipboard, I inked the Shabby Brick bits. Once my layout was almost completed, I added the final touches with splatters of inks, white gesso and touches of Sterling Silver Seedlings.


Blue Fern Studio products used:

Paper:
Remnants Bloomsbury

Chipboard:
Remnants printed collection self adhesive
Shabby Brick Bits

Flowers: Remnants Bloom & Florals

Embossing Powder: Garnet

Seedling: Sterling Silver

Stamp: Vintage Edges

***********************

Love (Layout #3)


 I just loved this picture of my niece with the new born son Ayden, I've been enjoying making many pages for her recently. I have to say that this one is simple but oh so happy about how it turned out.


The starting point was this amazing paper from the Happy Accident collection called Incident. I love textured backgrounds and this one does the work for you, so rich in details, I opted not to alter it and just build layers.


I selected to emboss the Chicken Wire Panel with Blue Sky embossing powder. I did the same with the Love title chipie.


On my flowers, I opted to add some touches of white gesso and Blue Ice glitter.


Blue Fern Studio products used:

Paper:
Happy Accident- Incident

Chipboard:
Chickenwire Panel
Love title

Flowers: Remnants Bloom & Heartland Blossoms

Embossing Powder: Blue Sky

Glitter: Blue Ice


Well I hope you enjoyed my 3 pages for my first series with Blue Fern Studio, I wish you a very crafty 2018 !

France xxx

Sunday, October 16, 2016

October Projects by Maja

Good morning, BFS Fans, welcome to the blog today :)

I'm happy to be here again to share three layouts. They feature different collections and themes, but have something in common - they all show the "backsides" of papers for the backgrounds :)
Let's begin with the one you might have spotted during our October challenge announcement:


I made the layout using the Seaside Cottage collection. I layered selected paper, going for the nice pastel teal Regalia sheet for the background. Then I added the chickerwire chipboard painted with white gesso. Then I mounted the title chippies on it, combining some Spiritually Speaking words to form "Heaven Sent Blessings. :


I also added XOXO chipies and a mixture of flowers to further decorate the page. I chose the word pieces to be embossed with the Ruby ep for a nice contrast against the white chickenwire:


Heaven Sent Blessings:

Papers: Seaside Cottage: Relics, Regalia, Splendor, Whitewash
Chipboard: Chickenwire Panel, Spiritually Speaking, XOXO
Flowers: Seaside Lilies, Attic Charm Daisies, Courtship Blooms,
EP: Ruby

Now on to two layouts I made using the latest release, the Memoirs collection.
The first one was a true challenge for me, as I bravely used an yellow-orange-blue palette I'd never used before! :) But this combo makes a perfect choice to scrapbook your autumn, school or Halloween photos:


The palette was detrmined by the photo of my younger son that I used :) And so I selected the vintage newspaper sheet for the bacground that reminds me of some old book page. I added some brick stamped directly on it:


Embossed the "Noted" piece from Arrow Words and the Mini Frame Dangle with Tangerine and Copper eps and added the flowers in yellow and orange. Then I cut out the books motit and used it as a separate embellishment:


The title piece, Back To School, is embossed with Sand and Sea ep, one of my favourite new colours :) I also used a dimensional epoxy sticker to make an embellishment with a cut-out writing hand image. Finally I added some crystal dots and splashes of glitter ink to finish my page off:


Back to School:
Papers: Memoirs: Tale of Treasure, Calling Cards, Chronicles, Grand Sequel
Chipboard: Back to School, Mini Frame Dangle, Arrow Words
Flowers: Memoirs Blooms, Attic Charm Glitter Roses, Tranquility Blooms
Stamps: Essential Textures
EP: Sand & Sea, Tangerine, Copper

And here's the second layout I made with the Memoirs papers, and look how different it is!


I really love the deep dark red colour of the Songbird's Drama sheet! I wanted it to play the leading role and so used few elements on the page, not to cover it too much. The photo is one of the old photo shoot (you can tell by a different hairdo of my elder son ;) ) that I really like and already scrapbooked a dozen of times ;) First I layered nicely contrasting grey and red papers and added some stamping in the corners:


I embossed the gorgeous Chelsea Frame piece with Snow to make it clear white and really pop out of the background. Then I embossed the "you" from the title piece with Black Sand and then the whole of the chipboard with Ebony. I really like the metallic gold peeping through the black!


And finally I added the flower cluster with a bow of beautiful guipure lace and some embellies:


Grateful For You:
Papers: Memoires: Tale of Treasure, Songbird's Drama,
Chipboard: Chelsea Frame, Grateful For You
Flowers: Harvest Lilies, Dark Tropic Lilies
Stamps: Beads&Charms, Deja Vu, Forever, Ornamentals
EP: Ebony, Black Sand


And what do you think of the Memoirs collection? I hope to see many beautiful creations of yours with these papers!

See you later - Maja

Sunday, August 7, 2016

Pregnancy photoshot layouts by Marie-Eve Bernard

Hello,

Today, I have 3 layouts with pictures from my pregnancy photoshop.  I was 35 weeks pregnant at the time and very excited about the arrival of a baby boy in our family (after two wonderful princesses, we were so happy to finally have a boy!). Léo arrived at the end of June and we are so happy to cherish this third treasure.  Be sure you will see some baby picture from me soon!

Anticipation:

For this layout, I use the gorgeous Timeless collection.


I cover the Corner flourishes with gesso and then paint it with a shiny red paint.  My title, family chipboard, was done almost the same, but use spray instead of paint.


In my flowers arrangement, I use the Attic Cham glitter roses and some Courtship blooms.  I match these with flowers from my stash. 


List of Blue Fern Studios supplies:

Papers:
Timeless Collection, Adobe
Timeless Collection, Artistique
Timeless Collection, Couture

Chipboards:
Serendipity words 1
Corner Flourishes

Stamps:
Arcadia Texture
Garden Frolic

Flowers:
Attic Cham glitter roses
Courtship Blooms

Family:

This time, I had fun with the Tranquility collection.


I leaved the Chicken wire panel and my title unaltered. I fit my layout perfectly this way.


On the butterflies, I apply gesso and before it was dry, I sprinkle some Imagine Ink Seven Seas and Breeze Embossing Powder. 


List of Blue Fern Studios supplies:

Papers:
Tranquility collection, Jubilation
Tranquility collection, Peaceful
Tranquility collection, Patience

Chipboards:
Chicken Wire Panel
Magical Monarchs
Family

Imagine Ink Embossing powders:
Seven Seas
Breeze

Flowers:
Attic Charm Flowers
Tranquil blooms
Tranquil roses and lilies
Patience:

For the third layout, I use the Tranquility collection again.  This collection is so stunning!


I cut the Ring panel into pieces and leave it unaltered.  I like that look with this paper collection. 


I embellish the layout with the Blue Fern Studios Flowers.  My title was emboss with the Imagine Ink Honey Embossing Powder two times.


On my background, I apply randomly white gesso. Then I stamp with the Journey and the Forever Stamp Set with yellow permanent ink.  Finally, I use some inks to do splatters.


List of Blue Fern Studios supplies:

Papers:
Tranquility Collection, Contentment

Chipboards:
Rings panel
Blissful, Jubilation, Patience

Stamps:
Journey
Forever

Imagine Ink Embossing Powder:
Honey

Flowers:
Attic Charm Daisies
Attic Charm glitter roses
Courtship blooms


Hope to have Inspired you with those layouts! Have a nice day!

Marie-Eve

Monday, April 4, 2016

Three April Projects Using Three Different Paper Lines By: Renea Harrison

Hello, and welcome to my April Design Team Reveal!! This month I have 3 different projects that I created using 3 of the newest Blue Fern Studios Paper Lines; Courtship Lane, Timeless and Serendipity. I love creating in different styles and I hope that you are inspired to try out one of the new paper collections and make it your own!!

I love creating beautiful pieces with hints of grunge and shabbiness and the new Blue Fern Courtship Lane Collection along with the April Sketch was perfect for pulling this look off
for this first layout:


I started with a layer of Courtship Lane Royal Street Paper and then added a 2nd layer of Courtship Lane Royal Street Paper that I heavily distressed and inked. 


I added a layer of Timeless Lace for softness, 


 then took a Ruth's Doily Chipboard piece, painted it with gesso and script stamped it with clear embossing ink, coated it with Imagine Ink Ebony Embossing Powder tapped off the excess and heat set it to get a gorgeous raised script to match my book theme.


For the floral layer, I added a large fabric flower, and then layered in some of the new Blue Fern Courtship Lane Roses, some mulberry paper leaves, feathers and a resin swirl.


I then did some tearing at the top of my layout and took a Blue Fern Chipboard Peek A Boo, gave it the same technique treatment as the Doily, tucked it behind the tear and then sewed up the tear with some embroidery thread and tied a bow.
I added drips and splatters of gesso and glitter glass randomly to my layout for lots of visual interest.


I added some more of the Courtship Lane Roses, leaves and feathers to the top corner of the photo,


and added a Silver Pocket Watch that I filled with different beads and Glitter Glass for some really YUMMY Texture.


To finish up my layout, I took a Blue Fern Serendipity 1 Word-Contemplation and heat embossed it with the Ebony Embossing Powder, and then added on a set of my handcrafted Sweet Dreams Lavender Butterflies.

Blue Fern Studios Supply List:
Paper:
Courtship Lane-Plaza
Courtship Lane-Royal Street

Chipboard:
Ruth's Doily
Peek A Boo
Serendipity Words 1 (Contemplation)

Flowers:
Courtship Roses

Imagine Ink:
Ebony

I just love the new Blue Fern Studios Serendipity Collection!! The papers are perfect for my "edgy" meets beautiful style, and provided the perfect venue for me to create this natural, grungy pocket journal:


I started with a pocket journal base that I sew together using upcycled manilla folders. I then layered on a piece of the Blue Fern Serendipity Glee Paper that I cut to fit my design


I cut a strip of canvas and 2 tone spray stained it and then threaded a metal safety pin into the top of it, added a little bird cabochon to match my theme and adhered the piece down the side of the journal.
I took some Blue Fern Chicken Wire Panel Chipboard pieces that I cut out from the panel, and gave them a "rusty" look by heat embossing them with Imagine Ink Nutmeg Embossing Powder, and tucked them into my design.


Next, came a piece of torn, 2 tone spray stained, corrugated board, topped with spray stained cheesecloth, and different flowers and little bird's nest.


I then took a Blue Fern Frill Heart Chipboard Piece, and I heat embossed the edges with Imagine Ink Peacock Embossing Powder. For the center I coated it with Shard Glitter Glass and then shot it with some of the spray stain that I used on the other pieces. I then created a little, multiple layer heart with leftover Serendipity Paper Pieces, and added a little flower.


I added another spray stained piece of canvas and cut out the word "Beauty" from the Serendipity Calling Cards Paper, and added it to it. The Chasing Butterflies are some of my handcrafted Butterflies that I love to add to my projects for added dimension.


The pockets of the Journal Base contain tags and pieces that I created from the Blue Fern Serendipity Glee, Imagination, and Calling Cards Papers. They include:
2 Oversized Tags topped with hand dyed seam binding bows and cabochons
2-Large tags topped with spray stained canvas pieces
2 - Calling Card Pieces that open up book style
and 


this large piece that I created by taking a Blue Fern Swan Gate Chipboard Piece, and lining it with Serendipity Paper to create a tag. I added a Dream Metal Key and hand dyed seam binding hanger. 


To get the rusted look on the gate, I first heat embossed it with Imagine Ink Peacock Embossing Powder, and then randomly dabbed it with clear embossing ink and sprinkled those spots with Imagine Ink Nutmeg Embossing Powder to get that YUMMY, aged look.


Here is the back side of the jounal that was finished out in Serendipity Imagination Paper.

Blue Fern Studios Supply List:
Paper:
Serendipity-Imagination
Serendipity-Glee
Serendipity-Calling Cards

Chipboard:
Chicken Wire Panel
Frilly Hearts
Swan Gate

Imagine Ink:
Embossing Powder-Peacock
Embossing Powder Nutmeg


And for my 3rd and final project, the Blue Fern Studios Timeless Collection with it's grungy, darker more Vintage look papers inspired me to create the following masculine layout of my son, Draven. I just used the papers in a way that omitted or covered up the more feminine floral designs to leave me with designs that worked perfectly for that no flower, all edginess of masculinity.


I started with a a layer of Timeless Main Street Paper, and then tore and layered in corrugated board pieces that I two tone misted and Timeless Papillons and Artistique Papers.


I did some edge curling on some of the paper and then inked them to match the corrugated board colors.


Next, I added in Blue Fern Roman Clock Chipboard (small).


I then took some Blue Fern Cogs And Gears Chipboard pieces, and heat embossed them with Imagine Ink Honey and Ebony Embossing Powders, and layered them onto the clock pieces.


I also used Blue Fern Frolic Mesh Chipboard that I cut into pieces and colored with a distress marker and tucked into random places throughout the layout. I added various metal pieces to round out the finishing touches for the layout. 


Here you can see all the dimension and textures that the layers of papers and chipboard created.

I know a lot of you tell me that masculine work is a real challenge for you, but the Blue Fern papers and quality chipboard really do make it easy to pull a gorgeous masculine piece off!! Thank you so much for checking out my April work, and I hope you have fun creating!! Hugs~Renea

Blue Fern Studios Supply List:
Paper:
Timeless-Papillons
Timeless-Main Street
Timeless-Artistique

Chipboard:
Roman Clocks Small
Cogs & Gears
Frolic Mesh

Imagine Ink:
Embossing Powder-Honey
Embossing Powder-Ebony