Showing posts with label Winter Titles. Show all posts

Wednesday, November 18, 2015

Snow Fun-with Vintage Christmas by Keren Tamir


Hello everyone,
It's Keren here with my November post for Blue Fern Studios.
As you might have seen already, Blue Fern Studios has released a brand new collection called Vintage Christmas. Its a beautiful holiday and wintery paper collection and it was perfect for scrapbooking last year's winter photos. I used it for both of these layouts.
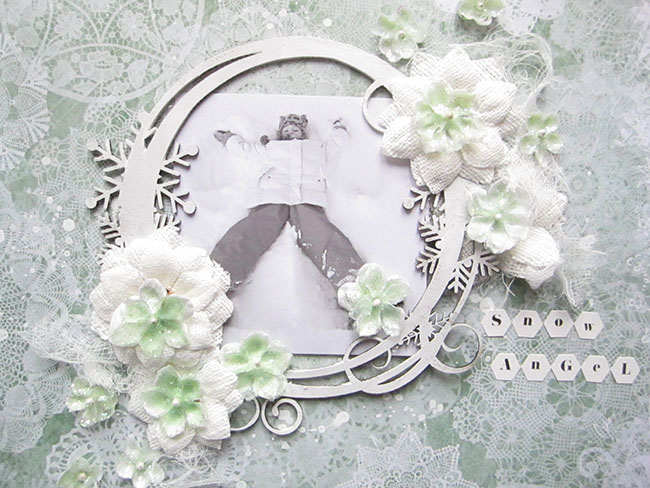
"Snow Angel"

For this background I used the "Magical" paper from the Vintage Christmas collection.


I'm not too fond of winter as I don't like feeling cold. However my kids love playing in the soft fluffy snow. Here is my daughter making snow angels on the snow. I framed her photo with the Snowflake Frame chipboard which I simply covered in white gesso. I wanted to create the most monochromatic layout I could so I could showcase the whiteness of winter. I used flowers and cheese cloth to enhance the feel of winter, too.


<<<<<<<<<>>>>>>>>>

"Snow Sparkles"

For this background I used the "Auld Lang Syne" paper from the Vintage Christmas collection.


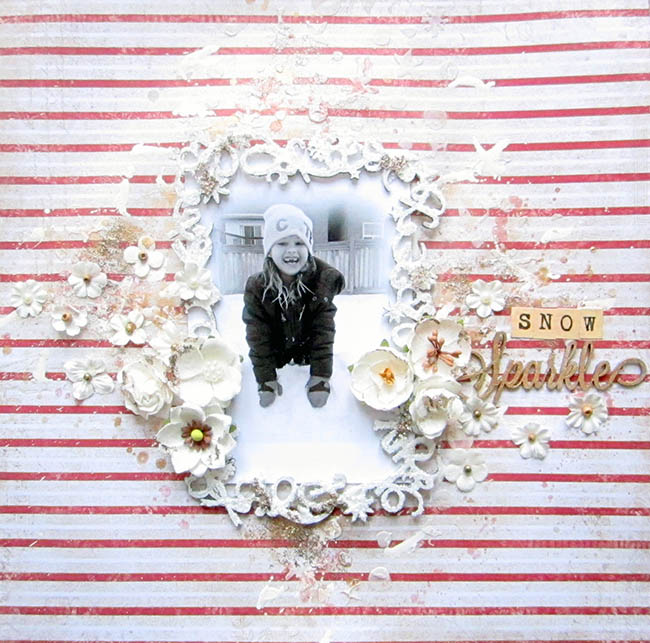
I framed my daughter's photo with the Holiday Frame. I primed it with white gesso and then sprinkled it with diamond dust to give it a snowflake texture feel. Finally I used some Imagine Ink Pyrite glitter to add some golden highlights around the frame and on the background.


I used the Blue Fern Studios Persimmon, white and golden spray to add some texture and sparkle to the background.


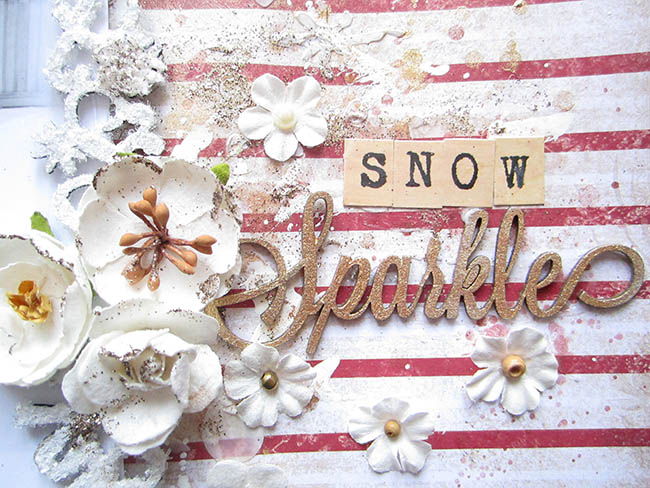
Finally I used the "Sparkles" chipboard word from the "Winter titles" set. It was sprayed with gold ink.


Thank you so much for visiting the Blue Fern Studios Blog
Have a wonderful day!!

Keren


Monday, November 16, 2015

Vintage Christmas With Debbie

Hi everyone!  Debbie here with you today sharing 3 layouts I created with the new Vintage Christmas paper collection!  This is such a beautiful paper collection.    

My first layout features the Deck The Halls paper.  Beautiful hues of reds and pinks! I layered underneath my photo with the Noel paper.

I used 4 different chipboard pieces here, Blooming Curls, Royal Border, Classic Ornament and Twinkle from the Winter Titles.  I misted the Royal Border and Classic Ornament with the Imagine Ink Cotton Candy Mist and added some micro beads.  I painted my title dark red and added some of the Petal Embossing Powder.

 When using the Blooming Curls chipboard, I cut it apart and used it in three different places on my layout.  I also cut the Classic Ornament piece in half and used in on the top and bottom of my photo.

Another piece from the Blooming Curls shown here.

My next layout features Auld Lang Syne, Noel and Wonderland papers.  I primed my background with some clear gesso and did some random masking.  Then I added some Imagine Ink Cotton Candy Mist.

Love this old photo of my grandfather !  I cut apart the Holiday Frame chipboard and added a piece to the bottom of the photo that I misted with the Imagine Ink Winter Mint and Jingle Bells mist and then added some micro beads.

Tucked beneath the pink rose is another piece from the Holiday Frame chipboard.

Here I used a piece from the Damask Panel, misted with Imagine Ink Winter Mint and Jingle Bells.

Love the details in the Winter Sleigh chipboard.  I covered it with gesso and then added some Pyrite Glitter.

My final layout was created using the  November sketch.
I used the Auld Lang Syne, Noel and Wonderland papers.  After adding some masking to the background, I misted with the Persimmon and Jingle Bells Imagine Ink Mists
 
My title Magical is from the Winter Titles.  I painted it white and then randomly sprinkled it with Pyrite Glitter.

Pieces of the Berry Stems chipboard are placed with my flower clusters.  I pained the stems brown and added  Phoenix Glitter.

On each side of my photo I used The Holiday Vine Chipboard which I painted brown and added Phoenix, Pyrtie and Fern Glitter.

                       
I hope you have enjoyed my layouts.  Don't forget that you still have time to enter our November Sketch Challenge.  You can find all of the details here.

Thanks for stopping by!
. . . Debbie

Monday, October 19, 2015

Vintage Christmas with Angelica

Hello friends! Today I'm sharing my BFS projects for the month of Octobers. I was so excited to get my design team package. Why you ask!??! Because it was packed with the new Vintage Christmas Collection. Also included was matching chipboard, mist and glitter! Happy Day!

I started this page with masking and misting the background. Then just layered. I painted the winter page dangles and use the new glitter. It's ultra fine and a beautiful color!

Products used:
Noel
Magical Stripe
Deck the Halls
Greeting Cards
Winter Page Dangles
Phoenix Glitter
Cotton Candy Mist
 

This layout is based on the October Sketch. Again I did some masking and misting for the background. I painted all the chippy pieces with gesso then added some texture and glitter.
 Products used:
Auld Land Syne
Wonderland
Winter Page Dangles
Winter Title
Let it Snow
Snowflake Frame Square
Wintermint Mist
Sky Mist
 
This paper is to pretty to cover up. So I went for a simple design in the middle. For the chipboard pieces I painted then mist with the wintermint mist. Then used the new glitter! So sparkly!
 Products used:
Magical
Greeting Cards
Holiday Vine
Holly Sprigs
Wintermint Mist
Caribbean Glitter
 
Thanks for taking a peek!

Thursday, October 15, 2015

A Layout Featuring Vintage Christmas with Debbie

Hi everyone!  Debbie here with you today sharing a layout I created with the new paper collection Vintage Christmas along with some of the new Imagine Ink products; mists, embossing powder and glitter.
I love the paper collection!  Gorgeous colors and details!  For my background I used the Wonderland paper and did some fussy cutting with the Magical paper and used the Calling Cards for some layers behind my picture, which by the way is me as a child.  I primed the background paper with some clear gesso and added some stenciling.  Once the stenciling was dry I added some of the Imagine Ink Mica Color Mist in Cotton Candy along with some pink microbeads from my stash and some Imagine Ink Glitter in Pyrite.


I primed the chipboard words Sparkle and Merry with some white gesso.  After it dried I sprayed it with the new Imagaine Ink Mist Jingle Bells and added some Pyrite Glitter.

Tucked beneath my flower cluster I used the chipboard piece Dresden Corsage which I primed with white gesso, sprayed with the Imagine Ink Mist Cotton Candy and applied some of the new Petal embossing powder.  I then embossed a layering stem chipboard piece with the new Lucky embossing powder.

So excited about all of the new products and can't wait to share more projects with you.  You can find all of the new products here in the store.

Thanks for stopping by!
. . . Debbie

Thursday, February 5, 2015

January Sketch Challenge Winner and Featured Layouts

We are thrilled with the response to the January sketch.  It was our best month ever, so thanks to each of you who played along with us in January.  But don't stop there, the February sketch has already been posted.  You can find a link to it in our right sidebar.

As always, let's start with the winner.  Based on a random draw, the winner this month is ...........#4, which happens to belong to Laura Gilhuly of Canada!!

Congratulations Laura!  You have won a prize package of Blue Fern Chipboard!  
Please send me an e-mail, within the next 7 days, 
at {valerie(at)bluefernstudios(dot)com} to claim your prize.
Here is Laura's layout created using paper from our Sanctuary Collection and chipboard pieces (both the positive and negative) from our Turkish Bits.  We love how she colored the chipboard using mist, paint, and a little gesso.
Sometimes we just don't know when to stop.  So this month, we have even more layouts to feature, which isn't a bad thing!  You guys are just awesome.  Here we go.........

"Twinkle in Your Eyes" by Wendy Scholten

 This layout, with such an adorable photo, immediately caught our eye.  Wendy has used several papers from our beautiful Montage collection, one as the background and some fussy cutting from other papers.  She also used several pieces of Blue Fern Chipboard - the Checker Bits, Bohemian Flowers, Nested Circles, and the word Twinkle from our Winter Titles set.

"Fabulous"by Miki of Japan

Miki also chose paper from our Montage collection for her entry in the January Sketch Challenge.  The title is from one of our very popular sets, the Arrow Words.  We love how this all came together to create a beautifully designed layout.


"Happy" by Marina Timofeeva

Everything about this layout is "Happy".   Marina has used this happy paper with polka-dots from our Sanctuary collection.  The title is from The Optimist Word Set, and the other chipboard is from the Turkish Bits Set. 


"Left-Handed" by Sara K. 

On her blog, Sara says she really wasn't happy with this layout at first, but we love it!  What an adorable photo  - such concentration on that little face.  The Blue Fern chipboard stars, from our Seeing Stars set are the perfect touch. 

"Cherish"by Alena Grinchuk

Layouts don't always go as planned, which was the case with this one.  Alena had something else in mind when she began, but didn't like the photo she had chosen, so she switched to this black and white photo, instead.  The outcome is stunning!  The background paper and fussy cut flowers are from paper in our Montage Collection.


"Sweet Bundle of Joy" by Paulien van den Bosch

Our final choice for the month is this precious layout created using this dark navy paper from the Sanctuary collection.  Love how this came together, Paulien. Your grandson is so super cute!


 Congratulations to our winner and to the creators of our six featured layouts.  
We hope to see all of you again in February!


Thursday, November 27, 2014

'Sanctuary' Inspiration by Lisa Griffith

Hello Blue Fern Studios friends....

I am a little later than usual this month due to some technical difficulties on my part...
But I actually felt very lucky to have a few more days as it gave me a bit more time to play
with the new collection 'Sanctuary', that I am so IN LOVE with....

'perfect'


I started with the beautiful paper 'Conservatory' and then I layered a lot of pieces of Blue Fern Studios papers including the 'Calling Cards' from the Sanctuary collection and some pieces from the Blue Fern Garden collection in the background and created lots of texture with gesso, paints, stamping and gold micro beads.


For my title I embossed a piece from the 'Chunky Word Set' set in copper to match my copper colored paints.


I also used pieces of the 'Shabby Brick Bits' which I painted in white and then covered in different paints in gold and copper colors. You can also see a piece of 'Ginger's Poppies' tucked under my photo.

'girl in bonnet'


For my second project I started with the paper 'Bountiful' also from the Sanctuary collection. I only recently tried to do a layout with a dark background and I love how it turned out, using a dark background paper looks so dramatic and makes your photos and embellishments really stand out.


I layered some gesso using several masks, some blue and pink paint and pieces of washi tape to create my background and then added some bits of lace, flowers, and tucked in a piece of 'Blue Fern Frame' that I painted white and blue. You can also see small pieces of the paper 'Mercantile' from the Montage paper collection.


'magical'


For my final layout I started with the paper 'Meadows of Time' from the new Sanctuary collection. 
I just love the blue and brown vintage patterns here, so gorgeous and totally inspiring to me. I knew I wanted to make a wintery looking page so I started by adding gesso with a sea sponge for a very uneven look and then I added some mists in blue and brown.


I tucked in a few pieces of Blue Fern Garden paper, and then added some pieces of the 'Shabby Flakes' and a piece of 'Winter Titles' which I painted white and then sprinkled with white glitter.


I hope I have inspired you a little today :)
See you next time...
Lisa 


Sunday, November 23, 2014

Video Tutorial with Adrienne Ford

Hello All!

Adrienne here, to share with you a new video tutorial- Twinkle. That word just gets me dreaming of sitting by a lit Christmas tree- Just gets me right into the Christmas spirit! Since the holiday season is fast approaching, I jumped right in and have a Holiday themed layout for you today.


This layout features the NEW and oh-so gorgeous Sanctuary paper collection. It is amazing! The theme is very vintage- lots of muted tones- wonderful for lots of themes. The Winter Titles are also so wonderful and I just had to alter my "Twinkle" title with lots of sparkle! 


In this video I will be particularly showing you have my Swirl Ornaments will come to live and give your layout a realistic feel.

Enjoy!

Blue Fern Products-
Santuary Collection: Conservatory
Swirl Ornaments
Winter Titles

Thursday, November 20, 2014

Two Layouts and a Card with Rae

Hello! It's Rae with you today and I'm sharing some projects I made with the Montage and Ombre Dreams paper lines.

"Twinkle" Layout


For this layout I used the Montage paper collection.  It's based on our November sketch. Check out the sketch challenge HERE. There's still time to play along!

Here's a closeup of the Quatrefoil Panel piece that I cut to size. I used pink, white, and gold embossing powders to get this effect.

Here's a closeup of the title that I used from the Winter Titles set. I kept this treatment simple by using gold embossing powder. 


In this close up, you can see the piece of the Heart Border that I cut and painted with a whitewash.

I also cut up the Organic Vine Corner. I painted it with a dimensional green paint, and sprinkled it with green embossing powders and heated it up until the paint was bubbly.


"Follow Your Dreams..." Card


I really wanted to fit this card in a standard envelope, so I made it as flat as I could! I used some of my scraps from the Montage line. 

Here's a closeup that shows the treatment of the Mixed Chains and part of a Ginger's Poppies piece. I used grey and black ink pads directly on the chipboard without priming it.


Mommy's Boy


I used papers from the Ombre Dreams and the Montage lines. 

In this closeup, you can see the Corner Flourish. I also used a Mini Flourish on the other side of my flower cluster. I scraped these pieces with a black archival ink pad that desperately needs to be reinked, but it worked for this layout. :)

For the Mommy's Boy title piece, I used a turquoise embossing powder, then used that same archival ink pad to give it a worn look.

For the Romantic Page Dangle, I used grey chalk ink, then some black distressed embossing powder in random places. I also touched it with some blue chalk ink to soften the look of it. 


Thanks for stopping by to check out my projects today! Check back often- our team is always posting amazing creations!

Rae