Showing posts with label Nested Circles. Show all posts

Sunday, February 8, 2015

February Projects by Melinda Thompson


Hello there everyone :)

I am happy to be here today to share with you all my February projects for Blue Fern Studios.

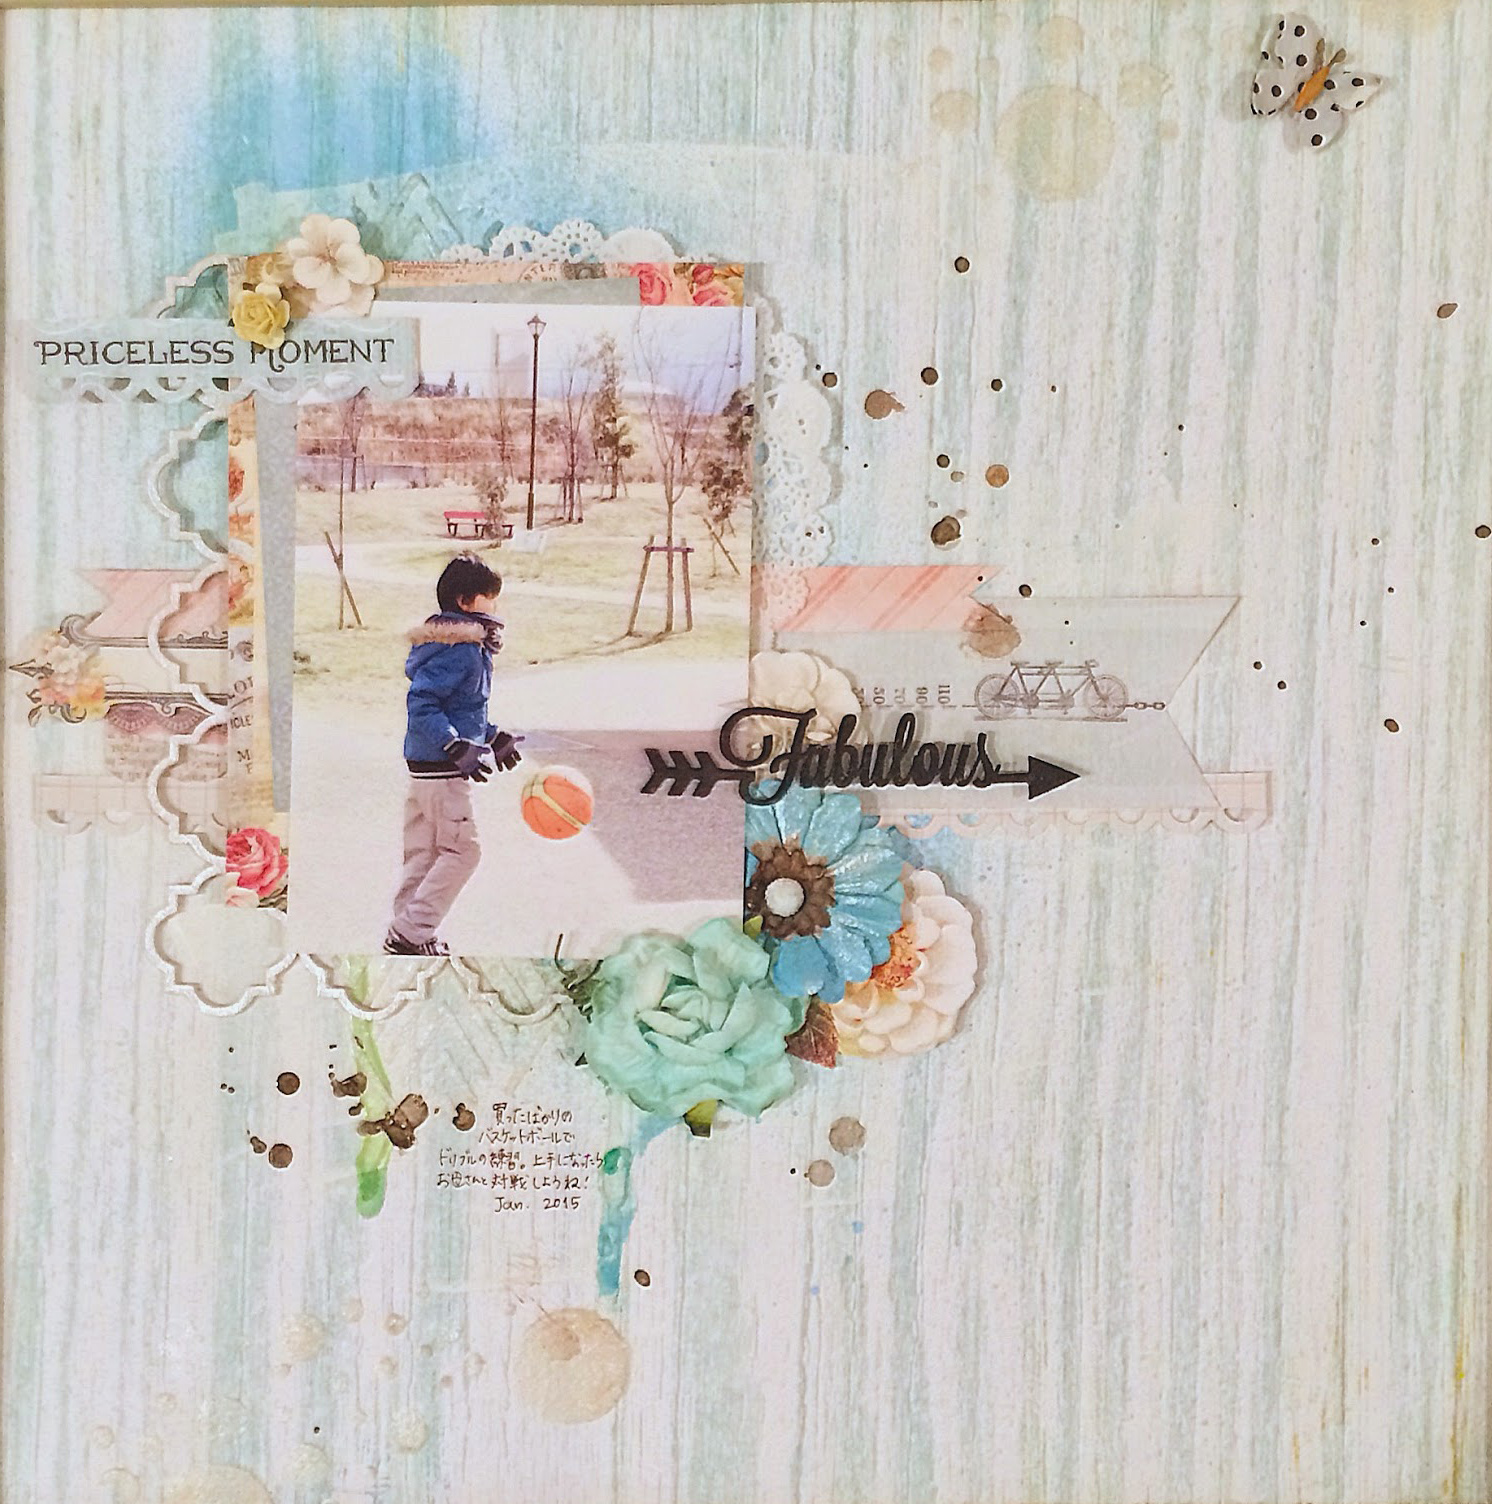
I can't get enough of the Ombre Dreams paper range...such beautiful colours. I have created this layout using Julianna's Dream as well as Dream Cards in my layers.

"Adore"


Kind of had a little fun with this layout.  I used some chipboard from the Chunky Heart Panel which I just cut out bits that I needed, covered them with gesso and then added some crackle paint over the top. Using some of the negative hearts from the panel piece, I added them in random places and sprinkled them with glass beads for a cool effect.


I have also used the word "Adore" for my title from the Adore, Love Cherish pack and a Romantic Page Dangle.


Paper: Ombre Dreams Collection: Julianna's & Dream Cards
Chipboard: Romantic Page Dangle, Chunky Heart Panel, Adore, Electic Heart


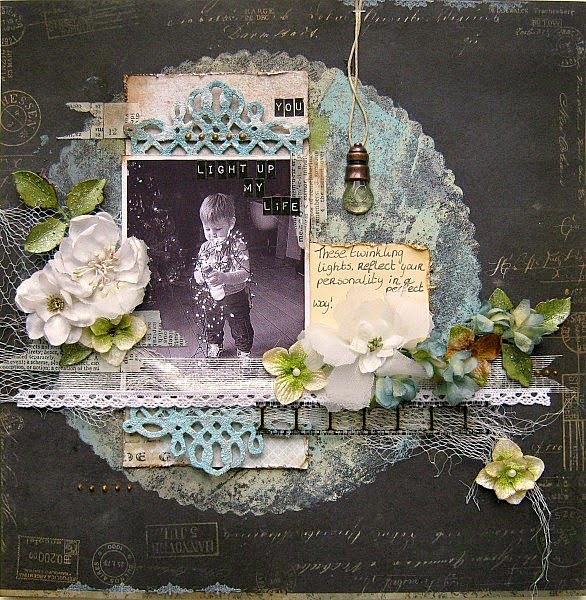
My next project is a personal project, something just for me.
I have used papers from the Montage Collection: Invitation and Calling Cards.


"Noted"


I have used a few various pieces of chipboard on this layout.  I have used the Turkish Bits chipboard on the background, the Swirly Doodle layered next to my photo and an Arrow word "Noted" .  In among my flower cluster you will also notice a piece from the nested circle set. All have been primed with gesso first and then lots of different inks and mists to alter them.


Paper: Montage Collection: Invitation & Calling Cards
Chipboard: Swirly Doodle, Nested Circles, Arrow Word, Turkish Bits

Happy Scrapping :)
Melinda 

Thursday, February 5, 2015

January Sketch Challenge Winner and Featured Layouts

We are thrilled with the response to the January sketch.  It was our best month ever, so thanks to each of you who played along with us in January.  But don't stop there, the February sketch has already been posted.  You can find a link to it in our right sidebar.

As always, let's start with the winner.  Based on a random draw, the winner this month is ...........#4, which happens to belong to Laura Gilhuly of Canada!!

Congratulations Laura!  You have won a prize package of Blue Fern Chipboard!  
Please send me an e-mail, within the next 7 days, 
at {valerie(at)bluefernstudios(dot)com} to claim your prize.
Here is Laura's layout created using paper from our Sanctuary Collection and chipboard pieces (both the positive and negative) from our Turkish Bits.  We love how she colored the chipboard using mist, paint, and a little gesso.
Sometimes we just don't know when to stop.  So this month, we have even more layouts to feature, which isn't a bad thing!  You guys are just awesome.  Here we go.........

"Twinkle in Your Eyes" by Wendy Scholten

 This layout, with such an adorable photo, immediately caught our eye.  Wendy has used several papers from our beautiful Montage collection, one as the background and some fussy cutting from other papers.  She also used several pieces of Blue Fern Chipboard - the Checker Bits, Bohemian Flowers, Nested Circles, and the word Twinkle from our Winter Titles set.

"Fabulous"by Miki of Japan

Miki also chose paper from our Montage collection for her entry in the January Sketch Challenge.  The title is from one of our very popular sets, the Arrow Words.  We love how this all came together to create a beautifully designed layout.


"Happy" by Marina Timofeeva

Everything about this layout is "Happy".   Marina has used this happy paper with polka-dots from our Sanctuary collection.  The title is from The Optimist Word Set, and the other chipboard is from the Turkish Bits Set. 


"Left-Handed" by Sara K. 

On her blog, Sara says she really wasn't happy with this layout at first, but we love it!  What an adorable photo  - such concentration on that little face.  The Blue Fern chipboard stars, from our Seeing Stars set are the perfect touch. 

"Cherish"by Alena Grinchuk

Layouts don't always go as planned, which was the case with this one.  Alena had something else in mind when she began, but didn't like the photo she had chosen, so she switched to this black and white photo, instead.  The outcome is stunning!  The background paper and fussy cut flowers are from paper in our Montage Collection.


"Sweet Bundle of Joy" by Paulien van den Bosch

Our final choice for the month is this precious layout created using this dark navy paper from the Sanctuary collection.  Love how this came together, Paulien. Your grandson is so super cute!


 Congratulations to our winner and to the creators of our six featured layouts.  
We hope to see all of you again in February!


Thursday, January 8, 2015

January Design Team Projects by Melinda Thompson

Hello!

I am so excited to share with you my very first projects as a designer for Blue Fern Studios.


My name is Melinda Thompson and I am from Australia and live in a growing country town called Emerald right in the heart of Central Queensland.  Its dry and its hot and our summers last for around 8-9 months of the year and we only have an odd week or two where we experience cold weather. And even then its not cold compared to what others experience...we may only need to pull out the ugg boots and jumpers!

I am married to my best friend for nearly 15 years and have 3 adorable, but full of life, boys who are the centre of my life and who I mainly scrap about.

I started scrapbooking when I took maternity leave from my job to have my first baby and it just grew from there.

A bit about my scrapbooking style:

- Even though I have 3 boys which means I am constantly surrounded by cars, trucks and lego and all things noisy and dirty, my pages are super girly and feminine.  I will nearly always use flowers and usually alot!

- I am inspired by colour and will even scrap using pink on a boys page...after all its my art :)

- I love texture so my pages are very dimensional they never fit into albums.

- The backgrounds to my layouts are always created using lots of mixed media techniques and products.

Looking forward to joining the Blue Fern Studios team for 2015!

You can find more of my work and follow me on my blog:
www.minseverydaymoments.blogspot.com


My 1st project was using the January sketch.  For the background of this layout I have used the paper Garden Plaza from the Sanctuary Collection and created some layers behind my photo using the Calling Cards also from the Sanctuary Collection.


I have used a stunning Tattered Butterfly, the Notebook Edges and the word Laughter from the Laughter Happy Smile pack.  With each of my chipboard pieces I coat them with Gesso first and then in this instance I have given them a light covering with some paint and mist.


Paper: Sanctuary Collection: Garden Plaza & Calling Cards
Chipboard:  Notebook Edges, Tattered Butterfly, Laughter


My 2nd project I used the Ombre Dreams: Gingers Dreams paper for my background.


I have used a couple of pieces of Graduated Circles...love these! I have tucked them in an around my layers behind my photo and covered them with mist and paint. The stunning La Plum chipboard piece was lightly painted and then dipped in glitter.


I have also used a piece from the Nested Circle pack, cut it in half and placed at the top and bottom sides of my layout.


Paper: Ombre Dreams: Ginger Dreams & Dream Cards
Chipboard: Graduated Circles, Nested Circle, La Plume


For my 3rd project I was drawn to the gorgeous vintage background of the Meadows of Time paper in the Sanctuary Collection.  But in my usual style I brightened things up!


I cut the bottom section off and turned it over to reveal the beautiful flower pattern that was on the reverse side.  I have used the Small Circle Flower Flourish as well as one of the Corner Flourish.  Down the bottom edge of my layout I have included one of the Arrow Words "Love This".


Paper: Sanctuary Collection - Meadows of Time, Bountiful
Chipboard: Arrow Word, Small Circle Flower Flourish, Corner Flourish


Thank you so much for visiting, I hope you enjoyed my projects...see you next month!

Melinda

Thursday, August 22, 2013

Projects by Kerryn Lawson

 
Hi, Kerryn here and I would like to share some of my recent Blue Fern Studios projects with you on the blog today.
 
I am always looking to add new cards to my stash so that I am prepared when those last minute invitations arrive.  Chipboard adds instant impact to your card and with the variety of products in the Blue Fern Studios range there is a chipboard design to suit every occasion.
 
For my first card I have combined a nested circle chipboard with a piece from the ironwork accents set.  Both pieces were primed with gesso before white paint, vintage photo distress ink and perfect gold Perfect Pearls were randomly applied to suit the neutral colour palette I was working to.


Chipboard used : 


For my second card I have gone to the complete opposite end of the colour scale opting to bring out some bright, happy colours.
 
I wanted to create depth of colour on my industrial gears chipboard so I have inked the chipboard with yellow chalk ink before applying and heat setting yellow embossing powder.  The chalk ink works quite well with embossing powder but gives you a more rustic, uneven finish than embossing ink will.


 Products used :
 
 
Along with the cards I have also created a layout featuring one of my absolute favourite Blue Fern Studios products, the Brigitte butterfly.
 
On this occasion I wanted to replicate the distressed feel from the papers with the treatment of both the butterfly and flourish chipboard pieces.  To do this I have used paint in a number of colours but as the layers have been built up the paint was added randomly rather than to the entire piece.  Once the paint had dried, the chipboard was gently sanded to expose both the different paint layers and the raw chipboard.
Perfect gold Perfect Pearls was added to the centre of the butterfly wings to add a touch of contrast to the blue/green and white.


Chipboard used :


 Thank you for stopping by and checking out my projects today.
 
Kerryn

Friday, July 19, 2013

Chipboards and Beads by Camilla

Hi there! Camilla here with two new Blue Fern Studio projects. First one is a layout of my son with his skateboard. Blue Fern Studios has some great title chipboards! I have used Boys Will Be Boys and I also have used the Quatrefoil Garden Panel  and a heart from the Heart Set.


To match the papers I first covered the chipboards with white gesso. Then I added some blue microbeads and some brownish beads before I covered the chippies with glossy accent.


Then I made a card using the Organic Vine Corner and Nested Circles. I really like to use naked chipboards sometimes. It makes a great contrast to colours, here purple.


Make sure to check in every other day to get some new chipboard inspiration! See ya!

Camilla

Wednesday, March 27, 2013

Dress Form; Bird Cage; Nesting Circle; and Tuscan Frame


Hello, Joyce here.  Again, I was bitten by the inspiration bug, but this time the inspiration came from a wide piece of green ribbon with hand sewn flat ribbon roses. I bought this ribbon a year ago at a Scrapbook Expo, and I have not had the heart to cut it up until my BFS dress form accidently fell on top of it.  Then the “Aha” moment came to me… I was going to make a skirt out the flat ribbon roses, but first I have to take the ribbons a part.  Here is the dress form painted with crackle paint; some stencil work and molding paste at the base of the form; and the inspirational ribbon skirt with beads added at the end of each ribbon strand to hold the weight of the curly ribbon down.  This canvas will be given to my teen-aged niece who has just finished painting her bedroom in a soft green color.  I hope she likes it!  


Nesting Circle and Tuscan Frame:

The piercings on the large nesting circle were calling out to be adorned.  The holes in the piercing were the perfect size to weave in some bead work.  The chipboard was painted with white acrylic paint and then a color mist was applied on top of the chipboard followed by a Martha Stewart stencil (her small stencils work perfectly on these chipboard pieces- I also used this same stencil package on the dress form above) with an application of Viva’s molding cream and allowed to dry.  After the molding crème dries, apply another application of your favorite mist and enhance the patterns created with the stencil and molding cream with a watercolor pencil to add more depth. Finally, add a little bit more shimmer using an Inka gold product.  


Bird Cage:


To achieve the two-toned color chipboard piece, paint chipboard with a white dauber, and then apply your favorite crackle product to the large surfaced areas of the chipboard only. When the crackle product has thoroughly dried, use a misting product and apply the mist to the small areas of the chipboard.  Some of the mist will flow onto the crackle product which is fine.


TIP: To enhance those lovely little cracks on your chipboard, use a dry and sharpened watercolor pencil.  Hold the pencil horizontally to your chipboard, and press down the sharpened end of your pencil with your index finger on top of the sharpened area and gently rub in a tiny circular motion in a parallel position. Lift the pencil up and use your index finger and blend the color in. Do not hold your pencil in a vertical position.  Do not wet the watercolor pencil because it will render a muddy looking appearance.