Showing posts with label Renaissance Border. Show all posts

Wednesday, July 5, 2017

Meet our July Blue Fern Fan of the Month!

We hope that all of you in the United States enjoyed a wonderful day of celebrating
 our country's independence yesterday. 

The first Wednesday of each month also allows us the celebrate the Blue Fern Fan of the Month!  
Joining us for the month of July is the awesome Tracy Funk.  You will enjoy the vintage and 
slightly grungy style that she uses when creating.  Each Wednesday during the month 
Tracy will share a layout using Blue Fern products.

Let's turn it over to Tracy so you can get to know her a little better, 
and to see the first layout she has created for us this month!


Hi, my name is Tracy Funk.  I live near Toronto, Canada with my husband and two teenage sons. I have always liked crafts but discovered scrapbooking in 2008 and have been addicted to it ever since.  My style leans toward vintage because I love to scrap old family photographs but I do like to scrap photos of my boys too. I am so excited to be Blue Fern Studios' Fan of the Month for July.  I love their chipboard and the premium quality paper they make, especially. It's a pleasure to create with their products.


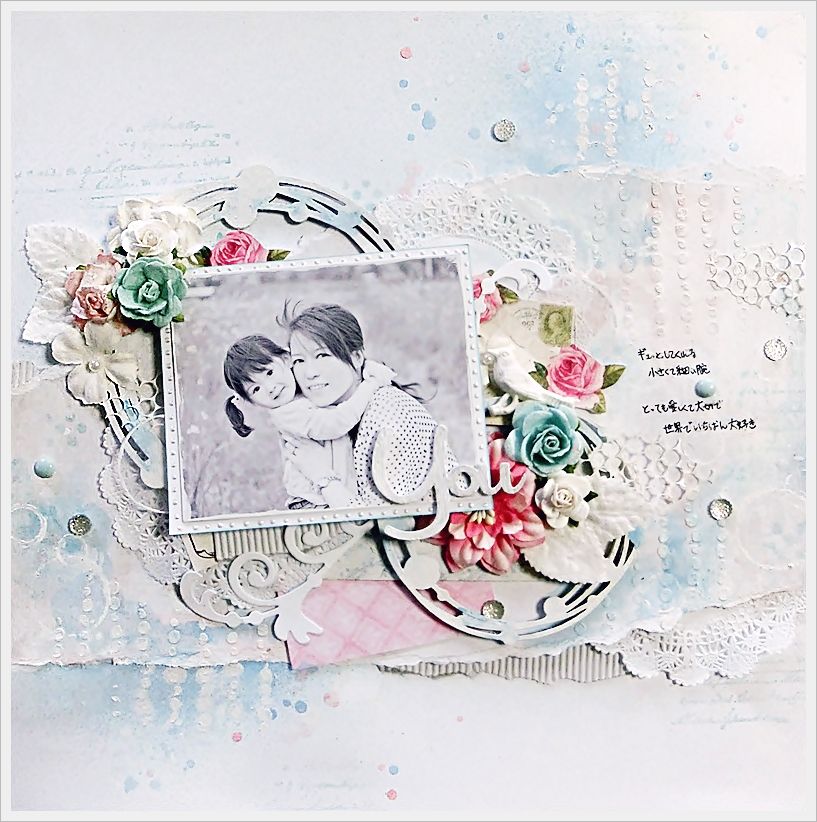
I'm very excited to present this layout called "Garden Contemplation" that I did for Blue Fern Studios
 as their "Fan of the Month" for July.  If features a photo of my husband's great-grandfather.  
For this layout I used Patience from the Tranquility Collection.


This chipboard piece is the Floral Lattice Bits which I finished by dabbing them with
 green, blue, brown and white paint using a brush.


The Ironwork Arch at the top left of layout was painted with white and various shades of brown 
using a sponge stippler to give a soft, blended effect.  I also inked around the edges with dark grey.


I used brown embossing powder on the Renaissance Border and rubbed green paint over the rough embossed surface using my finger.  I then glued some tiny beads randomly over top using a clear-drying adhesive.

Thank you so much to Blue Fern Studios for this opportunity!

Wednesday, April 27, 2016

April Inspiration by Elena Volchkova

Hi everyone! Today, I have prepared three layouts using the beautiful Blue Fern Studio materials. And I'm happy to show them to you.

Adventure's layout

My first layout about travelling and adventures at sea. Pirate spirit and eco style.
I used the Meadows of Time paper from the Sanctuary collection. It's lovely combination of colors.
Chipboard "Born to be Wild" I colored with Heavenly and Seven seas Imagine Ink Embossing Powders.
Leaves from the "All Natural Set" was covered with Imagine Ink Lime embossing powder.
Bird from сhipboard set "Birds in Flight" toned white acrylic and decorated with Postal Textures Stamp.
In my project you can seу the many eco-friendly elements such as wood saw cuts, cork, stars anise, craft, thread and stones.
Blue Fern Studio Supply List:
Paper:  Sanctuary - Meadows of Time
Chipboard: Born to be Wild, Birds in Flight, All Natural Set
Stamps: Postal Textures
Imagine Ink Embossing Powder:  Heavenly, Seven seas, Lime

Dreamy layout

My second april project you can already see. This layout I have made for the Blue Fern April sketch.
This layout is about a girl, which need to believe in yourself and know that she is beautiful!
I used the Main Street paper from the Timeless Collection as my background paper.

 "Wish" сhipboard was covered with mixture of Garnet Imagine Ink embossing powder and Merlot Glitter. I used the Burnt Copper glitter to color the chipboard Renaissance Border.


Blue Fern Studio Supply List:
Paper:   Timeless- Main Street, Serendipity - calling Cards
ChipboardRenaissance Border, set "Wish, Wonder, Dream"
Stamps: Romantic Accents
Imagine Ink Embossing Powder: Garnet, Nutmeg, Copper
Glitters: Autumn, Burnt Copper, Merlot
Flowers: Courtship Blooms, Courtship Roses

Green spring layout

Spring layout for one more wonderful young girl. Many flowers and tenderness. The mix of a great paper for background - Love Story (calling Cards) and Frolic (Allegro).

Bird Ornaments Chipboard was covered with Imagine Ink 14 Karat embossing powder and cracle past on the bird.
Сute little elements and Brocade Texture Stamp on the background.

Sprigs Blooming Foliage сhipboard was covered with mixture of Imagine Ink embossing powders in Lime and Sage, which give the the perfect combination! Courtship Blooms flowers added volume and charm.
Blue Fern Studio Supply List:
Paper:  Love Story- calling Cards, Frolic - Allegro
Chipboard: Bird Ornaments, set "Wish, Wonder, Dream", Blooming Foliage
Stamps: Brocade Texture
Imagine Ink Embossing Powder: 14 Karat, Lime, Sage
Flowers: Courtship Blooms

I hope you enjoy viewing my projects. See you next time :)
Hugs, Elena

Friday, December 26, 2014

My last inspiration for Blue Fern

Hello !
Olga here. Today is my last post for Blue Fern Studios. It was great adventure and honor to work in this team :) I prepared last inspirations for You .
First project is LO. The base are papers from Sanctuary collection. I use parts of Ring Panel Renaissance Border covered with Inka Gold as embellishment and Captured Words as title.


Main element on this canvas is Orante heart and on of the arrow words is part of main sentence on my work.


I really enjoy Sanctuary collection I use papers as background and made some flowers from them .Ironwork Arch I use as base of my composition and add some sentence from Memory frames

Friday, June 20, 2014

Ombre Dreams projects with Rae

Hello all! It's Rae sharing some projects I've made using the amazing new paper line, Ombre Dreams. I have to say that I LOVE this paper so much!


"Dreams Come True" Layout


This is my layout based on the June sketch. 


I used the "Dream Cards" paper to make the title. I wanted to use this piece of the "Layering Stems" set  in this flower cluster, but I only had ONE! What's a girl to do? Well, I soaked that piece in water for a few minutes, then peeled the layers, and got three pieces out of it! This is a great way to get a lighter look with chipboard, and let it flow and give a little different kind of dimension. After the pieces dried, I painted them with green paint and added some darker green ink for a realistic look.


I primed the "Renaissance Border" with gesso, and added some purple microbeads while the gesso was still wet. The beads only stuck in some places, and gives it a unique look. After the gesso was dry, I misted the whole piece with some peach colored mist.


I added a a "Royal Page Bauble" that I painted gold using distress stain.


 "Wonder" Layout


 I adore cemetery statues! I found this picture on Reddit, and there was no photographer listed to give credit to, but MAN! What an amazing photo! I printed it out some time ago, and it seemed to fit so well with the "Ginger's Dream" paper. 


I painted the "Ginger's Poppies" pieces with gesso, then added some green watercolor for the leaves and stems, then added some watered down Izink to the flowers, which resisted in some spots- AWESOME!
 Here's the other poppy.


One of the layers behind the photo is the "Grand Garden Gate." I used a combination of distress stains, distress inks, and chalk inks to get this patina look. 


"All You Need is Love" Layout


This is one of my favorite pictures of me and my son. I've made a few layouts with this picture before, but my family has taken them! This one is just for me. 


Again, I primed the "Small Circle Flourish" with gesso and painted the leaves and flowers with some green and purple mists to give a watercolor look. Then, I added some flowers. See that heart lock? I cut that from one of the "Romantic Page Dangles" and colored it with silver Izink and grey chalk ink.


Here I cut up more "Romantic Page Dangles" so I could use the chains to accent the larger chain which is from the "Page Chains" set, and used the same products I did on the heart lock. 

The key is from the "Vintage Keys" set. I lightly scraped black archival ink over the key. 

Thanks for having a look at my pages using Ombre Dreams! Have a great day!


Rae

Monday, May 26, 2014

2 Layout and Card by Yuko


Hi! evryone! It's Yuko.
This month I made 2 layouts and 1 card.
I 'm  so happy sharing my projects to you!


【adorable】
This paper is one which I like very much.
Grain background is very nice!!!


  The letter of the title colors it with pink ink.
 I painted with jesso  at random after.


I      I added structure to Shabby Layered Frame with modeling paste.
I stacked the thing which cut a cardboard thin on the top.


I painted Manor Hinges with ceramic stucco.

<Blue Fern Garden Products>
Papers  /  Blue Fern Garden   In Bloom
Chipboards/Electorid Hearts .Good Vibes


【you】
 photo CIMG6688_zpsbd7e5f4d.jpgI wanted to make a translucent layout and colored white card stock with mists.


After the chipboard applied gesso,
 it included mist in the brush and it applied it partially. 


<Blue Fern Studio Products>
 Papers/Blue Fern Garden   Calling Cards
Chipboards/Valentine's Word Set.Beaded strings


【you】


<Blue Fern Studio Products>
 Papers/Blue Fern Garden Calling Cards .In Bloom
Chipboards/Ptite Windows.Renaissance Border


Thank you for lookig!

Yuko