Showing posts with label Winter Page Dangles. Show all posts

Thursday, August 21, 2014

{Cards} with Patter

Hello! Patter here with you today. I wanted to share two cards with you that have the same design concept but look very different. Both cards use the Ombre Dreams paper line and the Leafy Bough chipboard. Both also use a doily, stitching, lace, and flair for the sentiment. Let's look at today's card inspiration.

Hello There
For this card, I used a portion of the Leafy Bough chipboard. I also left the branding strip on at the bottom of the patterned paper. It has a lace design on it which gave me the idea to add real lace to that portion of the card, and it also brought in a second color to the card.
To distress the chipboard, I misted it with water to peel up the leaves into more layers. I then painted the chipboard with gelatos.
Blue Fern Studios products used:
Ombre Dreams paper (Charlotte's Dream and Joyce's Dream)
Leafy Bough chipboard

Hello
This card is a 4 1/4 x 4 1/4 square card. I used the left-over piece of the Leafy Bough chipboard from above.
I also treated the chipboard in the same way that I did with the above card. I did color it with different colored gelatos however.
Blue Fern Studios products used:
Ombre Dreams paper (Shannon's Dream)
Leafy Bough chipboard

Missing You
This is the card I created for the Blue Fern Studios August Sketch Challenge. I only used a portion of the sketch to create this card. I used the Blue Fern Winter Page Dangles chipboard and cut off the top portion of the chipboard to add the detail to the upper left corner of the card too.
Blue Fern Studios products used:
Ombre Dreams paper (Ginger's Dream)
Winter Page Dangles

Thanks for stopping by. I hope you will join in on the sketch challenge and also make some cards with your Blue Fern Studios products. Blessings,

Tuesday, February 25, 2014

3 Times Color and media


Hi, Olga here! I love Chipboards in mixed Media. You can use them in many ways.  I like to use them as main elements. Here I use  Memory frames, This is my Life and "CLICK" from Picture Perfect, as black accents. And Blue fern Bits  as red accents. WIth multicoulor background i have nice looking canvas .


 This is my life i covered with UTEE and get this amazing gloss effect!!


 If you like colors all around You page this one should interest you . I use Circle Groups  first as mask for my background, then as element of my composition. I use also "leftovers" from this chipboard.  I added some Widgetworks and Boys will be Boys element.


If you are curious how exactly i did it i made Step by Step Video with this boyish work


And again chipboard as accents. I had amazing vintage style photos of Young Lady with red accent. I Made vintage style work with red shiny chipboard accents.  I use Winter Page Dangles and Heart set. To add title to my work i use Delightful from  The Optimist Word Set


Sunday, February 9, 2014

Valerie Shares a Little Bit of Love

Hi all.  It's February, so it's only natural to think of love.  My parent's just celebrated their 60th wedding anniversary.  Instead of a card, I wanted to make a canvas for them.  I chose the beautiful Ornate Frame to use in the background.  It's a large piece of chipboard, but it works great for a project like this.


I primed the chipboard with gesso, then applied pink paint, and some Shimmerz Dazzlerz.  While it was still wet, I also sprinkled it with white glitter.  When dry, I used some ink around the edges.


I am having such a great time creating with the Blue Fern Garden paper collection.  I love the beautiful colors and attention to detail in the backgrounds.  This is one of my absolute favorites from the collection.


If you're like me, you often have problems coming up with a title, or would like something different.  The Blue Fern chipboard words are the perfect solution.  I wanted this title to stand out against the background, so I painted it brown, and used some dimensional adhesive to lift it off the page just a little.  It really adds some depth, and it's a nice change from alphabet stickers.


Here is a closer look at the heart from the Winter Page Dangles set of three.  This photo also gives you a closer look at the detail in the paper.  I primed the chipboard with gesso, and then painted it with Distress Stain.  It wasn't quite the color I wanted, so I also used some red ink.  It was finished off with a few pearls and some Inka Gold (Old Silver). 


Thanks for stopping by today and letting me share my projects with you.  Jackie is up tomorrow, so be sure to stop by and see what she has been creating.  ~~~Valerie

Monday, January 20, 2014

A Layout and a Card with Rae Moses

Hello, everyone! I'm Rae and I am so honored to be a part of the Blue Fern Studios Design Team! This is my first post, so I'll here's a little bit about me:

I live in Colorado with my husband and three children. I used to be a high school teacher, but I currently enjoy being a stay-at-home mom. I enjoy spending time with my family, reading, and crafts of all kinds! I've been scrapbooking for about six years, and I am hopelessly addicted! I love creating layouts and altered projects of all kinds. I love the shabby chic, elegant, and grungy styles. I love layers and distressing!

Here are a couple of my first projects I have made for this month:
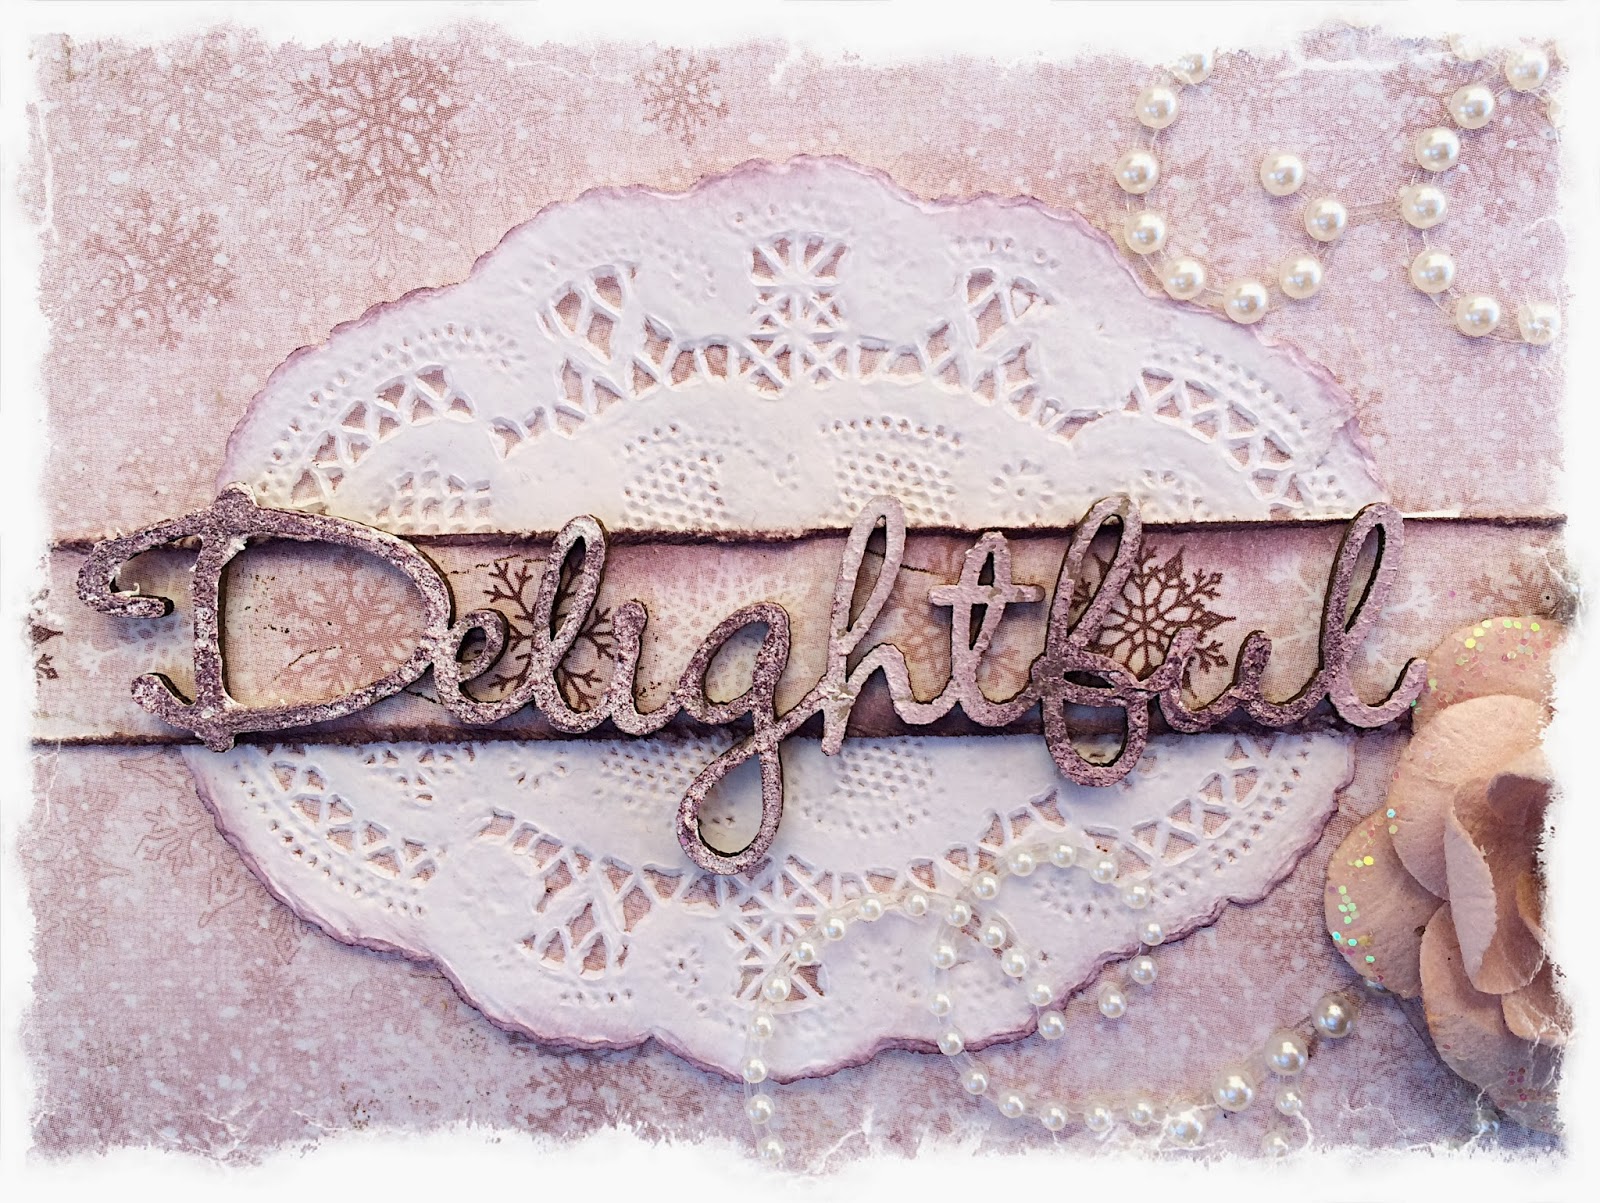
"Delightful" Layout 


If you follow the BFS blog, then you've seen this layout already because it's my take on the January Sketch Challenge. :)  But, I thought I would share some closeups of how I treated the chipboard. 

For this snowflake dangle, I painted it with gesso, then added some Distress Glitter.

I also painted this dangle with gesso, and once it was dried, I used some purple chalk ink on the bows and outlined the heart. I finished it off with Tattered Angels Glitter Glam.


 For the "delightful" piece, I painted it with gesso, then I pressed the purple chalk ink onto it in a random fashion.
Chipboard used: Winter Dangles, The Optimist Word Set

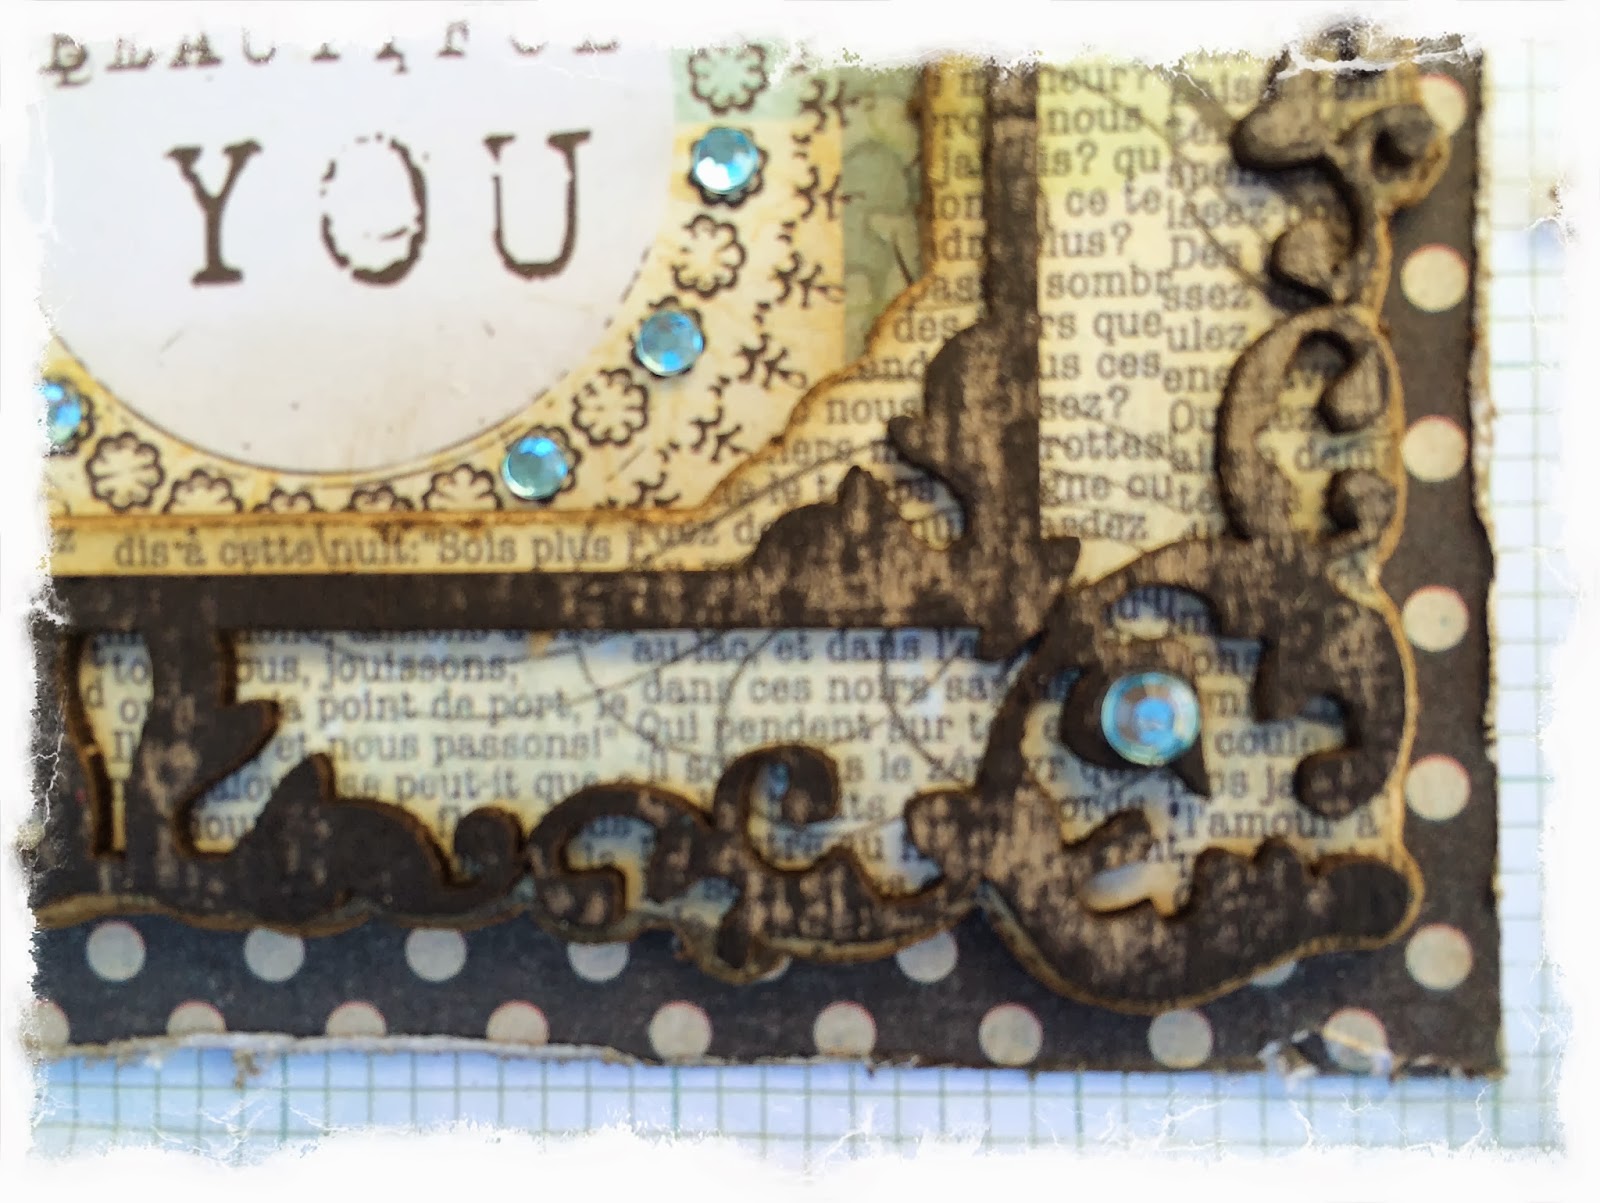
"Beautiful You" Card


I just adore this Shabby Layered Frame! I thought it would make a perfect fit for a card, so I made one with it. And, because I was going for a basic distressed look, I decided to cover the bottom layer of the frame with paper. I simply traced the frame on the paper I wanted to use, and cut it out and glued it to the chipboard, and then used a file to sand the paper to show the fine details of the outline.

For the top layer, I decided to simply "brush" it with black archival ink, careful to leave some of the raw chipboard showing.

Chipboard used: Shabby Layered Frame

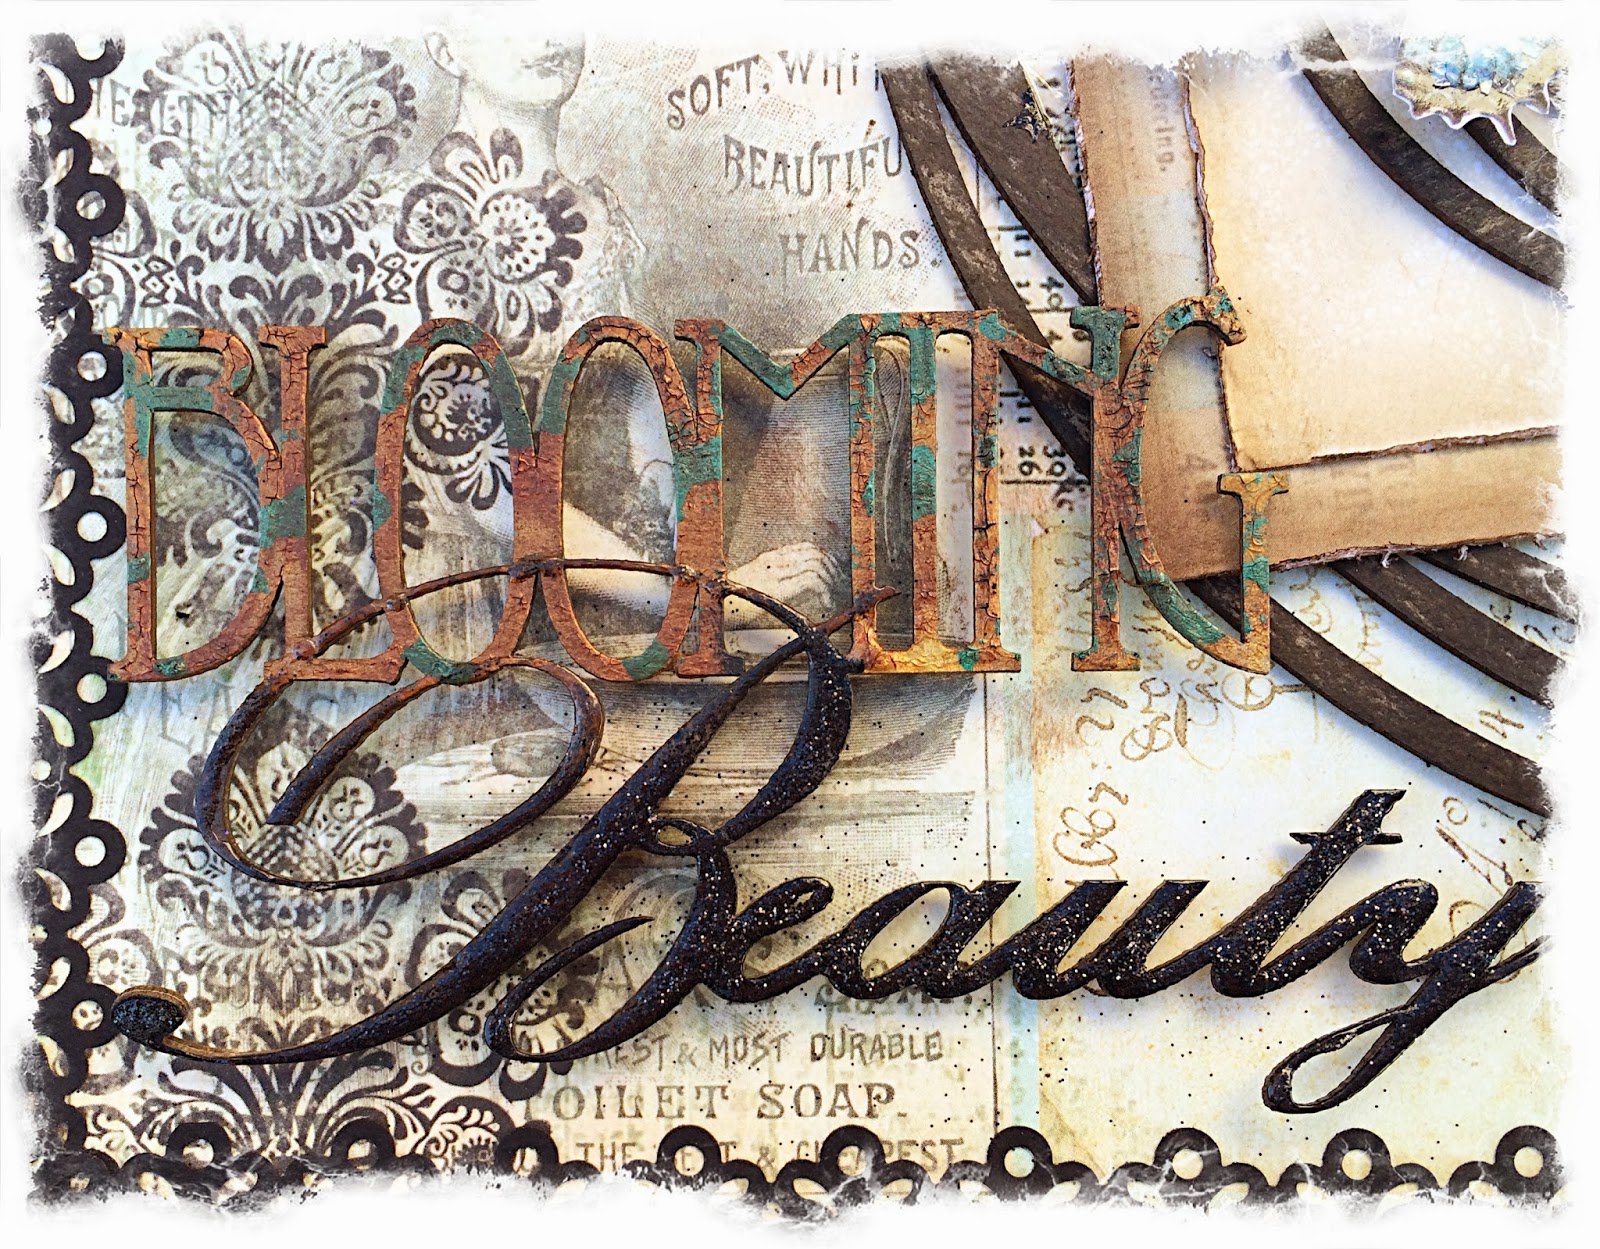
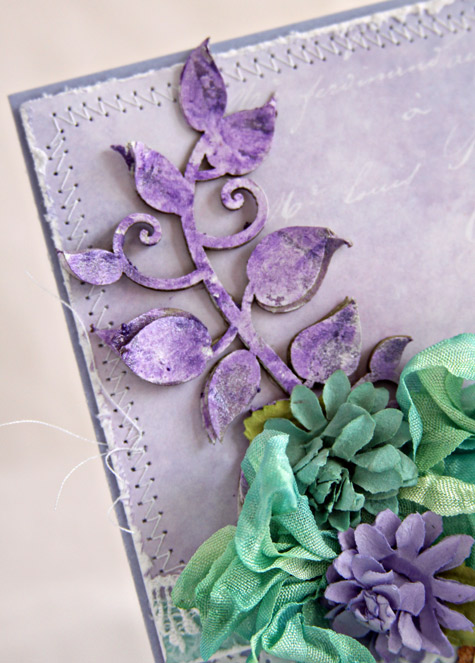
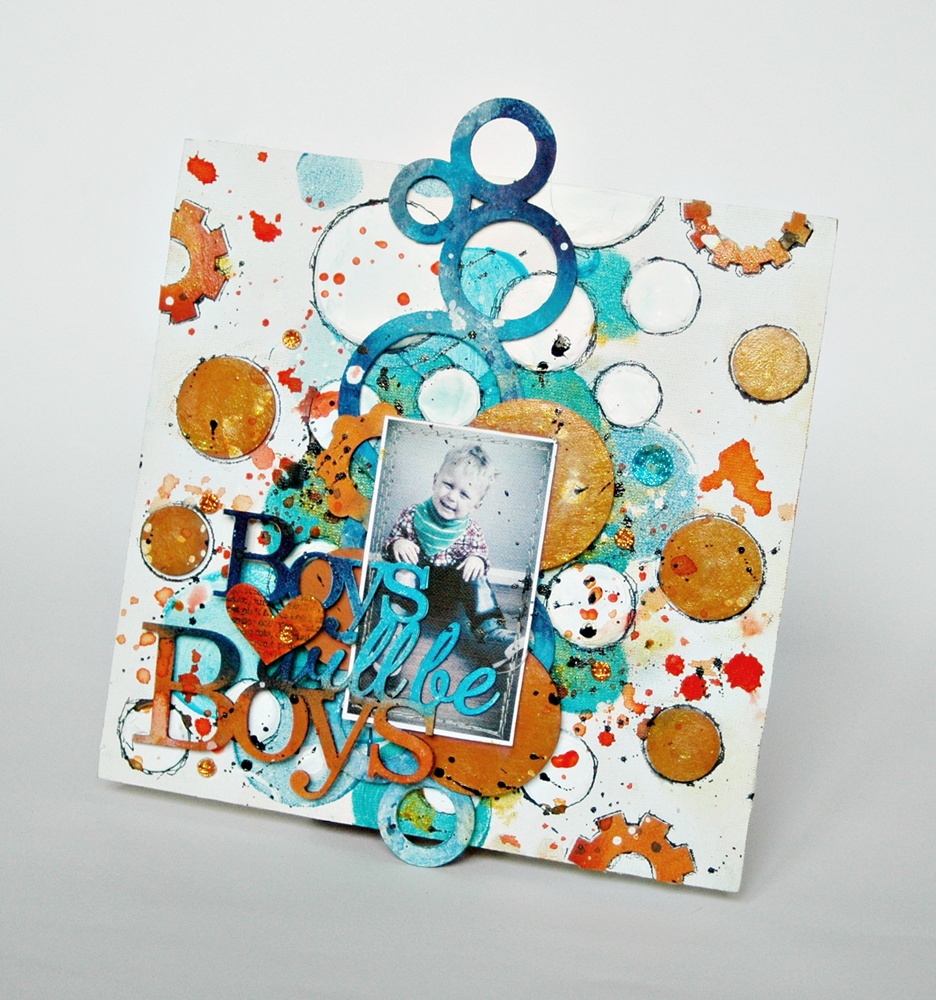
"Blooming Beauty" Layout


There is A LOT of chipboard on this layout!

For these Graduated Circles, I used basically the same technique that I did for the card above, but I used brown archival ink.


On this Spring Branch, I started out with a heavy layer of gesso, then I randomly poured clear microbeads on it while the gesso was still wet. Once dry, I used Silks Acrylic Glaze paint in Guatemalan Green. It was a little brighter than I wanted, so I applied Distress Ink in Walnut Stain to make it match better with my color scheme of my layout.

For this frame from the Petite Boutique Frame set, I put on a heavy coat of Croco paint from Viva Decor. Once it dried, I dabbed on some Vintaj Patina paint, and finished it off with brushing it with Distress Ink in Walnut Stain.

And, for my title, I used the Blooming Beauty piece. I used the technique I used on the frame above for the "Blooming" part, then I covered the "Beauty" with black glitter.

Chipboard used: Graduated Circles, Spring Branch, Petite Boutique Frames, Blooming Beauty

Thank you for taking a look at my projects! And, thank you so much to Leslie and Valerie for having me as part of this team!

Thursday, January 9, 2014

A Layout from Valerie

Hello Blue Fern fans!  It has been a great start to 2014 here at Blue Fern Studios.  I sure hope you've enjoyed what our new design team has shown you so far this year.  They sure are a talented group of women, and there's so much more to come this month.

Today it's my turn to share a layout with you, titled "Best of Times". 


I have used 4 different pieces of Blue Fern chipboard, although they might not be obvious at first glance.  I'll start with one of the most obvious, the frame, from the Memory Frames set.  Ever struggle with a title?  I do all the time, so I love it when an embellishment, such as chipboard, provides the title.  I coated this piece with gesso and used a black paint dabber.  It was very quick and easy.  Then adhere the frame to your photo, and cut around it!


I also used the Berry Stems in my flower cluster.  Once again, I coated the chipboard with gesso, and used a dabber style paint.  Not only does it go on quickly, but there is no mess!


I also used one of the pieces from the Winter Page Dangles set of 3.  I cut it in half and used it in two places on my layout.  These pieces were also coated with gesso, then some gold paint that had some shimmery bits in it, which gave it a rough texture.  I then applied a little Inka Gold. 


The fourth piece of chipboard is from the Ever After Frame Set. It's a little oval frame that I have tucked behind my photo on the top right side.  Who says frames have to go over your photos?  I also used a paint dabber on that piece, and when dry, used some permanent ink and a text stamp.

I urge you to not only use your embellishments for the obvious, but try to find other ways to use them, as well.

That's all for today.  Be sure to check back to see what our other designers have for you!

Friday, December 27, 2013

Two Projects from Erin!

Good morning! I hope that your Christmas went well and that you're getting ready to welcome in a new year :). We're back to business as usual here at Blue Fern Studios, and I'm happy to share some classy Christmas cheer with you all, as well as a sweet and simple project too!

"Let it Snow"
Blue Fern Studios has released some beautiful holiday themed chipboard pieces over the past month or so, as well as some wintry ones as well- simply perfect for this time of year! The "Let it Snow" set includes the title piece and snowflake you see here, as well as a tree and some additional snowflakes. A must-have!

For the frame I first primed with gesso before applying embossing ink. I then sprinkled on some sparkly white and gold embossing powders as well as some glitter and then setting with a heat gun. The snowflake was treated with white embossing powder and set. Finally, the title piece was stamped with chalk ink and sealed with some glossy accents.

Blue Fern Studios Products Used:
Let it Snow
Ever After Frame Set

Next I have a sweet and simple card for you!

"A Very Good Life"
I love the "Winter Page Dangles", and I have been envisioning creating a tall, narrow card with one for a while now. I wanted to make sure the chipboard piece was the focus, so I kept the rest of my card fairly simple. 

I used a white chalk ink before adding embossing ink and glittery white embossing powder to my chipboard. It turned out sparkly and feminine which was perfect for my girly card!

Blue Fern Studios Products Used:
Winter Page Dangles

Thank-you for stopping by amidst the holiday happenings! 
I hope you've had a chance to play along with our sketch challenge this month too- there's still time left to enter!