Showing posts with label Garden Lattice Bits. Show all posts

Tuesday, August 1, 2017

Wanderlust Inspiration by Kris Berc

Hi, Blue Fern Studios fans! It's Kris here to share my August projects with you.  I have three layouts using the new Wanderlust collection to show you today...oh how I adore the colors and patterns in this collection!

I Think You're Wonderful


I started with the gorgeous Wanderlust Ocean Voyage paper and prepped it with clear gesso.  I couldn't resist coloring the paper with yellow spray inks to match those beautiful, vibrant yellow flowers in the Wanderlust Vine! I then applied modeling paste through a stencil and some black stamping here and there with the new Travel Time stamp.


I treated the title chipboard piece with two embossing powders: Summer Breeze and Starry Night.


I used the same treatment on the Garden Lattice Bits chipboard.


I tucked a Wanderlust printed chipboard piece in at the bottom right of the photo, then layered on a Wanderlust Vine, a Wanderlust Lily, and a white rose from the Happy Roses set.


Blue Fern Studios products used:

Paper
Wanderlust - Ocean Voyage
Wanderlust - Seascape

Chipboard
I Think You're Wonderful
Garden Lattice Bits
Wanderlust Printed Chipboard

Embossing Powder
Summer Breeze
Starry Night

Stamp
Time Travel

Flowers
Wanderlust Vine
Wanderlust Lilies
Happy Roses

-------------------------

Happiness


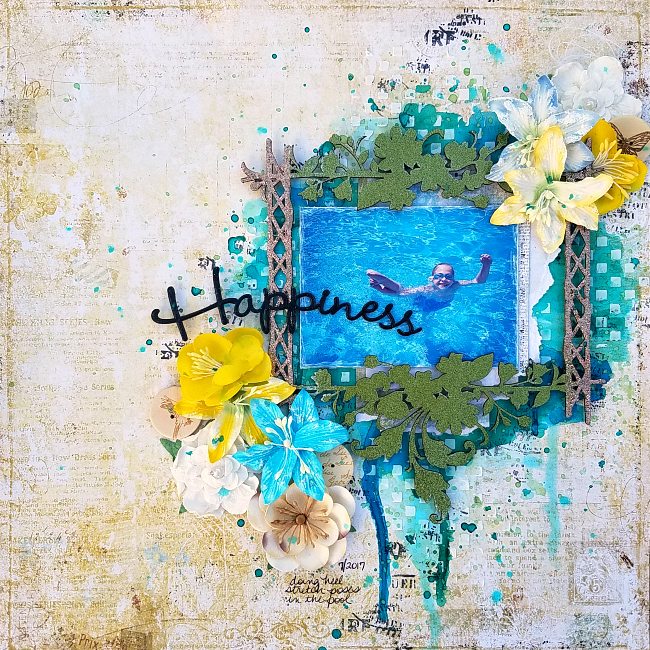
For my second layout, I started with the gorgeous Wanderlust Mountain View paper. This time I was inspired by the blue pool water in my photo to add various colors of blue spray ink.  I then applied modeling paste through a stencil and some random stamping in black with the new Departure stamp.


I embossed the Happiness chipboard piece with Ebony embossing powder.  I embossed the sides of the Natural Frame chipboard piece with Hot Cocoa embossing powder, and then embossed the foliage areas of it with Avocado embossing powder.


My flower clusters include yellow and blue Wanderlust Lilies, a blue lily from the Dark Tropic Lilies set, and yellow blooms from the Spring Florals set.


Below is a closer look at the Avocado embossing powder...isn't it lovely?!


Blue Fern Studios products used:

Paper
Wanderlust - Mountain View
Wanderlust - Petites

Chipboard
Good Vibes set
Natural Frame

Embossing Powder
Ebony
Avocado
Hot Cocoa

Stamp
Departure

Flowers
Wanderlust Lilies
Dark Tropic Lilies
Spring Florals

-------------------------

This Moment


I changed things up a bit for my third layout and focused more on the Wanderlust collection's neutral tones.  I started with the B-side of a piece Wanderlust Calling Cards paper and then layered strips of Wanderlust Pacific Coast paper (both sides) horizontally.  After a treatment of clear gesso, I painted the paper a bit with tan and brown spray inks, followed by stamping here and there in black with the new Dispatch stamp.


I embossed the "this Moment" chipboard piece with Mushroom embossing powder and then grunged it up a bit.  Above the chipboard piece, you can see some of the new Ivory Braided Trim.


The Swallow Border chipboard piece is another new item!  I treated it with Mushroom embossing powder and then added some Speckled Mint embossing powder in random areas.  It's layered on top of some of the new Ivory Venise Lace and topped with a Wanderlust Lily.


The Fern Leaves chipboard pieces are new, too! I treated two of them with the new Avocado embossing powder and tucked them into my embellishment clusters.


Blue Fern Studios products used:

Paper
Wanderlust - Calling Cards
Wanderlust - Pacific Coast
Wanderlust - Souvenir

Chipboard
This Moment
Swallow Border
Wanderlust Printed Chipboard

Embossing Powder
Mushroom
Speckled Mint
Avocado

Stamp
Dispatch

Flowers
Wanderlust Lilies

Lace
Ivory Braided Trim
Ivory Venise Lace


Thank you for stopping by today.
I hope I have inspired you to create with your Blue Fern Studios products!

Wednesday, April 26, 2017

Spring Garden layouts by Patty Rogers

Hello everyone!  Today concludes our projects from the Blue Fern Fan of the Month, Patty Rogers.  It has been such a joy to have her with us this month, as we know what a big fan she is of everything Blue Fern.
Today, Patty has created 2 layouts to share with you.  I will let her tell you all about them!

* * * * *

Hello Blue Fern Studios fans! It's Patty with my last post as Fan of the Month. What an honor this has been! I thoroughly enjoyed working with the Spring Parade collection.


Hi Blue Fern fans! It's Patty with another layout from the Spring Parade collection.
 I did quite a bit of fussy cutting for this piece, as well as 3-D work and applying texture.


One technique found in my work is layering. I think it shows off all of the beautiful papers,
 so dimension is a must for me.


You can see where I used the Forever stamp with Pink Dust embossing powder
on each of the layers in random places for texture and dimension.


I applied a few brushstrokes of gesso on the flowers to lighten them a little and distressed the layered papers.


Here, you can see the layering, distressing, textured background, splatters of color and embossed chipboard pieces.


For this layout, I used May Vignettes as my background paper. The little eggs, bunny, and
flowers are sweet without dominating the background. Again, I used the Spring Bunny Frame,
Good Vibes and Garden Lattice Bits for the chipboard.


I embossed the frame with Snow and Sea Mist embossing powders with just a sprinkle of Spring Posy glitter.


Fussy cutting the little bird in a basket adds dimension to the layout when popped up.


The banners were distressed and I embossed the title using Lavender Eggs.


The flowers used on this layout were Spring Peony and Berries, Spring Florals, 
Dark Tropic Lilies and Courtship Roses. 

 Wishing everyone a lot of creative enjoyment with Blue Fern Studios products! --- Patty

Wednesday, April 12, 2017

Easter Joy by Patty Rogers

As we approach Easter, our Blue Fern Fan of the month, Patty Rogers, has an adorable Easter layout to share, using paper and chipboard from the Spring Parade Collection.  I'll let Patty fill you in on all the details:


Hi everyone! It's Patty Rogers again to share a layout I created with the beautiful Spring Parade collection. I wanted to use this photo of my two children as they were enjoying Easter Sunday. Don't you love the Spring Bunny chipboard frame?  The charming little bunny and its size are perfect for the trend in scrapbooking to use a small photo. 


For this piece, I used a variety of papers from Spring Parade (Market Place, April Medley, Sunrise, Susie's Garden and Spring Parade). The stripes in Sunrise paper begged for a horizontal or vertical design.  I used an inking sponge to darken the paper a little behind the area of interest to draw attention to that area and to make it pop. 


Some of the background work that I did can be seen here. First, I used Essential Textures stamp to play up the brick wall seen in the photo.  For the embossing, I used Lavender Eggs, Snow, and Sea Mist and added sprinkles of the brand new Spring Posy glitter! Also, I added a few splatters of gesso. 


This beautiful little girl is one of the many reasons I love Blue Fern Studios products! I fussy cut and popped her up for dimension. Also used here is Garden Lattice Bits chipboard in the background. I seem to be hopelessly addicted to dimension, texture and beautiful paper! 

 Flowers used here are the Spring Florals and Spring Peony and Berries. I painted a bit of gesso on the flowers to give them a lighter feel. 


Thanks for stopping by. See you next time!

Monday, July 4, 2016

Celebrating My Freedom To Create This 4th Of July By: Renea Harrison

Happy 4th Of July!!! I hope this Independence Day finds those of you who celebrate, enjoying time with your family and friends, and enjoying so many of the freedoms that we as American's have.

Today, I am celebrating my freedom to create in three different styles. First up is a Shabby Chic layout that I created using the Blue Fern Studios Courtship Lane Paper Collection. 


I started with a layer of Blue Fern Studios Courtship Lane~Main Street Paper, and then layered on another layer of Courtship Lane Bourbon Avenue Paper, that I did some stenciling with texture paste, corner rolling and distressing on. I then added a layer of lace and then took more of the paper collection and created a matte for my photo.


At the corner of my photo, I took a Blue Fern Studios Courtship Violin Chipboard Piece, and crackle painted the violin portion of the piece, letting it air dry to get a deep crackle finish, and then I rubbed different layers of purple and lavender ink over the top to bring out the textures.


I then colored the greenery part of the piece with markers, and then used an embossing ink dabber to randomly add in, and  coated it with some Imagine Ink Sage Embossing Powder to get a raised two tone surface.


I then added some mulberry flowers, a daisy from the Blue Fern Attic Charm Flower Collection, some burlap string bows and a sweet metal heart.


Next, I took some Blue Fern Garden Lattice Bits, coated them in embossing ink, and then coated them with Imagine Ink Mystic Purple Embossing Powder, heat set the powder, and added on some pearl accents, and placed the bits randomly around the edges of my layout.


I added some more mulberry flowers to the top lattice piece along with some a matching burlap string bow. To top my piece off, I added in some of my handcrafted Dragonflies for dimension.


Here with this side shot, you can see all the dimension and texture that those amazing Blue Fern Products can help you create!!

Blue Fern Studio Supply List:
Paper:
Courtship Lane~Main Street
Courtship Lane~Bourbon Street

Chipboard:
Courtship Violin
Garden Lattice Bits

Imagine Ink:
Mystic Purple Embossing Powder
Sage Embossing Powder

For my second project this month, I wanted to create something with a bit more of a grunge feel to it. I love playing with color and inks, and sometimes like to challenge myself to create without using flowers or the more feminine embellishments that most work that I see contains. It challenges me to step outside the box and to be more creative, and I love that the Blue Fern products allow me to still create something amazing and visually stimulating without having to grab a package of flowers, or any fluff.


I started with a layer of Blue Fern Tranquility~Calm Paper,  and then layered on a second layer of Blue Fern Tranquility~Patience Paper, tearing the right side, and heavily inking that edge, then layered on a 3rd layer of Blue Fern Tranquility Serenity Paper, that I distressed and inked the edges on, and then tore and heavily inked the right side edge, layering it over the 2nd layer, so that the 2nd layer so that it peeked out, then layered in some film strip transparencies. I then used texture paste and a stencil to create the raised texture on the paper, spraying it with 3 different layers of spray stain to capture the colors I used in the layout.


I created a background layer by taking corrugated cardboard and spraying it with 3 different layers of spray stain, and then inking the edges. I grabbed a Blue Fern Grunge Frame,

and first stained it with a brown color, then used a clear embossing ink dabber randomly, added coated it with Imagine Ink Seven Seas Embossing Powder, and heat set it, then randomly dabbed with the clear ink again, coated it with Imagine Ink Peackock Embossing Powder, heat set it and then inked back over the whole piece. I then distressed and inked the edges of my photo and added it on.


The clock pieces are Blue Fern Small Roman Clocks that I stained and layered in.


Here you can see all the dimension of all the layering in that I did with the gorgeous Blue Fern papers and embellishments.


The "Story" piece o my layout is a chipboard piece from the Blue Fern~Story, Fairytale, Magic Set. For this piece I inked it in 2 different colors, randomly dabbed it with an embossing ink dabber and then coated it with Imagine Ink Copper Embossing Powder, and heat set it~YUM!!


For the finishing touches I rolled some of the paper scraps and tied them with burlap string bows, added some More of the film strips, a paper button and some metal accents. I just love those blues and browns in the Tranquility line, so bold and so perfectly grungy!!

Blue Fern Studios Supply List:

Paper:
Tranquility~Patience

Tranquility~Calm
Tranquility~Serenity

Chipboard:
Small Roman Clocks
Grunge Frame
Story, Fairytale, Magic Set

Imagine Ink:


Seven Seas Embossing Powder
Peacock Embossing Powder
Copper Embossing Powder


For my final project this month, I decided to do a Mini Album with a Magical Fairy Theme using the Blue Fern Studios Attic Charm Paper Collection:


I used a gate fold album that was perfect for using the Blue Fern Royal Gate Chipboard to create a piece where the gate actually opens. The cover was layered with Blue Fern Attic Charm~Haberdashery Paper.


A Side View.


I did a crackle finish on the gate and then heat embossed it with Imagine Ink Pearl Embossing Powder, and then over inked it with a gold color.


The edges of the album are coated in a pink Glitter Glass. The "Magic" piece is from the Blue Fern Story, Fairytale, Magic Chipboard Set. I heat embossed the piece with a mixture of  Imagine Ink Honey & Buttercup Embossing Powders, and then went over the edges with some green ink to highlight it.


I added flower and feather details. The Daisy, and small green flower are from the Blue Fern Attic Charm Daisies and Courtship Blooms Flower Collections.


When you open the right side of the gate. you are greeted with a Blue Fern Attic Charm Calling Card.


When you open up the whole album, it folds out to a large sectional that is layered with Blue Fern Attic Charm~Curio Paper, lace and a large Blue Fern Gazebo Chipboard Piece that I painted white. The edges are done out in Imagine Ink Blue Ice Glitter.


Page 1 and 2  are covered in Blue Fern Attic Charm~Spring Posy Paper, with pockets created from Attic Charm~Foyer Paper, along with 3 pull outs and a booklet piece created from the Attic Charm~Calling Cards Paper. Details include: lace and a sweet bunny from the Blue Fern Chipboard All Natural Set that I painted white.


Pages 3 and 4  feature Attic Charm~Foyer Paper, and a Blue Fern Attic Stairs Chipboard Piece that I heat embossed with Imagine Ink Oatmeal Embossing Powder.


Pages 5 & 6 feature Attic Charm~Generation Paper, and have to heart doily accents.


Pages 6 & 7 are covered in Attic Charm~Generation Paper, and lace.


Pages 8 & 9 are covered in Attic Charm~Attire Paper, and the page 9 features a Blue Fern Lace Round Chipboard Piece that was heat embossed with Imagine Ink Sage Embossing Powder.


Pages 10 & 11 feature Attic Charm~Calling Card Paper, with Calling Card Cut Outs for accents, along with a garden fairy die cut and a wildflower from the Blue Fern All Natural Chipboard Set that I colored the stem with a marker and then inked the flower head on.


The last set of pages gives you this fold out appearance that matches the the very 1st fold out section using Attic Charm~Curio Paper.


The back of the album is covered in Attic Charm~Spring Posy Paper with the edges finished out in glitter glass.


I hope that you have enjoyed all of my projects this 4th of July, and that you find the time to to grab some of those YUMMY Blue Fern products for yourself, and celebrate your freedom to create!! Hugs ~Renea

Blue Fern Studios Product List:
Paper:

Attic Charm Papers~
Attic Charm
Haberdashery
Curio
Spring Posy
Foyer
Generation
Calling Cards
Attire

Chipboard:
Gazebo
Royal Gate
Magic (from Story, Fairytale, Magic Set)
Bunny (from All Natural Set)
Attic Stairs

Lace Round
Wildflower (from All Natural Set)

Flowers:
Attic Charm Daisies

Courtship Blooms

Imagine Ink:

Embossing Powders:
Breeze
Pearl

Sage
Honey
Buttercup
Oatmeal
Imagine Ink:
Blue Ice Glitter