Showing posts with label Country Picket Fence. Show all posts

Sunday, December 13, 2015

Christmas altered art by Marie-Josee

Hello folks!

This is my last post for Blue Fern Studios and I have three projects to show you, all created with the Vintage Christmas collection.
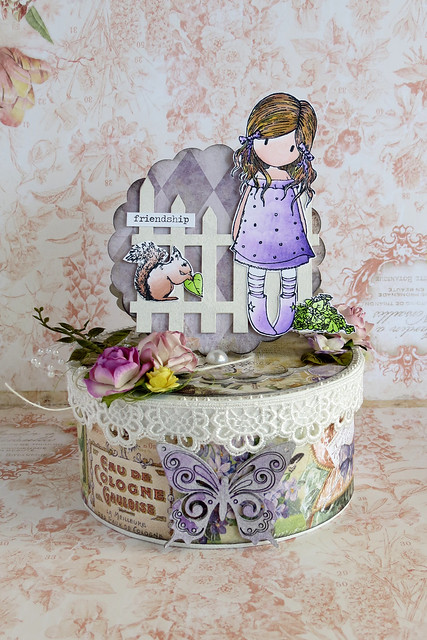
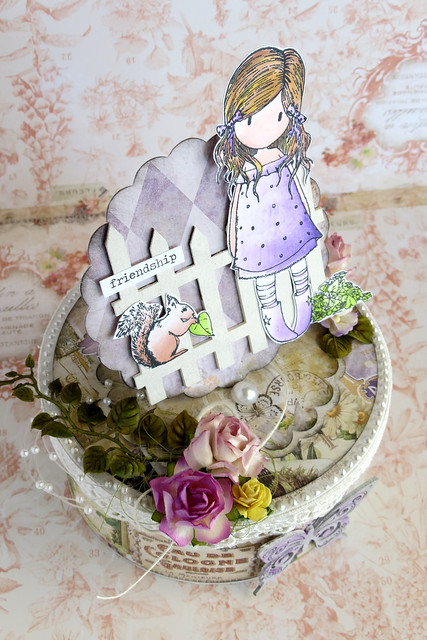
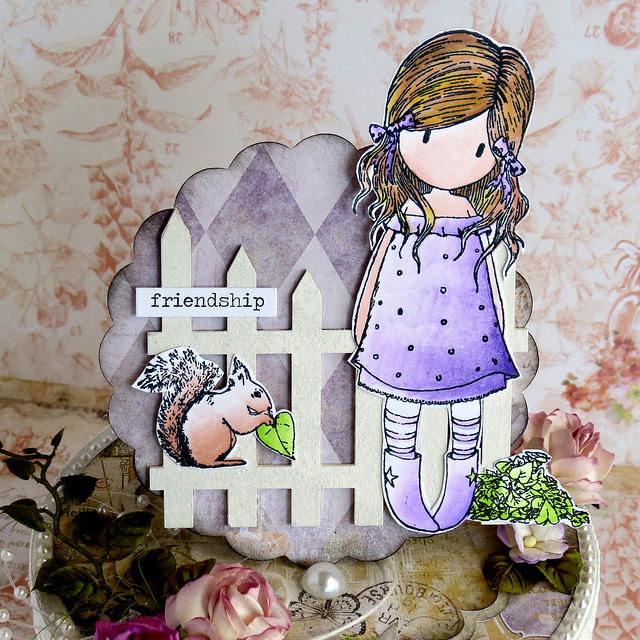
Box card

I did a bit of fussy cutting for the card. I cut the child and the Christmas tree out of the Calling Cards paper. I used a piece of the Country Picket Fence chipboard between the child and the Christmas tree and a piece of the Winter Flakes chipboard set. Both were altered with white gesso.


Gift bag

I created this gift bag from scratch, using a Vintage Christmas paper. I cut small pieces of the Mini Rings Panel and glued them to each side of the bag. Then, I applied gesso randomly with a sponge. I also added Imagine Ink Embossing Powder in Poinsettia.


Christmas scene

Finally, here's a Christmas scene in a box. I created the box from scratch using kraft paper. I cut the bottom and used parchment paper as a background (you can also use vellum paper). I used various Vintage Christmas papers and a die to create the houses. I added gesso to the edges, as if it is snow. I also altered the two snowflakes from the Winter Flakes set with gesso.

I used parchment paper as a background to be able to light the scene with battery-powered tea lights, which I put behind my Christmas scene, so that it creates a soft glow.


Saturday, June 13, 2015

Three projects, three collections by Marie-Josée

Hello all,

I hope you are all doing fine. School is almost out (well, here in Canada), and summer is just around the corner. Here are a few projects for you!

Box + easel card

I created this gift box with an easel card on top with the Déjà Vu paper collection. I used two different papers: Friperies for the box, and Un voyage à Paris for the card.


I altered one of the butterflies from the Brigitte Butterfly Set with white gesso and purple mist.


I also used a piece of the Country Picket Fence, altered with white gesso:


"Delight" layout

For this layout, I used a paper from the Blue Fern Garden paper collection, the first released by Blue Fern.


I glued the Checker Bits chipboard pieces to my background and added white gesso on top with a sponge.


I also altered a piece of the Postage Frames chipboard set with white gesso. The word Delight from the Delight set was altered with Gelatos. I just used the Gelatos on the bare chipboard and with my finger and a bit of water, I applied the color all over.


"Memories Captured" layout

This layout was created with the Ombré Dreams paper collection. The paper I used is Julianna's Dream.


 I used the Crosshatch Frame under my photo. I didn't alter it.


I also used the Memories Captured chipboard from the Captured Words set. This piece was also used as is, without any medium.


Monday, October 20, 2014

More Montage Layouts with Rae

Hello everyone! Today I'm sharing three layouts I have made with the Montage paper collection.


"Sweet as Honey" Layout


I used a handful of papers from the Montage paper collection to create this layout, and ripped the papers to create dimension. I had fun playing with these light colors, adding a lot of white with the ripped edges, doily, frame, and bunting!

Here is a close up of the Twilight Garden Frame. I primed it with a heavy layer of gesso, then sprinkled glass filler over it to give it a sugared look. I use the same technique on pieces of the Organic Vine that I cut up and tucked under the flower cluster.


The title is from The Latest Buzz set. I treated it with multiple colors of embossing powder to get this look.


I used the same technique on this small piece of doily bunting.

"Happy Memories" Layout


I just adore this piece of Montage paper, Mercantile. It's a very busy pattern, so I tried to keep my design simple by adding black accents and also choosing a black and white picture that wasn't too busy.

Here is a closeup that captures both pieces of chipboard I used.


For the Large Circle Frame, I simply painted it with one coat of black chalkboard paint, allowing hints of the natural color of the chipboard show through the paint. I added some pearls to the circles in the design, and some flowers over the flower silhouettes on the frame.

The title is two pieces from the Chunky Word Set that I treated using some multicolored embossing powder.


Untitled Fall Layout


Again, I used Montage paper, but added a piece from the Ombre Dreams collection for the layers under the picture. I found this picture on Pinterest. 

Here are two closeups of the Floral Wreath that show the distressing of the piece. I sprayed the chipboard with water, and separated the edges to create a level of dimension and "realness" of the leaves and flowers. Once it was curly, I dried it with a heat gun, then added some green and brown mists.


I cut a piece of the Country Picket Fence to add to the bottom corner, and scraped it with a distress ink pad to get that finish.


Lastly, I added a bird from the Little Birds Set. I used brown and gold embossing powders.

Thanks for checking out my projects! Have a great day!

Sunday, July 13, 2014

Three cards by Marie-Josée

Hello all!

Today, I am featuring three cards that I created with the Ombré Dreams collection. Here they are!

For the first card, I used the Shannon's Dream and Joyce's Dream papers.

 
I also used two pieces of chipboard, a piece of the Layering Stems (altered with Silks Acrylic Glazes) as well as the Country Picket Fence (altered with Gelatos). I cut the fence because it was too big for my card.
 

For the second card, once again, I used the Shannon's Dream and Joyce's Dream papers.

I also used two pieces of chipboard, a piece of the Berry Stems set as well as a piece from the Little Baskets set. Both were altered with mists.


For the third card, I used the Charlotte's Dream and Shannon's Dream papers. I also used the Village Sign Post chipboard, altered with Silks Acrylic Glazes.


Tuesday, February 25, 2014

Blue Fern Garden with Jelissa


Hi there! Today is my turn to share with you two projects for February. I've just come back from a family holiday in Japan and there were so many photos to scrap. And the new paper line from Blue Fern Studios is just perfect for remembering this wonderful vacation.

"Perfect Moment"


For my first layout I used "Parlour" as the background paper because of the sweet blues and greens on a neutral cream base. It also matched the colors of my photo quite well and gave me a lot of space to create my cluster. For the paper layers, I cut out and distressed the elements from "Calling Cards" - I think this particular paper must have been designed for people like me who just love to layer.


Some chippy goodies: I painted the picket fence with gesso and plastered texture paste randomly over. I snipped the Organic Vine into two and used it in both corners of my main cluster. Tucked in are also pieces of the Berry Stems. Leaving the stems bare, I covered the rest of the two pieces with gesso and painted over with watercolors. As a final touch, I added some shimmery-colored texture paste.


I fussy-cut out the corner element from another sheet of "Parlour" and tucked it underneath the Petite Window, which I covered with texture paste randomly.

Blue Fern Products used:
Blue Fern Garden "Parlour"
Blue Fern Garden "Calling Cards"
Country Picket Fence
Petite Windows
Berry Stems
Organic Vine


"Mini Album"

My next share is a mini which I created using the Blue Fern Garden papers. The colors from the line matched my entire vacation so well (how often does that happen?) that I just had to use them for this project. 


On the cover, I used a piece from the Ever After Frame set and covered it with two different shades of embossing powder for a duo-toned effect. I then fussy-cut out an element from Blue Fern Garden "Calling Cards" as a mat for the title.


I layered Bits of Honey under my photos and painted it with gold paint. 
Here's a tip: don't discard the extra strip at the bottom of your Blue Fern Garden papers. There are beautiful patterns on them and I found the thickness to be just perfect for layering banner strips. I've used these throughout my mini. 


I painted the Heart Panel Chunky with some water colors, inked the edges and layered it under my photos. I also did the same for the Spring Branch chippie below.


Blue Fern Products used:
Blue Fern Garden "Parlour"
Blue Fern Garden "Calling Cards"
Blue Fern Garden "Boudoir"
Blue Fern Garden "Love Letters"
Blue Fern Garden "In Bloom"
Bits of Honey
Heart Panel Chunky
Ever After Frame Set
Spring Branch

This is all I have for now, thanks for stopping by!
 love, Jelissa