Tuesday, February 16, 2016

Maja's February Projects

Hello, Blue Fern Studios Fans and welcome to the blog today :-)

For my today's post I created various projects, so I hope everyone would find something for themselves to get inspired. All of them feature our latest release, the Serendipity collection.
Let's start with the layout:


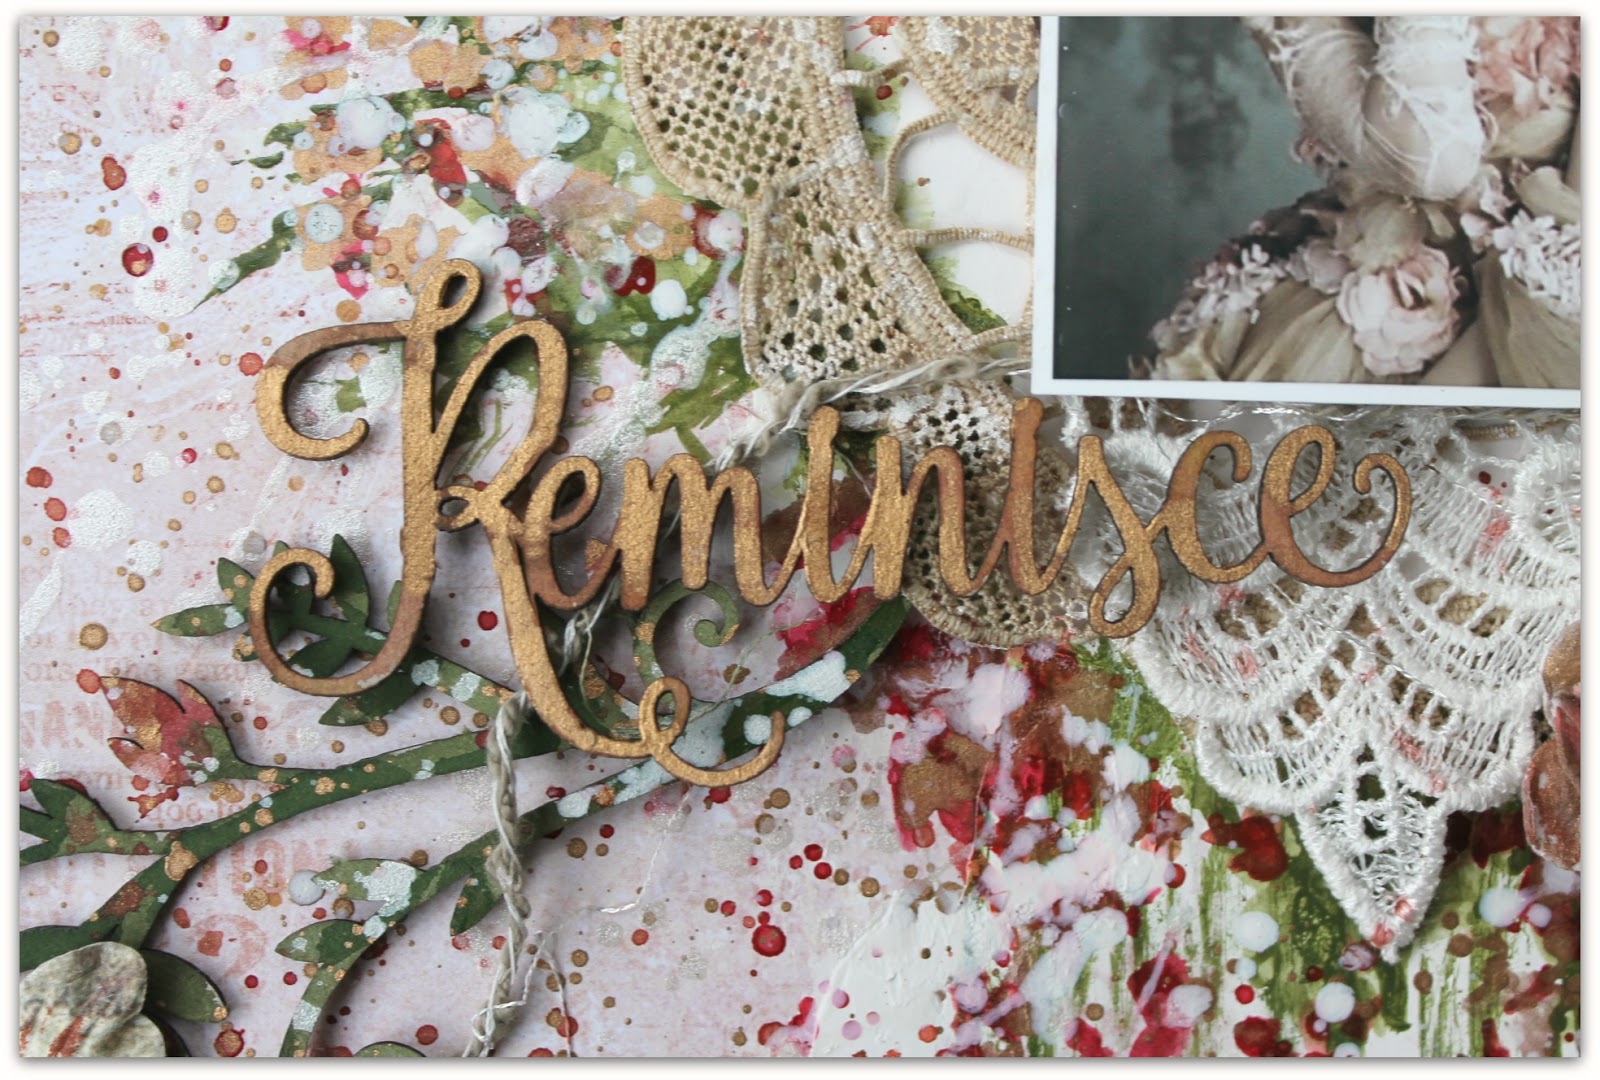
I first layered two papers in contrasting colours for the background and added some stamping. For the title, I traced the words of the "Always Remember" chipboard with embossing marker and heat-embossed them separately with Heavenly and Ginger embossing powders:


Then I cut out some journaling cards to mat my photo. I tucked some flowers in between then layers,  I also included some loose brick pieces I found with my Shabby Brick Panel (you can also find them in the Extra Bits sets :-)) that I covered with subtle crackle paint.


I created a custom button by attaching an epoxy sticker to the bird image and cutting it out. As for the extra pieces you might get with your chipboard, I decided to keep them and use for some interesting decor element :-) I first removed the pieces from the chipboard, covered them with various eps and but them back together, creating kind of a mosaic/stained glass element (to be able to mount it on 3D dots, I matted the shapes with some paper on the back side):


For the word part, I first embossed the background pieces with Breeze ep and then re-heat it a bit so that particles of Oatmeal ep would stick to it and embossed again to get a shabby chic look:


Always Remember:

Papers: Serendipity: Anticipation, Fascination, Imagination, Chronicle
EP: Ginger, Heavenly, Azure, Seven Seas, Breeze, Oatmeal
Chipboard: Always Remember, Charmed Page Dangles, Shabby Brick Panel/Extra Bits
Stamps: Photography, Forever, Vintage Edges

I used this mosaic/stained glass technique for my next project too, an OTP home decor piece with the beautiful Couture chipboard as the main image:


Just as with the Charmed dangle, I removed the pieces, covered them with Lilac and Mystic Plum eps and but them back into the main piece that I covered with 14 Karat ep.


For the background, I layered some papers, put some lace in between the layers and stamped a dangle from the Deja Vu stamp set, then added some dimensional elements to it:


I also included a flower cluster with a button and metal wing charm in it. Beneath my composition I put the Inspiration chipboard on the passe-partout I splashed with black ink:


Inspiration:

Papers: Serendipity: Inspiration, Merriment, Reminisce
EP: Lilac, Mystic Plum, 14 Karat
Chipboard: Couture, Serendipity Words 1
Stamps: Deja Vu

I also made two cards for this post - here's a wedding card that features the Boston Lattice chipboard piece:


I think it makes a beautiful bakcground for the flower cluster, and it also reminds me of a wedding pergola :) For the background, I layered two sides of the Glee sheet:


 I covered the chipboard with white chalk mist and used the extra pieces as propping places to hide 3D dots:


Wedding card:
Papers: Serendipity: Glee
Chipboard: Boston Lattice


It wouldn't make a February post without a Valentine's card ;) Here's one I gave to my own personal hubby:


I used the True Heart stamped image for the main motif: I stamped it on watercolour paper, coloured it with Distress inks, cut out and mounted on layered papers that I also stamped with Journey stamps:


For the sentiment, I used the "love" word from the Chunky Words set, covered it with glue and dipped in the Fool's Gold glitter. Just to make sure it would fall off, I secured it with glossy accents. 


Love card:
Papers: Serendipity: Contemplation, Inspiration
Chipboard: Chunky Words
Glitter: Fool's Gold
Stamps: Journey, True Heart

I wish you a lot of creating time - and see you next time!
Maja Nowak

Monday, February 15, 2016

Inspiration from our Creative Team

Welcome to the middle of February.  We hope you had a sweet Valentine's Day.

We have loved seeing how our Creative Team has used all the new Blue Fern Studios products this year.  Today we would like to share some additional projects from our great team.  In honor of Valentine's Day, our theme this week is pink and/or anything love related.   You are sure to find some sweet inspiration! 

First up is this frosty, wintery layout created by Keren Tamir using several Blue Fern snowflake chipboard pieces that she has painted white.  The title is from our "Cool, Calm, Chill" word titles set.  
What a gorgeous layout Keren has created!


Like Keren, Wilma Voermans's layout shows how a piece of basic white cardstock can be transformed into a work of magic.  The finishing touch is the "Blushing Beauty" chipboard title.


Marie-Josee Hamel created this beautiful layout using our Blush Collection.  
The photo is perfectly framed with a couple of our chipboard borders.


A collection of love-inspired layouts just wouldn't be complete without a baby.   
Sandi Clarkson also chose to use the Blush collection for this super-sweet layout. 


If you miss seeing two-page layouts, then this one is for you.  Nicole Doiron has created two very romantic wedding layouts using the Blush paper collection, along with our Best Day Ever chipboard title, and the Romantic Page Dangles. 


Although Bec Genet's layout isn't pink, it certainly is elegant with tones of gold and black, and fits in nicely with our love theme.  The paper is from our Autumn Anthology and Love Story collections.  The "Love This" title is part of the "Arrow Words" chipboard set which also contains 7 other titles.


Our final project today is for those of you who love Artist's Trading Cards (ATC).   Renea Harrison has one for you that she created using the Timeless collection.  The shabby hearts are accented with Blue Fern's Mystic Plum embossing powder.  Who wouldn't love to receive this beauty?


We hope you have found some inspiration to use the next time you create!


Sunday, February 14, 2016

Two mixed media layouts with video tutorial by Wilma Voermans

Today I present you the two layouts I made with the new Serendipity collection.
Newly I do not only scrap for keepsakes.
I love scrapbooking , but most of my familypictures are in project life albums. 
More pictures and more journaling, and it is my big fun to make my own cards.

But.....I still love scrapbooking on 9x12 and 12x12.
And I will still do familyphotos 
But when I see a beautiful picture somewhere online I just scrap it .
No more bad feelings that it is not a keepsake.
I keep them for myself  , after all it is a hobby..

Enough  talking , here is my first layout


I can tell you how and what I did, but if you want to know.....
Here is the start to finish video. Which will show you the whole process.
Chipboard used: Serendipity title and grid pieces .

I hope you have time and fun to watch .


***********************

The second layout is also made with the Serendipity collection.
The background paper is called merriment.
Normaly I work many hours on a layout.
Well...working is a big word :) 
But I think  add something, drink coffee, add something, etc etc.
This layout ;  I cant believe I did it.....was made in one hour!!
It was difficult, to just add without thinking and not go through my stash for hours.
But I saw the sun going away , and I really wanted to make a bright picture for this post.
I am not comfortable to rush, but today it just worked out.

For both layouts I used the Serendipity words as a title.
All the color you see is done with bright Japanese watercolor.
On the title aswell .

I used it because watercolor dryes quick .
The flourish is the organic vine.
I had fun with this new collection.
Thanks for visiting the blog.

x Wilma x


Saturday, February 13, 2016

February Projects by Bec Genet

Hi everyone, today I'm here today with my February Shares. I've made layouts with the amazing my Blush and Timeless collection. 

Special


I used the new Blush collection for this layout. To start my layout I began my tearing the edge of the Reminisce paper from the Blush collection. I layered the torn edge under the paper as well as adding the border strip in too. I attached these layers to a strip of the Enamored paper to make a full 12x12 page. Next I took the rest of the Enamored paper to mat my photo.

To add details to the background I used the brick stamp from the Essential Textures Stamp set with the Cotton Candy embossing powder. I also used some modeling paste through a script stencil. 


I coloured all my chipboard with embossing powder on this layout, I used the Icicle embossing powder on the main part of Ruth's Doily and Cotton Candy on the centre piece of the doily, I used  Icicle again on the word 'Special' from the Perfect, Adorable, Special Word Set. And on the Flourish Medley I used Icicle, Cotton Candy and Honey.


I cut the Ruth's Doily into two pieces, one larger than the other. I tucked the larger piece under my photo and the small piece to the edge of the page, with the centre piece of the doily popped under the flowers on the side of the photo. Next I tucked the Flourish Medley under the other side of my photo to add interest to both sides of the photo. 
Finally I layered on all my embellishments, I used flowers, cheesecloth, resin pieces, buttons, pearls and vellum butterflies


Blue Fern Studios Products Used
Paper: Blush collection - Reminisce and Enamored 
Chipboard: Ruth's Doily, Flourish Medley, and Perfect, Adorable, Special Word Set.
Embossing Powder: Icicle, Cotton Candy and Honey
Stamps: Essential Textures Stamp

Adorable


For this layout I used the Fondness paper from the Blush Collection as my background paper, and a piece of the Sweetheart paper to back my photo.  


To my background I added some light pink stamping with the Weathered Doily Stamp, I put pink Gelatos through a flower stencil and then some white texture paste with a flourish stencil 


I embossed the chipboard word 'Adorable', from the Perfect, Adorable, Special word set with the embossing powders Buttercup and Cotton Candy. I coloured the chipboard pieces from the Bird Ornaments and the Leafy Rings (the large one in pack) with Gelatos 


I mounted my photo on cardboard to prop it up and layered flowers around my photo. I cut the Leafy Rings in half, one half went under the top corner of my photo, the other tucked under the flowers. I glued the on of the Bird Ornaments to the top of the page and added flowers down one side. For extra embellishing I used seam binding ribbon, pearls, resin and mini lace flowers


Blue Fern Studios Products Used
Paper: Blush Collection - Fondness and Sweetheart 
Chipboard: Bird Ornaments, Leafy Rings and Perfect, Adorable, Special word set 
Embossing Powder:  Buttercup and Cotton Candy
Stamps: Weathered Doily Stamp


Sassy


This layout was made using the February Sketch

I used the Timeless Collection on this layout, I chose the back side of the Calling Cards as my background paper, then I backed my photos on the Abode paper. 


On my background I used the Vintage Edges stamp set with the Iris embossing powder. Next I mixed modeling paste and a light beige mica powder to put through a flourish stencil. 


I used this same mix of paste and mica to cover the a piece from the Classic Ornaments set. I then went around the edges of the chipboard with brown ink before I tucked in between my paper layers. 
I covered the Deco Shelf chipboard piece with the embossing powder in Oatmeal, I tucked this under the bottom of my photos. Then I covered the chipboard word Sassy, from the Cute, Sweet, Sassy word set, with embossing powder in Garnet. 


 I added some flowers in coordinating colours, putting little peices of frayed cheesecloth amongst them. Finally I added a few vellum butterflies and pearls to complete the layout
 

Blue Fern Studio Products Used:
Paper: Timeless Collection - Calling Cards and Abode
Chipboard: Classic Ornaments, Deco Shelf  and Cute, Sweet, Sassy word set
Embossing Powder: Iris, Oatmeal and Garnet 
Stamps: Vintage Edges

Thanks for visiting today

Bec

Friday, February 12, 2016

February Inspiration with Sandi Clarkson!

"On the Road"

Hello, Blue Fern fans! Sandi here with you today sharing my February projects with 3 different collections. 
For this project, I've chosen the Serendipity range which works nicely with this particular photo of my daughter. As have several others, I've chosen Contemplation as my background layer. It seems to be quite popular! I really went to town on the mixed media with this one  .. it is hard to even see my stamping. 


The Swan Gate is a gorgeous piece of chipboard! I've used it here as a photo layer along with some random pieces of Calling Cards and Chronicle.  The gate was heat embossed with Ginger Embossing Powder with various intensity of heat so that some of the powder is not totally embossed. Then I went over the gate with Gold and Patina metallic rub medium.


Titles are hard for me, so I love that Blue Fern carries so many title pieces. This one was perfect! After I gessoed it to give it some tooth, I just did my favorite thing which is to ink them up! When I was completing my page, I added some copper glitter randomly over the page but made sure to give this title  some chunky love. 


Once again, I've merely gessoed and inked my chipboard piece, even making the little bird the same color as the branch. Then a fussy cut butterfly (Merriment) was added for more dimension and color. Right beneath this branch you can see some of my stamping. 


The B Side of the Chronicle paper is a beautiful damask look, while the A side provided fussy cut flowers. The little bird is from the Glee papers. A Calling Card makes a great title mat. 


A few more butterflies cut from the Merriment sheet finish things off. I've also tucked in an older flower from my stash that matched perfectly and provided some femininity to juxtaposition against the more grungy papers and textures. 


Just one more close-up of that gorgeous Swan Gate.
 A final splatter of white paint and this one was done! 

Blue Fern Studios Products used:
Paper:
Serendipity Glee,  Contemplation, Chronicle, Calling Cards and Merriment

Chipboard:
Swan Gate, Mystic Branch,  On the Road

Stamps:
Christmas Collage

Embossing Powder:
Ginger

***

"You are Unforgettable"

This project was a true labor of love. This 12x12 Butterfly Grid is a lot of chipboard! There are so many directions you could do with this one but I decided to add color. It didn't turn out quite like I imagined it but it was fun nonetheless. And I'm anxious to use this piece again. 
I've used the Timeless Main Street as my background and added Calling Cards for my photo layers. 


The Majestic Frame was embossed with a powder from my stash but the title piece was done with Blue Fern Ebony Embossing Powder. After that, I got to work on the butterflies using paints and then Mystic Plum and Iris Embossing Powders. 


Everything got a little white to paint to help with blending.


Gold and violet flowers were added, although the gold are looking a little orange-ish here,


You can see here that parts of the grid were cut away in the corners so that the paper floral design would show.  Also, some of the butterflies were cut to allow me to lift their wings.


A final side view.

Blue Fern Studios Products used:
Paper:
Timeless Main Street, Calling Cards

Chipboard:
Butterfly grid, You Are Unforgettable, Majestic frame

Embossing Powders:
Mystic Plum, Iris and Ebony

Mist:
Jingle Bells

***

"Dreams Come True"

You probably have already seen this project if you made it here for the February Sketch Challenge Post. This one was created with the Blush Collection which I have found so easy to scrap … my fave colors. The background was embossed with the Brocade Texture stamp and 14K Embossing Powder. I also did some other light stamping with the Forever stamp. Then lots and lots of layers from mostly torn paper but also plenty of fussy cut layers as well. 


I totally love the medley and ironworks type pieces. Here I've embossed the  Ironworks Medley piece with Copper Embossing Powder and then randomly smudged it with an antique gold and a patina wax metallic finish. I adore the look of patina on my chipboard pieces! You can also see the fussy cut florals I've tucked in as a layer. 


The Dreams come True title piece was embossed with the Fern color Embossing Powder and then I rubbed more of the antique gold metallic finish on it as well Dabbed it with white paint for a good shabby look! 


A few more fussy cut pieces from Cupid's Folly, a heart, florals and a wee butterfly. 


The embossed background looks so cool! I plan to do this again soon! The 14K just shimmers and the brocade stamp is the bomb!


A final shot to just show you some of the dimension on the page. 

Blue Fern Studios Products Used:
Paper:
Blush Celebration, Reminisce, Fondness, Cupid's Folly and Valentine Calling Cards

Chipboard:
Dreams Come True, Ironworks Medley

Embossing Powder:
Fern, 14 Karat and Copper

Stamps:
Brocade Texture, Forever

That wraps up my February projects. I am already working away on March.
Thank you so much for coming by the Blog today.

Remember that we are now on Instagram at @bluefernstudios and on Twitter @BlueFernStudios.
There are links on the side bar to all of our Social Media accounts.
See you next time!
Sandi