Tuesday, June 24, 2014

Ombre Dreams 3 Times

Hello  all Blue fern studios fans !

Today i have for You 3 Layouts on Ombre Dreams. The Latest paper collection from BFS.  I love them since first look . They are soft , pastel universal, thick and beautiful.

My first work is with Ginger's Dream and Susan's Dream . At first i prepared background with
City Map Panel and my mist sprays. I simply sprayed through the chipboard on regular white cardstock. I received interesting background - negative of my chipboard panel. Chiboard is still perfect to use.   I could use in the same work and get pattern and color match but i left it for another work ;)   Techno Rings fitted me perfectly in industrial background composition    At the end I used Captured Words as title of my work.


Second work is based on Susan's Dream. I made it with photo of my friend. Again I used chipboard to make some effects in background. They are lights and soft because the paper is so beautifull , soft and fitted amazingly to my work so i decided to not cover it too much.

I started with adding little bit of gesso through Circle Groups around my composition. I
used also Broken Rings, Seasonal Wildflowers,  and Picture Perfect,  as elements around the photo


This one is in violets and blues. little bit of messy with lot of stamping. Instead of photo I used here beautiful postcard . I use Charlotte's Dream as base of my project and as paper elements in composition I used Broken Rings and Dot Grid Panel as elements under my photo. And Dream Big as title to my work and ligtest element in the same time


Monday, June 23, 2014

New Products for June!

We're excited to reveal today our latest chipboard designs! We hope you like them!

Anchors Away

Birds on a Wire

Brick Rings

Brown Eyed Girl

Express Yourself

Grunge Shooting Stars

Seeing Stars

Ups and Downs Page Panel

Which ones do YOU love the most? We'd love to hear from you!

Sunday, June 22, 2014

'Best of times' by Lisa Griffith

Hello BFS fans! It's my turn to share my projects with you today.

I know you've seen by now the new 'Ombre Dreams'. I really love the rainbow of 
colors in this collection, and I also totally love how the BFS chipboard patterns are 
echoed very softly in these beautiful papers. I have enjoyed working with them so much.


In honour of Father's Day this month I wanted to create a lo with a photo of my Dad.
I found this photo of when my parents visited us when we were living on Miami Beach.
The photo was many years ago but I still remember everything we did that day ;)

Here are a few close ups....


I used the paper called 'Ginger's Dream' for my background, and pieces of 'Dream Cards'
as layers under my photo. I also used 'Turkish Panel' , 'Memory Frames' and a piece of 
'Sail Away' which I painted white and then sprayed lightly with colored mists.


My next project is a card I made for my mum using a photo of her when she was young.


I wanted to make her something really pink and shabby and the paper 'Shannon's 
Dream' was so perfect for this! I started with masking with gesso and then used 
pink and gold mists. I used some pieces of 'Quatrefoil Panel' which I painted white.


I hope I have inspired you a little today! 
Until next time, Lisa xo


Saturday, June 21, 2014

Ombre Dreams Projects - With Kelly Foster

Good morning!
Kelly here today. I have a layout and tag to share created with Ombre Dreams and some of the new chipboard designs!

"Remembering Special Moments"

For this one I paired the warm colors in my photo with the pretty orange and pinks in the "Shannon's Dream" paper. I applied all kinds of mixed media work to my background, followed by the "Wild Flourish Bundle" (cut in two and placed half in each cluster), and behind that, tucked in some of the "Mixed Chains".


All of the chipboard was first painted white, then colored with chalk inks, Inka Gold Metallic Rub, and lightly stamped.


Blue Fern Products:
Ombre Dreams "Shannon's Dream"
Ombre Dreams "Dream Cards"
Wild Flourish Bundle
Mixed Chains

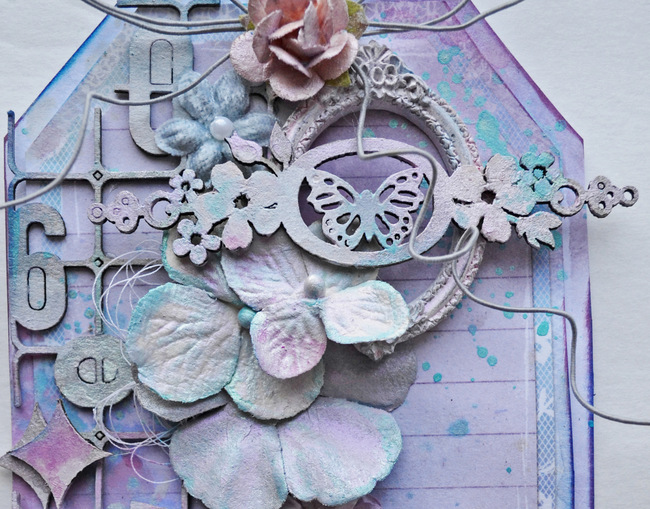
"Be Free" Tag
For my tag base, I cut the tag shape from one of the "Dream Cards" and layered it over a piece of "Joyce's Dream" and cut around it. I cut a piece of the Number Grid - Small, and first painted it with Primary Elements Artist Pigments mixed with a clear glaze. Atop that, I painted with Silks in various colors, then adhered to my tag.


 I applied the same paints to one of the Spring Trinkets, and the little diamond pieces are off cuts from one of the panels. Everything was given a bit more color with watercolor paints and mist splatters.

Blue Fern products:
Ombre Dreams "Dream Cards"
Ombre Dreams "Joyce's Dream"
Number Grid - Small
Spring Trinkets
Blue Fern Bits

Thank you so much for taking a look today! I hope you are enjoying the Ombre Dreams collection as much as I am :)

*Kelly*


Friday, June 20, 2014

Ombre Dreams projects with Rae

Hello all! It's Rae sharing some projects I've made using the amazing new paper line, Ombre Dreams. I have to say that I LOVE this paper so much!


"Dreams Come True" Layout


This is my layout based on the June sketch. 


I used the "Dream Cards" paper to make the title. I wanted to use this piece of the "Layering Stems" set  in this flower cluster, but I only had ONE! What's a girl to do? Well, I soaked that piece in water for a few minutes, then peeled the layers, and got three pieces out of it! This is a great way to get a lighter look with chipboard, and let it flow and give a little different kind of dimension. After the pieces dried, I painted them with green paint and added some darker green ink for a realistic look.


I primed the "Renaissance Border" with gesso, and added some purple microbeads while the gesso was still wet. The beads only stuck in some places, and gives it a unique look. After the gesso was dry, I misted the whole piece with some peach colored mist.


I added a a "Royal Page Bauble" that I painted gold using distress stain.


 "Wonder" Layout


 I adore cemetery statues! I found this picture on Reddit, and there was no photographer listed to give credit to, but MAN! What an amazing photo! I printed it out some time ago, and it seemed to fit so well with the "Ginger's Dream" paper. 


I painted the "Ginger's Poppies" pieces with gesso, then added some green watercolor for the leaves and stems, then added some watered down Izink to the flowers, which resisted in some spots- AWESOME!
 Here's the other poppy.


One of the layers behind the photo is the "Grand Garden Gate." I used a combination of distress stains, distress inks, and chalk inks to get this patina look. 


"All You Need is Love" Layout


This is one of my favorite pictures of me and my son. I've made a few layouts with this picture before, but my family has taken them! This one is just for me. 


Again, I primed the "Small Circle Flourish" with gesso and painted the leaves and flowers with some green and purple mists to give a watercolor look. Then, I added some flowers. See that heart lock? I cut that from one of the "Romantic Page Dangles" and colored it with silver Izink and grey chalk ink.


Here I cut up more "Romantic Page Dangles" so I could use the chains to accent the larger chain which is from the "Page Chains" set, and used the same products I did on the heart lock. 

The key is from the "Vintage Keys" set. I lightly scraped black archival ink over the key. 

Thanks for having a look at my pages using Ombre Dreams! Have a great day!


Rae

Wednesday, June 18, 2014

Journaling Yourself- By Keren Tamir


Keren here and its my turn again on the Blue Fern Studios blog.
This month my reveal is all about me, how I feel, my thoughts and memories of this time of my life as I'm approaching 40. I had to jot down some of my thoughts and feelings so I can one day look back and remember them. I guess this is what scrapbooking is all about. I always thought I should scrapbook for my kids so they can have these memories in the future. However I actually think that I am scrapbooking for myself, so when I'm old and gray (LOL) I can look back and remember how I felt or how I looked. That is if I can find these layouts amidst the hundreds of boxes I will have by then.

"Happy"


 I've used the new and amazing Ombré Dreams collection for both layouts today. It is such a gorgeous collection and so versatile. I just love it so much and its perfect for my style.


I framed my photo in the new Wildflower chipboard frame. I painted in purple and turquoise to match the colours of the papers. 


I used a few of the layering stems and the tweet friends branch to layer in between the flowers. I also painted them in purple and turquoise. 


Finally I used pieces of the graduated circles and the happy title from the optimist word set to finish the page.


<<<<<<<<<<<<<<>>>>>>>>>>>>>>>

"Believe"


Here is my second layout this month and it also about me but with my new haircut.
I recently cut my hair short so I can donate it. I figured I should also record this episode in my life as I very seldomly journal about myself. I think it happens about once a year so at least now I have two layouts showing my Before and After pictures of my hair.


I have a how to video on how I create this layout here below so I won't go into a lot of specific details and just watch the video.


Thank you so much for visiting the Blue Fern blog today!!
Have a wonderful day!!

Keren

Tuesday, June 17, 2014

Orchid, Lilac, and Yellow


Joyce  here today to share some projects using the Ombre Dreams paper collection, and some chipboard too.  This paper collection has a color for everyone, and for me it’s the orchid, lilac and yellow colors.
Here’s a layout using the Juliana’s Dream  paper featuring the colors of orchid and yellow. The Quatrefoil Panel chipboard was used as a stencil in the background  to add some texture, layering, to further blend the colors together, and grounding the softness of the colors with a hint of charcoal mist. 


 Close ups of the Bohemian Butterfly, and the Grande Cage:


And, here’s a little card featuring a piece of Juliana’s Dream paper and the Jeweled Page Dangle chipboard piece. I first applied gesso to the chipboard piece and was going to leave it as it was because it looked nice on the card that way too.  But, then that inner voice that whispers in my ear, “embellish, embellish, embellish” whenever I work with chipboard just kept getting louder until I succumbed and agreed that I couldn’t just leave it as  it was. It is a very small piece but the design is so exquisite and the dropped baubles required some dimension. Apply some molding paste to those focal points on chipboard to create dimension.  Here there are three values of the color yellow to add some shadow and more interest on each bauble. Try it… I think you will be pleased with the results.


Aren’t those daisies cute?  They are also elements from the Jeweled Page Dangle.  Paint them white, and follow the design of the petals with a water color pencil then add some color mist inside the watercolor pencil petal.  I would love to see more of these small daisy flowers in the Blue Fern Studios store (hint, hint, ;), they’re great little fillers.
Thanks for letting me share my projects with you.
See you on July 17th.