Wednesday, June 22, 2016

Attic Charm Inspirations with Video Tutorial by Marilyn

Hi everyone! It's Marilyn here with you today to share two projects and a video tutorial with the  new beautiful Attic Charm collection.
I worked with the Attic Charm-Haberdashery , Calling Cards and the Spring Posy papers.I gave different techniques to the Spring Posy paper that you can watch all the process in the video tutorial.  I painted and embossed the new Crackle Bites and the Happy word chipboards with a mix of Buttercup with Pearl embossing powders.

I cut out and distressed one of the cards from the Calling Card paper.

I highlighted the title (Happy, Heart, Love chipboard) tracing it with a distress marker. .

I used the Attic Charm- Daisies and the Glitter Roses.

Blue Fern supplies:
Attic Charm collection: Spring Posy, Calling Cards and  Haberdashery papers.
Chipboards:  Crackle Bits, Happy, Heart, Love
Flowers: Attic Charm Glitter Roses, Attic Charm Daisies
Embossing powder: Buttercup, Pearl
Stamp:Forever


Here's the Video Tutorial,take a cup of coffee or tea, sit relax and enjoy it!! :)


 "I LOVE YOU MORE"
My second project is inspired on the June sketch challenge. The paper are the Attic Charm- Curio and the Calling cards papers, the flowers-Daisies are from the same collection and the little ones are the Courtship blooms.

I framed the photo with the Shrine Frame chipboard that I embossed with Antique Gold embossing powder. 

I also embossed the title with the antique gold embossing powder  that is the "I Love You More" chipboard.


I added pieces of the Crackle Bits chipboard around the flowers and the card.

Blue Fern Products:
Attic Charm collection: Daisies and Glitter Roses
Curio and Calling Cards papers
chipboards: Shrine Frame, Crackle Bits, I Love You More
Embossing Powder: Antique Gold


Thanks for stopping by...until next time!
Marilyn Rivera


Sunday, June 19, 2016

June Inspiration with Karolina

Hi Blue Fern Studio's fans! It's Karolina here. Today I would like to show you my June's projects I made using our latest collection Attic Charm.

Paris Paris

Let's start with my first layout with beautiful view of the Paris and Eiffel tower. 


I started my work on the choice of photo and paper... It's always a most difficult step of the work ;) 
When I was planning my composition I realized I would like to add something interesting accent on my background. So I took another paper I tore it to the stripe. Then I put everything together and I knew it was a very good idea. I added some chipboard pieces, some flowers and medias and that' all! I really like this page, hope you too :)


I covered all  chipboards (except a frame) with using metallic paint in a copper color. A frame I covered with using a turquoise chalk ink.


Papers: Calling Cards, Curio, Generation, Sachet, Haberdashery, Spring Posy
Chipboard: Film Strips, Memory frames, Petite Boutique Frames
Stamps: Forever, 

Capture the moment


My second layout is definitely in a marine style. The idea for this work was born a year ago, but I was waiting for a good opportunity ;) First I used a clear gesso on my based paper, then I took unprimed canvas and cut out the sail. I built my whole composition on the top of the sail and I added some marine embellishments like a chain, steering wheels, a net. Finally I added a title using beautiful chipboard - "Capture the Moment". I covered a chipboards with using "seven seas" embossing powder. So everything is matching perfectly ;)


Papers: Curio, Generation, Sachet, Haberdashery, Spring Posy
Chipboard: Capture Words
Embossing powder: Seven Seas
Glitter: Caribbean, Gulf Coast
Stamps: Forever, Halftone,

Wedding cards

Attic Charm collection is very soft and romantic so it will be perfect for all you shabby projects. I prapered two very delicate cards for a wedding to show you how beautiful these papers are. I hope I succeeded.


Papers: Curio, Sachet, Mercantile, Calling Cards, Haberdashery, Spring Posy


Thanks for visiting the blog, see you soon in July!
Karolina

Saturday, June 18, 2016

Around the World with Blue Fern Studios- by Keren Tamir


Hi Everyone,
Its Keren here with a different type of blog post today!!!

Ever wonder where Blue Fern Studios' products are used? except for the US, where it is manufactured, Blue Fern Studios products travel to many places around the world.

Recently I had the pleasure of teaching this layout class below in Quito, Ecuador.
I have some photos below depicting my experience!!
I've also taught the same layout last year in San Jose, Costa Rica and so I'm sharing both events with you today as Blue Fern Studios travels to Central and South America!!

Enjoy!!


For the classes in Ecuador I used the Courtship Lane papers as the original ones were sold out. The Blue Fern Studios papers match so well with each other that it wasn't a problem switching these around.
The Blue Fern Studios chipboard pieces used for this layout were: Majestic Frame, Flutter Dangles and two special words "Momentos Especiales" designed just for us in Spanish.
I also used the Blue Fern Studios embossing powders to emboss the chipboard.

Here I am below explaining some components of the class.


Everyone is busy concentrating on their work. I love seeing my students working hard as it makes the final result so much more rewarding!!


Selfie with Isela the owner as everyone is working behind us!!


Look at the beautiful creations. Each one more beautiful than the next!!


<<<<<<>>>>>>

Below are the pictures of my event from last October in Costa Rica.
It was an amazing event as well and everyone loved the Blue Fern Studios products.
Below is the same layout class as above but with a different paper collection for the background.
The other components remained the same.


Everyone working hard!!!!


Here are the beautiful creations!! look at all the Blue Fern Studios loveliness.


Thank you so much for visiting the Blue Fern Studios blog!!
Hope you enjoyed this blog post!!
Have a wonderful day!!

Keren

Friday, June 17, 2016

June Social Media Feature and YOU!

We are so excited to bring you today's Social Media Feature! 
We have some great projects created by YOU, the end user of our products. 

And guess what?!! We crossed over the 1000 followers mark on our Instagram account and couldn't be more ecstatic! Thank you so much! It happened pretty organically and we are pleased about that. Not a follower yet? Here's a LINK for you. 

Of course, we are always on the "lookout" for YOUR creations on social media and love seeing your work! Facebook, Instagram, Twitter, YouTube, Blogs and even online galleries. Keep posting! It inspires all of us, especially here at Blue Fern Studios. 

Now are you ready to see some gorgeous projects? 


 First up is this sweet layout by Mei of Japan that we found on Instagram. Our Blush paper collection has been hugely popular for it's great color palette, vintage design and amazing fussy cutting potential. 
We love Mei's adorable double photo technique and floral clusters.
You can see more of her work on Instagram where her user name is @meikkmei92. 


We found this beauty by Barbara Kind, a Brazilian living in New Jersey, USA, on Instagram as well. 
Then we made a visit to her website and were blown away by her beautiful work. Here she has made the Ombre collection really come alive. Ombre is still a fave for many of us and we hoard it to use on our projects. Barbara's Instagram user name is @babikindl. Please leave her some comments there. 


An online scrapbooking retailer posted this lovely layout by Anita of the United Kingdom. We tracked down her Blog where she explains exactly how she created this layout using our Serendipity paper collection and several of our chipboard pieces, Berry Stems and Romantic Page Dangle. We hope to see more of her work soon! 


Katja Mezzanotte posts her creations on Social Media with some frequency and we were drawn to a recent project also using Serendipity. But as we perused her Instagram account at @mezzanotteskapar,
we fell in love with this gorgeous layout featuring the Autumn Anthology collection. The clean lines and oversized peek-a-boos draws the eye straight to her great photo. You can visit her blog on the link. 


  Tomomi Hiramaru is known as @tomomitti1117 on Instagram. She blogs at Her Blog, Happy Croppy where we hope you'll visit her. On this layout, she has combined some Serendipity papers with a Blush Calling Card and created the perfect scene for her sweet photo. Lots of great detail to enjoy on this one!  Especially that banner! 


We always like to bring you something "different" on Social Media Feature day. So, today we're sharing this altered book page that Kimiemin posted on Instagram as @montblanc3hamster. She did a beautiful job of fussy cutting the Blush collection and arranging her images to create a unique way to display her photo. Kimiemin has a website you can visit at Audrey Smile


Lastly, Mariko Hisazumi of Japan posted this glorious project on her  Blog, Pinterest and on Instagram at 
@yakmari. Even with her bold title, she still managed to use two photos, a note card and a few subtitles. The die cuts and florals definitely add a delicate touch. Her papers are from Serendipity, using the Merriment sheet as her background. 

So …. that wraps it up for today! 
Regardless of which Social Media outlet is your favorite, remember to tag us so that it will draw our attention. We would love to feature YOU on our blog!
Have fun creating! 

New products are coming SOON! 

Thursday, June 16, 2016

A Mini Album And A Layout by Maja

Hello everyone, welcome to the Blue Fern Studios blog!

Today I'd like to share some projects I made using our two latest collections, Tranquility and Attic Charm. I warn you, it's a lengthy post, so grab your favourite beverage and sit comfortably :-)
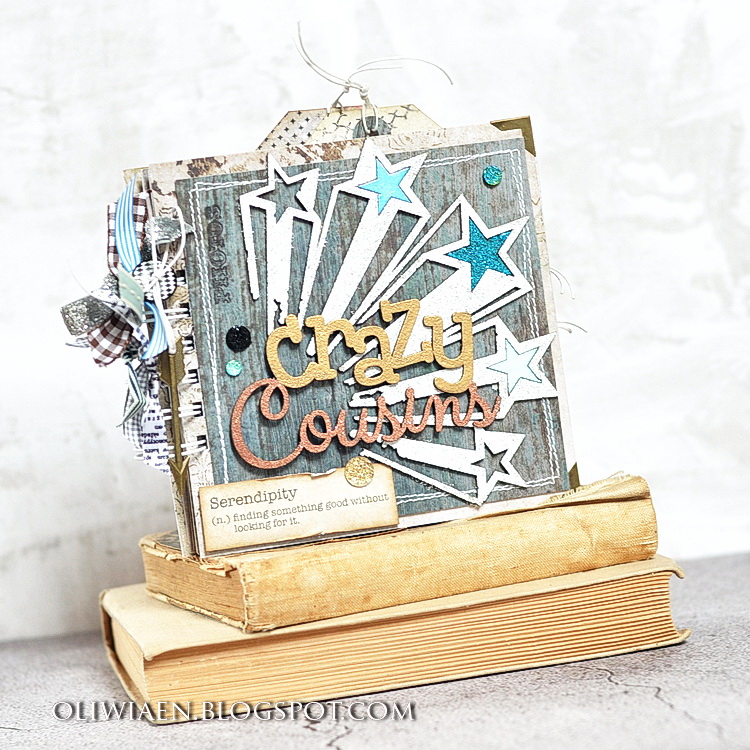
Let's begin with a mini album I made. It's been based upon the Tranquility collection, though has little to do with tranquility as such ;-) The very title says it all:


All the pages are made the same way: half of a sheet folded in two for greater sturdiness. For the pages I used the Serenity and Stillness sheets. The covers (made from the Blissful paper) are further strengthened with pieces of the Calm paper machine-sewed around.
I made the title of the mini by combining the Shooting Stars piece with the Crazy Cousins piece. I embossed the former with Icicle, Breeze, Cerulean and Azure eps (I removed two stars and left the three to symbolise the three boys :) ), and the latter with Ginger and Copper eps. I added the stamped word "Photos" and the definition of serendipity from the Serendipity Calling Cards sheet:


Each page features a photo/photos, some stamps and chipboard pieces.
The inner cover is decorated with one of the Captured Words embossed with Oatmeal (as are the bricks), a stamped vintage camera and a Serendipity Calling Cards tag for some jounraling. The first page is stamped with a Forever chain motif and decorated with the word Fun: I embossed the outline with Ebony ep and the inside letters with Breeze first, then re-heated it a little for the powder to become sticky again and sprinkled some Azure glittery bits. That resulted in a nice vintage look:


I stamped the next page with the banner motif from teh Flight & Flair stamp set and added the Arrow Word Friends embossed with Breeze and Mushroom eps and a Cogs&Gears piece embossed with Copper ep - love that glittery shine :-) Then I added an extra page with an Attic Charm tag and a metal key charm:


The other side of the extra page is for journaling: I stamped its edge with a partially inked Making Plans stamp and added an Arrow Word embossed with 14 Karat ep (did I mention I love that glittery shine? ;-)) The next page refers to the quotation from the front side of the extra page - I added the Laugh Loud piece. I embossed the "Laugh" with 14 Karat ep and the "loud" with Oatmeal. The stamps in the background come from the Essential Textures and Photography sets.


The next two pages include stamps from Halftone and Postal Textures sets. On the left page I used the Heads Up! piece from the Optimist Word Set and embossed it with In The Navy, Ginger and Celestial eps for a varied look. I also added a Directions arrow embossed with 14 Karat. The Grunge Word on the next page is embossed with Mushroom ep. If you heat it a little more after it melts, the light particles come up and you get a really nice weathered look.


As the album is small, it needs some space for the journaling. These two pages are also pockets that contain tags I cut out from the Contentment sheet and decorated with quotations from the Serendipity Calling Cards paper:


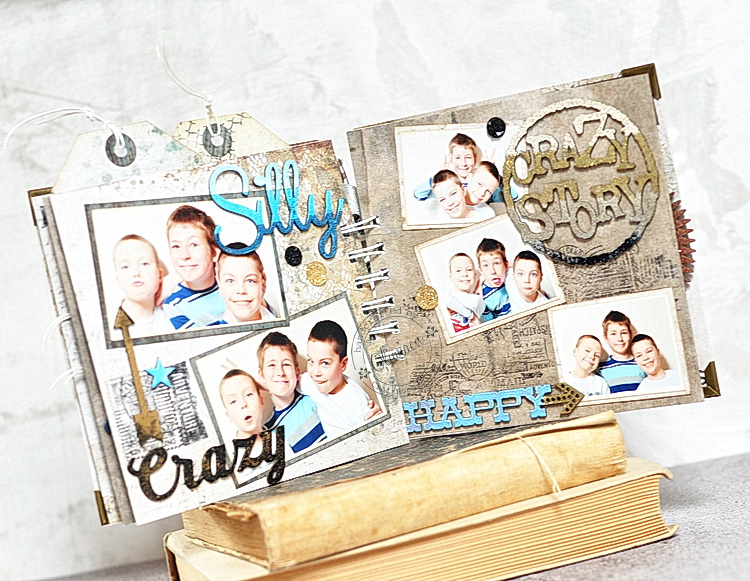
Now the mini's getting really crazy ;-) I stamped the bacgrounds with Journey and Postal Textures stamps and added some chippies. I embossed the Crazy word with Ebony and then sprinkled it with 14 Karat, and the arrow above it - just the opposite :-) The Silly word and Crazy Story from Grunge Talk are embossed to get an ombre effect - that quite easy, I just covered parts of the pieces with washi tape, ink with an embossing ink, embossed with powder and then repeated with darker shades. I used Breeze, Cerulean and In The Navy for Silly and Oatmeal, 14 Karat, Mushroom and Ebony for the circle. I also added the Happy word embossed with Cerulean and 14 Karat:


The last pages feature the Deja Vu, widgets and Journey stamps, Chunky Words embossed with ginger ep and another Grungy Talk piece covered with Copper ep. The tag for journaling is decorated with an Attic Charm Calling Cards quotation.


Crazy Cousins:
Papers: Tranquility: Peaceful, Blissful, Contentment, Stillness, Calm, Patience, Serenity; Serendipity: Calling Cards; Attic Charm: Calling Cards
Chipboard: Grunge Shooting Stars, Grunge Talk, Crazy Cousins, Crazy, Silly, Fun!, Blue Fern Bits/Shabby Brick Panel, Arrow Words, Laugh Loud, Captured Words, Chunky Words, Cogs&Gears, The Optimist Word Set, Directions
EP: Mushroom, In The Navy, Cerulean, Azure, Bonny Blue, 14 Karat, Ebony, Oatmeal, Ginger, Breeze, Copper, Icicle, Celestial
Stamps: Halftone, Journey, Making Plans, Deja Vu, Flight & Flair, Forever, Photography, Postal Textures, Widgets, Essential Textures


Are you still here? :-) Then take a look at the layout you might have seen already if you visited our challenge post! As usually, I followed the June sketch quite faithfully and created this light, cheerful page using the latest Attic Charm collection:


I first stamped a border around the page using Halftone stamps and added a small Dreamy stamp too:


I included the same quotation tag as represented in the sketch and added some glittery roses and daisies from the collection flower sets.


The photo is mounted on a small Splattered Circles frame that I embossed with three eps. I also added some more flowers:


I coloured the Crackle Bits piece with a light teal mist that coordinates with the pastel colours of the papers:


 I hope you join in the fun! :-)

Care:
Papers: Attic Charm: Curio, Calling Cards, Generation
Chipboard: Crackle Bits, Splattered Circles
Stamps: Dreamy, Halftone,
Flowers: Attic Charm Glitter Roses, Attic Charm Daisies
EP: Breeze, 14 Karat, Cerulean

That's all from me for June, thank you for visiting and keep dropping by for some more inspiration from my talented DT friends!

see you, 
Maja