Thursday, April 25, 2013

Three projects with Irina Gerschuk

Hi ladies!
It's Irina with you today and I'm really excited to share my new projects!
My first project is a LO "Blooming Beauty" about my little sister. It tells a short "family story" about our walk in the woods one hot summer day:
And let me show you some close-ups:
I covered the title "Blooming Beauty" with two different colors of paints then added a layer of crackle accent and after all covered it spontaneously with microbeads:
Here is one more closer look at the title, and under the rose is a piece from the Ornate Medallions set:
Well, here are three different pieces of BFS: Symphony border (also painted with different colors and than added microbeads), Evening Lamp Post (I covered it with white embossing powder) and parts from the Garden Window (again painted with different paints and after it added a layer of glance lacquer):
 The same window but from the other angle (just want to show you all the painting and volume here))):
And here are the pieces of BFS that I've used in the LO:
Garden Window (Model: 074691):
Garden Window
Symphony Border (Model: 074530):
Symphony Border
Evening Lamp Post (Model: 074660):
Evening Lamp Post
Ornate Medallions (Model: 074462):
Ornate Medallions
Blooming Beauty (Model: 074554):
Blooming Beauty
My next project is a birthday card. I used the Calligraphic Border and Damask Flourish in it:
Some close-ups:
The Damask Flourish I covered with two different kinds of paints (choosing colors that match the palette of the card) and than added a thick layer of crackle accent:
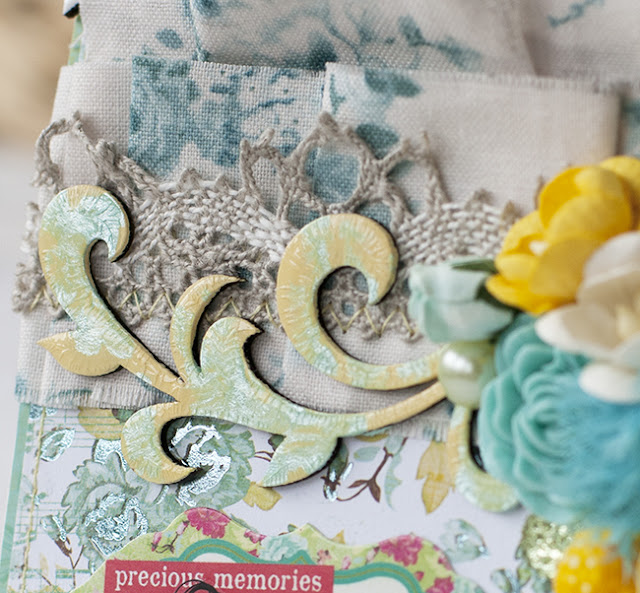
 I added a flower composition on top of it to achieve more volume and details here:
 And here is one of my favorite pieces of BFS - the Calligraphic Border. As to me it's stylish, elegant and so universal that can match almost very work))) I covered it with white embossing powder:
And here are the pieces I've used:
Damask Flourish (Model: 074868):
Damask Flourish (2)
Calligraphic Border (Model: 074363):
Calligraphic Border
My last project for today is a soft handmade notebook made from stitch:
I've used a piece from the Double-Dutch Flourish Set here:
 Covered the chipboard with lavender paint and than with white crackle paint:

And here is the BFS piece by itself:
Double-Dutch Flourish Set (Model: 074431):
Double-Dutch Flourish Set
That's all for today!
Thanks for stopping by!

Tuesday, April 23, 2013

Two layouts and a Tag from Irene


Hello everyone! First of all, I would like to share a layout which I've created based on this month's sketch challenge.


I've painted the Blue Fern Studio's floral clock with some black acrylic paint and detailed it with some metal embellishments, flowers and pearls.


Here is a picture of the chipboard piece used:

Floral Clock


My second project is a tag.


I've used a couple of feminine chipboard sets on this tag.


I've painted the mirror with white and later brush a thin layer of glitter on top of it. As for the dress form, I've painted it with black and deco with a small lace flower.


On the perfume bottles, I've painted them with dimensional paint and later covered them with stickers and glossy accents.

Here are the chipboard used:

Miss Tailor Set

Vanity Set

My last project for this month is another layout.


Here are some close-ups on the chipboard used.


All the chipboard pieces on this layout are misted with paints and later paint over with some dimensional paints.

Here are the chipboard pieces used:

Brigitte Butterfly Set

Floral Clock


Garden Daisies - Large


Garden Daisies - Small


Hope you all like all these projects. Happy scrapping!


Sunday, April 21, 2013

Blue Fern Studios Design Team Call!

It's hard to believe, but it's already time for a design team call at Blue Fern Studios! Wow, did this first six-month term go by fast!

We realize that the first six months is not yet complete, but we need to have the next team ready for July reveals. If you would like to be a part of a fast-growing company and would love to create with our high-quality chipboard products, then this is the team for you!

We are looking to add a handful of designers to our team and once again, we are seeking out those who specialize in either cards/tags, altered projects, mixed media, and layouts encompassing all styles. We are also interested in acquiring a video instructor! If you feel that you would be a good fit for any of these categories, we would love to review your application!

To Apply:

Please email the following information to submissions@bluefernstudios.com. Please be sure to include "Design Team Application" in your subject. Application deadline is May 10th, 2013 at Midnight US EST.

Full Name
E-Mail Address
Country
Blog Link
List of Current Design Teams
Links to Current Online Galleries
(3) Projects that best showcase your style (preferably using chipboard,
but not required).

Please resize to 650 pixels.

If selected, successful applicants will serve a 6 month term, creating (3) projects per month and will be compensated with a substantial selection of our products. New designers will be notified once selection
is complete, and the new design team will be officially announced May 14th, 2013 on the Blue Fern Studios blog.

We look forward to reviewing your applications, and wish you the best of luck!

Friday, April 19, 2013

Playing Dress Up - with the Blue Fern Studios


Happy Friday.  Jennifer Snyder here today to show you how I dressed up some Blue Fern chippies.


Playing Dress Up
This first layout is just dressing up the gorgeous ornate Blue Fern Sweetheart Dressform.  I painted it with some pale yellow acrylic paint and adorned it with gold tulle.  I wanted to emulate the tulle or georgette dress in the vintage photo.

Sweetheart Dressform Model 074574

I topped the neckline with glitter glue.  


Here are some of the simple flowers I made to look like the simple flowers in the patterned paper. 


Our Special Day
This is my next piece featuring a few different pieces of Blue Fern.

I used the Heart Set, which is so elegant and exquisite.  They can easily be tucked into clusters or featured on their own.  They can be layered or stand strong as individual pieces.   

These are the Blue Fern Studios pieces I used:
Heart Set Model: 074417

I have found the Cupids to be the perfect size for any reason and not just Valentines Day. 

 Valentine Cupids Model: 074769

I painted my chipboard with gesso to prime them.  They don't need priming, but I wanted them light because I was going to be painting them with a pale pink.  A nice base coat of  white creates a clean finished look for what I was trying to present.  

I then painted the hearts with light pink acrylic.  After they dried, I dabbed here and there with clear glossy paint and sprinkled with micro beads.  I also used some lace to back one of the hearts. 

After the hearts were dry, I rubbed some gold leaf wax on the edges of the chipboard and all over the page. 


 This beautiful ornate heart has a little white acrylic dabbed here and there to soften a bit.  The design is just so striking.   You can see how the gold leaf wax ( Rub N Buff) just adds a little extra elegance to the heart. 

Here is my darling little Cupid of love. He is sitting top one of the Blue Fern Hearts.  This heart has lace on the front of it. 

The Cupid is covered in chunky embossing enamel  and both heart and cupid have a little Rub N Buff on them also.  

You can also see the generous coating of Rub N Buff on the paper. 


Thanks so very much for stopping at Blue Fern Studios.