Monday, July 7, 2014

July projects from Camilla

Hi! Camilla here with a layout and a card. For both projects I have used papers from the Ombré Dreams collection.

When I made the layout I created the background by using Color Blooms, masks, stamps and texture paste. Then I added some paper layers underneath the photos and then some flowers and chipboards. The chipboards are painted with white gesso, then I used a script stamp before I inked with fluid ink chalk in blue.


Here is a close-up of the Blue Fern Flourish:


And the By the Sea chipboard:


And finally the Checker Bits:


This is the card. The chipboards are painted in white gesso with a hint of orange in it. Then I stamped with a script stamp.


The chipboards I have used are Lace Rounds and Wild Flourish Bundle.


Thanks for looking!

Saturday, July 5, 2014

June Sketch Challenge WINNER & Top 3 Features!

Good morning and welcome to our very special day where we finally get to reveal to you the LUCKY winner of our amazing prize pack for last month's sketch challenge! And of course we get to boast a few features too! 

So if you're ready, then let's get to it- no more waiting, right?!

First, our fabulous winner of THIS:


...


Congrats to Candy Cheeply!!!!!
Please e-mail me {erin@bluefernstudios.com} within 7 days to claim your prize!!

~*~

Now, our ever-talented Top 3 Features:


Thank-you for your beautiful work, ladies!!

And to every one of you talented individuals who took part in our sketch challenge last month, THANK-YOU!! You make our job VERY difficult when it comes time to thinning out the Top 3. So keep at it- we LOVE your work, your kind words of support, and the enthusiasm toward our products!

Have a wonderful weekend :)

Thursday, July 3, 2014

Layout and a tag...

 Lisa here today, bringing you 2 more projects using Ombre Dreams and wonderful chipboard from Blue Fern Studios.The Ombre Dreams papers are so versatile. Although they are all watercolor pastel colors, you can dress them up in vibrant colors and it still wont take away from the beauty of the papers. To prepare my layout, I used 2 different papers from the collection. I mounted them on cardboard after using a border punch for the paper in the middle. I used molding paste and a mask for the background.


   The small Circle Flourish Frame is BIG in design.There are so many different ways to adorn your chipboard. I used Lindys Flat Magicals to color all of my pieces, including my die cut leaves, and the spatters on the layout. I added a few pearls and gems to the middles of my flowers on the Circle Flourish piece. I touched it here and there with some clear crackle medium for texture.


 For the Bohemian Butterflies, I primed them with white gesso, and after they dried, painted them with the Magicals in 2 colors. Then added pearls to their antennae.


My next project is a tag I created with the cutout pieces from my 12x12 layout above. I used 2 layers and did some machine sewing around the edges before putting them together. One they were layered, I used gesso and a mask on the tag and did some spattering with the Magicals.


I used one piece  from the Romantic Page Dangles Set. I just created this one simple by adding some flowers and leaves. I colored some cream colored seam binding ribbon with Lindys Stamp Gang Starburst Sprays in 2 colors. a


For the Romantic Page Dangle, I heat embossed it using Lindys Embossing powder in Aurora Amethyst. Then just added a few pearls to finish the piece.


Thank you for joining me today. Don't forget to check out our July Sketch Challenge for a chance to win some beautiful BFS chipboard!!


Wednesday, July 2, 2014

An education video tutorial

Hello lovely readers!

So excited to be back in today to share a video I created for Blue Fern Studios. Do you know that BFS has a dedicated YouTube channel, packed full of inspiration and clever ways to use your chipboards and papers?

I made a hanging for my front door for this video. We used to have a welcome wreath but that one didn't last. Sifting through my Blue Fern stash, I was thinking just how perfect the Circle Flourish would be as a wreath, or on a round canvas and that was how this was born.


some close-ups:


Love the floral design on the flourish.


I've had the Grande Garden Gate for awhile but couldn't seem to find a use for it on layouts. But for this hanging, it's the perfect addition.


And every house must have a window (at least in mine, many big windows!). This is a piece from the petite window set.

Blue Fern products used:

Circle Flourish (large)
Grande Garden Gate
Petite Windows set

Here's the video on how I put together this canvas, and the various ways I altered the chipboard. Have fun watching, and remember to subscribe to the Blue Fern Studios channel to get first-hand update on more inspirational tutorials from the DT!


love,
Jelissa

Tuesday, July 1, 2014

July Sketch Challenge!

Good morning and welcome to a new month! We've got you covered for starting it off right with some creative encouragement with a brand new sketch designed by Michele Singh:

July Sketch

And sit back for this...we have a TON of inspiration for you from the design team!...

Camilla Ekman

Jackie Clark

Jelissa Mei

Joyce Lawrence

Kelly Foster

Keren Tamir

Leila Cardoso

Lisa Gregory

Lisa Griffith

Patter Cross

Valerie Serfozo

Yuko Tanaka
And we have a brand NEW batch of goodies for you too- including some of our NEWEST designs, hot off the press! Take a look at what one lucky randomly drawn winning participant will win from this month's sketch challenge:


In addition to our prize winner, we will also select a Top 3 to feature in our winner post!
 
We have just a few simple rules to follow if you would like to participate in our sketch challenge:
1.) Feel free to interpret the sketch as you please by means of taking it as-is or flipping/turning/mirroring it to suit your needs! **Please note that you can do whatever type of project you please- a layout, card, tag, canvas, altered item- whatever suits your mood and style! We would love to see the different ways our sketch can be used.**

2.) You must use at least one piece of Blue Fern Studios chipboard OR use Blue Fern Studios paper on your project. Please note that you do not need to use the pieces featured in the sketch- use whatever suits your fancy! You can find the store nearest you HERE. {Do not use any other brand of chipboard on your project please!}

3.) Upload your project using the Inlinkz tool below by midnight EST on July 31st, 2014.
We look forward to your entries!


Monday, June 30, 2014

End of the Month INSPIRATION!

If you're feeling the need for a little inspiration as we close out yet another month, never fear: Our team has exactly what you need! For some, they are inspired by color....others texture... for some it's a particular photo...or perhaps the embellishments? Or some paint? Whatever turns your head and gets those wheels turning, these designers have got you covered!

Here are some projects that are sure to spark some creativity in your day today...

Jelissa Mei

Joyce Lawrence

Kelly Foster

Keren Tamir

Lisa Gregory

Marie-Josee Hamel

Patter Cross

Are you feeling a little motivated now?? We sure hope so!  

We are always aiming to be your one stop shop for inspiration :)

Thank-you for giving us a visit today!

Sunday, June 29, 2014

Layouts of Love with Patter

Hello Blue Fern Studio fans! It's the 29th so it's time for me to share my June creations with you.

I Love You More
For my first 8 1/2 x 11 layout, I used a photo of two of my daughters that I took while we were on vacation in May. As a family, we say "I Love You More" a lot to each other. I felt that this photograph looked like a time they would be saying that to each other. The Blue Fern chipboard title "I Love You More" was perfect for the page. I also used the Blue Fern Garden Parlour papers.

To color the chipboard, I coated it in white gesso. While it was still wet, I spritz on several different mist colors then let dry. Some of the color pooled in some areas but I liked that because of the effect it gave the chipboard.

And notice below how I left the branding strip on at the bottom of the patterned paper. The branding strip contains the paper name, UPC code, etc. Sometimes I cut them off, sometimes I leave them on the paper as I did here, and sometimes I use the strips on cards and layouts. On the far left hand side, you can still kind of see the word "garden" at the bottom. I covered it mostly in modeling paste but still some showed through which is fine. Don't be afraid to keep those branding strips on your pages! Have fun with them.
Blue Fern Studios products used:
Blue Fern Garden Parlour paper
I Love You More chipboard
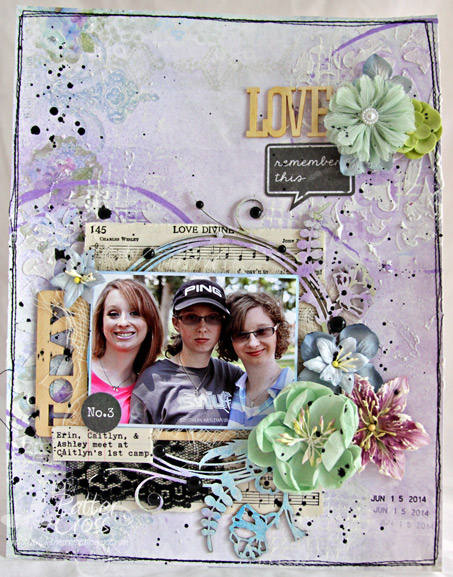
Love Remember
For this 8 1/2 x 11 layout, I used the new Ombre Dreams Joyce's Dream paper. I also used the beautiful chipboard piece called Circle Flourish Small.

To color the chipboard, I coated it in white gesso and let it dry. I then used a paint brush to paint on several different mist colors. By using a paint brush I was able to control where the colors went and how dark they appeared.
Blue Fern Studios products used:
Ombre Dreams Joyce's Dream paper
Circle Flourish Small chipboard

Sketch Layout
And this is my 8 1/2 x 11 layout I created using the June sketch challenge. If you haven't joined in the fun yet, there still is time. Click here to see the details and join in!

This layout is of myself and my oldest daughter (by a minute) and uses Ombre Dreams Shannon's Dream and Julianna's Dream papers. I also used the Heart Borders and Techno Rings chipboard pieces.

To color these chipboard pieces, I again painted each piece with gesso. After the chipboard was dry, I used mists and acrylic paints to achieve the various effects.

Blue Fern Studios products used:
Ombre Dreams Shannon's Dream paper
Ombre Dreams Julianna's Dream paper
Heart Borders chipboard
Techno Rings chipboard

Thanks for joining me today! See you again in July! Blessings,