Showing posts with label The Optimist Word Set. Show all posts

Monday, February 8, 2016

February Inspiration by Debbie

Hi everyone!  Debbie here with you today.  I have 3 layouts to share that I created with the Blush and Timeless paper collections, along another one featuring the new Serendipity paper collection.  Lots to share so this will be a lengthy post.  The new Serendipity collection was introduced  last month along with new chipboard, glitter and embossing powders.  Here is what I created with the Serendipity papers.
Serendipity is a gorgeous collection!  Love the vintage look, details and colors.  Here I've used the Chronicle paper for my background.  I applied some masking, misting using the Imagine Ink Sky and Winter Mint Mists along with the Arcadia Textures and Romantic Accent stamps and paint splatters. I used the Reminisce and Calling Cards papers to layer under my photo.

I used two chipboard pieces here.  The new Swan Gate along with the Swirly Circle.  Both were embossed with Oatmeal and Sea Mist embossing powders.  I then randomly added some paint and micro beads.

My title Dream Big is from The Optimist Word Set.  I first painted the words and then sprinkled on some Cranberry Glitter.

Blue Fern Studios Supplies
Paper:  Serendipity
Chronicle, Reminisce, Calling Cards

Chipboard:
Swan Gate
Swirly Circle
Dream Big

Imagine Ink Embossing Powder:
Oatmeal, Sea Mist

Imagine Ink Glitter:
Cranberry

Imagine Ink Mists:
Sky
Winter Mint

Stamps:
Arcadia Textures
Romantic Accents

The next layout was created using the Blush Collection.
The background paper is Key To My Heart.  The colors and details on the paper are beautiful! I applied masking, misting with Imagine Ink Cotton Candy Mist, stamping with Romantic Accents and Texture Circles to the background.  Layers of papers under my photo include Callings Cards and Cupids Folly.

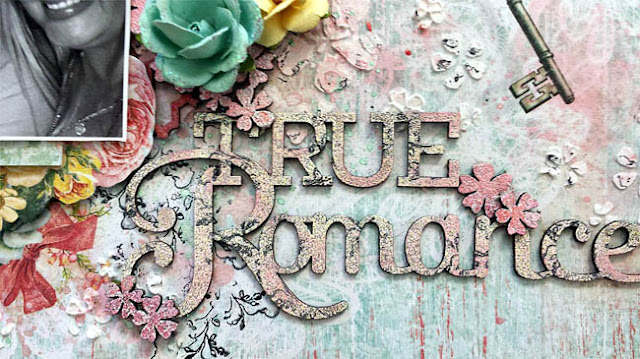
The True Romance chipboard was embossed with a mixture of  Pearl and Cotton Candy embossing powders, then lightly stamped with the Romantic Accents stamp.  I used the Floral Heats chipboard which I cut apart and embossed with Cotton Candy and added pink paint.  The flowers from the Floral Hearts are placed randomly on my layout.

Both sides of the photo include pieces of the Floral Hearts chipboard and Turkish Bits chipboard which I colored with gelatos and misted with Imagine Ink Persimmon Mist.

Blue Fern Studios Supplies
Paper:  Blush
Key To My Heart, Cupids Folly, Calling Cards

Chipboard:
True Romance
Floral Hearts
Turkish Buts

Imagine Ink Embossing Powder:
Cotton Candy
Pearl

Imagine Ink Mists:
Cotton Candy

Stamps:
Texture Circles
Romantic Accents

My final two layouts were created with the vintage Timeless collection.
My background paper is Song "Side B".  Lots of masking, misting and stamping using the Arcadia Textures, Forever, Romantic Accents, Shabby Edges and Vintage Edges stamps along with some embossing with Honey and Sage Imagine Ink Embossing Powders.  Lots of layering under a treasured photo, my dad on the right using Keepsakes and Calling Cards paper.

I used the Chelsea Medallion and Damask Panel  chipboard which I embossed with Oatmeal and Sage embossing powders.

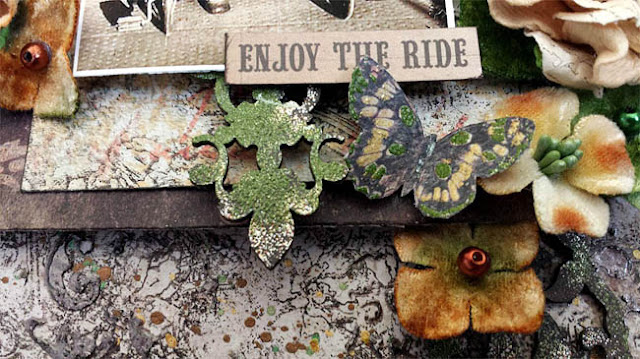
The butterfly was cut from the Papillions paper and embossed with the Honey and Sage embossing powders.

Blue Fern Studios Supplies
Paper:  Timeless
Song, Keepsakes, Calling Cards

Chipboard:
Chelsea Medallion
Damask Panel

Imagine Ink Embossing Powder:
Honey
Sage
Oatmeal

Stamps:
Arcadia Textures
Romantic Accents
Forever
Shabby Edges
Vintage Edges

My final layout featuring the Timeless Collection was created for the February sketch challenge.
I used side B of the Freedom paper for the background, with some masking, paint splatters and stamping using the Romantic Accents and Dreamy stamps.

The Tattered Butterfly chipboard was embossed with Iris, Pearl and Buttercup embossing powders.

Beneath my flower clusters I used the Blooming Foliage chipboard which I covered with some brown texture paste and added some Pyrite Glitter.

The title Timeless was embossed with Iris, Pearl and Buttercup embossing powders and lightly stamped.

Blue Fern Studios Supplies
Paper:  Timeless
Freedom, Keepsakes, Papillons

Chipboard:
Timeless
Tattered Butterfly
Blooming Foliage

Imagine Ink Embossing Powder:
Iris
Pearl
Buttercup

Stamps:
Romantic Accents
Dreamy

There is still plenty of time to enter our February sketch challenge.  Michelle Singh has created a beautiful sketch for you to use.

For more details and inspiration from the DT please click here.

I hope I have inspired you today with my layouts.

Thanks for stopping by!
. . . Debbie

Tuesday, January 19, 2016

My first projects for Blue Fern Studios - Karolina Czajkowska

Hi everyone! I am so excited to be here today with my first projects for Blue Fern Studios. 
Such an honor and a pleasure to be able to be a part of this fantastic team!


First, let me introduce myself. It's the most difficult moment, because I'm not really good in talking about myself. My name is Karolina Czajkowska and I live in Poland in one of the biggest city Łódź. I'm 26 and I'm an architect. I finished my study 1,5 year ago. 

I started my scrapbooking adventure 4 years ago and definitely it was a love at the first sight ;)
Scrapbooking is a huge part of my life, and it is more than a hobby by now. I can't imagine my day without scrapping and I am very sad when life and obligations do not allow me to go to my crafty space. One year ago I started to lead classes in Poland and abroad and I do love it! I think I'm mixed media girl. I'm pretty sure that this is the best way for me to find myself and my own style. And what my style is?
I still don't know, but defenitely it's not a clean&simple style ;)

You can find me on:

I created 2 layouts and a winter canvas to share with you today:


Layout "Delightful love"

My first layout is very soft and girly, I think. In the picture you can see two little ladies - my goddaugters. They are so cute, aren't they?


This page based on paper from the Love Story collection. I started my work of covering the entire background under my composition with using clear gesso. Then I made a composition using papers from Déjà Vu collection and of course I added some chipboard pieces.


I chose three chipboards - this one which you can see in the background its's a smaller piece of the Quatrefoil panel. First I used it like a stencil and then I covered it using mists and water paints in pink, lavender and warm beige colors.


I covered two smaller chipboards, a frame with "Love" inscription and "Delightful", using two embossing powders - very soft Cotton Candy and more contrasty Mystic Plum.


In the next step I added some flowers and embellishments of course, to make my projects and a composition richer. Then I added some color mists with paintbrush around my composition. Finally I decided to stamp a background a little bit.

Blue Fern Studios Products Used:

Papers: Love Story collection - The Grand Ball, Déjà Vu collection - Petites Cartes and La Plume

Chipboard: Quatrefoil Panel, The optimist word set, Memory frames

Embossing Powders: Cotton Candy, Mystic Plum

Stamps: Essential Texture 


Layout "Happy Way"

My second layout is defenitely more colorful with a lot of my favourite turquoise. I like to treat layouts a little bit like art journal pages - I mean: telling some story, capturing thoughts and feelings, not only pictures and memories.


I really like to create layouts on the dark background - this makes the colors "explode". This time I chose a beautiful paper in the deep navy blue color from the Sanctuary collection. I love a pattern of this paper. I prepared a photo and then I knew which colors I had to use. I have combined papers from two different collections - Ombre Dreams and Frolic and when I decided where my composition will be, I covered this area with gesso. I also used a modeling paste and stencils. In the next step I reached for a stamp with text and a pearl embossing powder. I wanted to connect it to the pattern from a basic paper.


On my layout you can find two chipboard pieces - the smallest circle from Beaded Strings set and beautiful Ironworks medley. Both of them I covered with a lot of different embossing powders to make a colorful embellishments, matching to my vision of this project. Then I added some light turquoise paint on all gaps.


After adding flowers and color mists around my composition, I stamped again using two stamps sets - this time with a black ink.


Blue Fern Studios Products Used:

Papers: Sanctuary collection: Bountiful, Frolic collection - Petits Moments and Friendship, Ombre Dreams collection - Dream Cards
Chipboard: Beaded strings, Ironworks medley
Embossing Powders: Garnet, Heavenly, Fern, Azure, Mystic Plum, Iris, Honey,
Glitter: Caribbean
Stamps: Essential Texture, Halftone

"Winter time"

My third project, which I would like to share with you today is a winter canvas. I know that Christmas time is gone, but we still have winter and maybe it's not my favourite season, but I really like winter projects!


In the background you can see old book pages. I really like this vintage effect. The next layer is a little piece from the Mini rings panel. I sprayed it with a dark brown mist and arranged it in such a way as to stick out from both sides of my composition. Next I built a very dimensional composition with papers from three different collections Déjà Vu, Autumn Anthology, Paisley & Vine and chipboard frame.


On the close-ups you can see all shades of my frame. First I covered frame with gesso and next I mixed gesso with a blue pigment and with using sponge I started to dabbed on blue accents.
I also added some stamps.


Smaller flakes I covered with white acrylic ink to make a very shiny surface. Then I added some translucent glitter. As a result, my project is more sparkling.


In the background you can also find some stamps and little black dots.


And finally a deer - this handsome gentelman would be a main point of my canvas. First I treated a chipboard with white gesso and then I distressed the edges.

Blue Fern Studios Products Used:

Papers: Déjà Vu collection - La Plume, Autumn Anthology collection - Mercantile, Paisley & Vine collection - Vineland
Chipboard: Winter Deer, Snowflake frame, Shabby flakes, Mini rings panel
Stamps: Essential Texture


I hope I have inspired you today. See you next time :)

Hugs,
Karolina

Saturday, January 16, 2016

January Inspiration by Maja Nowak

Hello there, Blue Fern Studios Fans :) I'm so excited to be sharing my first post as a DT member!


My name is Maja Nowak (Oliwiaen in the Internet), I live in Poland with my university-sweetheart husband and our two sons. I started scrapbooking in 2008 and, although I have always been crafting (drawing, painting, cross-stiching and decoupage), scrapbooking seems to have taken my whole heart (and time!). 
My style is mostly romantic and shabby chic. But being a mom of two growing up boys who are almost always present in my layouts, I sometimes create something more modern too :-) You can see my work on my blog (where you will find links to my Scrapbook.com and Pinterest galleries too).
I love Blue Fern Studios products: thick papers with beautiful designs, varied chipboard pieces and most gorgeous vintage stamp images! I'm really happy to be working with such quality products. So let me show you what I used them for in my first projects :)


I have created three layouts for January. You might have noticed the first one, as it was presented among fantastic samples by my DT friends with our January sketch challenge reveal :) I went for my favourite teal tones combined with golden and white accents to scrapbook a photo of my darling elder son:


I like to follow a sketch as closely as possible, and so I did for our challenge too. For the background I layered papers from the Paisley&Vine collection and added some elements I cut out from the Frolic collection:


Among other embellishments I used this cute chipboard arrow that I covered with 14 Karat embossing powder - I'm simply in love with this one, the best golden metallic/glittery golden ep I've ever used! Forgive me if I use it in every project of mine ;)


In my title piece I first covered the chipboard with Oatmeal ep and then sprinkled some 14 Karat here and there to get this effect:


I hope you'd join in the fun and share your interpretations of the sketch too :)

Dream Big:
Papers: Paisley & Vine: Nature, Deja Vu: Atelier, Frolic: Dans Le Jardin, Calling Cards
Chipboard: The Optimist Word Set, Directions
Embossing powder: Karat, Oatmeal


My second project is a layout that was inspired by... the piece of chipboard I used for my title: We're All Mad Here ;) I reminded me of the Alice in Wonderland style and I immediately thought the Blush collection and of those crazy photos of my sons and their cousins :) Together they resulted in a funny whimsical page that I had a true fun making!


For the background I used the Charmed paper, then I cut out the flowery frame from the Fondness sheet and layered it on top.


 I also cut the key image from the Key To My Heart paper and added it below my photos:


And then I used scraps of those papers to mat my photos and to stamp some images onto :) I stamped two balloon images, decorated them with liquid pearls, glitter and flowers and mounted on 3D dots:


As for the title piece, I decorated it with embossing powders and did that in stages: I first covered each word separately with embossing ink reinker (of course, you can use an embossing pen that I don't have ;)) and heat-embossed it with a different colour ep before going on to the next word:


We're All Mad Here:
Papers: Blush: Fondness, Charmed, Key to My Heart, Reminisce
Chipboard: We're All Made Here, Directions
Embossing powder: Buttercup, Karat, Petal, Fern
Stamps: Flight & Flair, Journey, Photography, Deja Vu


And finally the third layout I made using the beautiful Timeless collection: you should have seen me choosing the papers! I couldn't decide for ages, they're all so beautiful :) In the end I decided on gray tones and here's the result, with my shiny boys in the photo ;)


I distressed the edges of the Artistique and Papillons papers and layered them together. Then I added some stamping in the background:


I cut out some tags from the Keepsakes sheet and matted my photo.


I covered the title chipboard piece with the 14 Karat ep (told you, I love it!)...


...while for the "industrial" pieces from the Cogs&Gears and Working Parts sets I used a custom mixture of the Poinsettia, Cerulean, Icicle and Ebony powders. I took a pinch of each (a really tiny amount, together they gave me enough to emboss all the parts and still more than a half was left for future use. If you wish to mix several powders, I'd recommend taking small amounts and as you add more colours, emboss on some spare scrap of paper to check the result.) I mixed the powders well on a scrap of paper and after embossing my pieces I got this really natural rusty-patined but still metallic shiny look of old metal pieces.


I also added a real vintage watchface and a key charm to my page. Then I tucked in a couple of mini roses here and there - I think they go well with all those "masculine" elements ;)


You Shine:
Papers: Timeless: Artistique, Papillons, Keepsakes
Chipboard: Working Parts, The Optimist Word Set, Cogs & Gears
Embossing powder: 14 Karat, Poinsettia, Cerulean, Icicle, Ebony.
Stamps: Deja Vu, Essential Textures.

Thank you so much for visiting the Blue Fern Studios blog today - see you later!

Maja

Thursday, June 11, 2015

Inspired by Elena Morgun

Hello, friends!
It's Elena Morgun here today. Glad to see you here, I hope you are having great sunny days!
Today I'll be inspiring you with the layout and step-by-step video tutorial, and mixed media canvas.

"Happy" layout

For the background I used a paper from Love Story Collection. I love this kind of papers! Wonderful background to make a photo stand out. This shot was made while my kids were going crazy:) It's very difficult to take a photo with both of them, but I am trying my best.
All the details of creation process you can watch in step-by-step video tutorial.
Enjoy!

A few details:
Blue Fern Products Used:
Paper
- Love Story: The Grand Ball
- Déjà Vu: Tresors

Chipboard
- Ginger's Poppies
- Postage Frames
- The Optimist Word Set

Stamp
- Journey
- Forever
- Halftone
- Texture 1
- Widgets


The second project for today is the mixed media canvas.
I created the background with the help of paper scraps, adding texture paste, stamping and spraying. Oh, I how I enjoyed playing with colors and textures!
Canvas turned out quite dimensional. I think, it's going to look nice on the wall.
A few details:
Blue Fern Products Used:
Paper
- Déjà Vu

Chipboard
- Postage Frames
- The Optimist Word Set
- Rings Panel

Stamp
- Journey
- Texture 1


Hugs,
Elena Morgun