Showing posts with label Organic Vine. Show all posts

Friday, April 8, 2016

April Inspiration With Debbie

Hi everyone!  Debbie here with you today.    It's hard to believe that Spring is here.  It's been roller coaster of a ride with the temperatures.  One day in the 70's and the next day in the 40's.  I'm anxious to get outside and start prepping my flower beds, but I guess I am going to have to wait.  Hopefully next week it will warm up.  In the meantime, cooler temps makes for more scrappy time!  Today I have three  layouts to share created with the  Courtship Lane and Serendipity collections. 
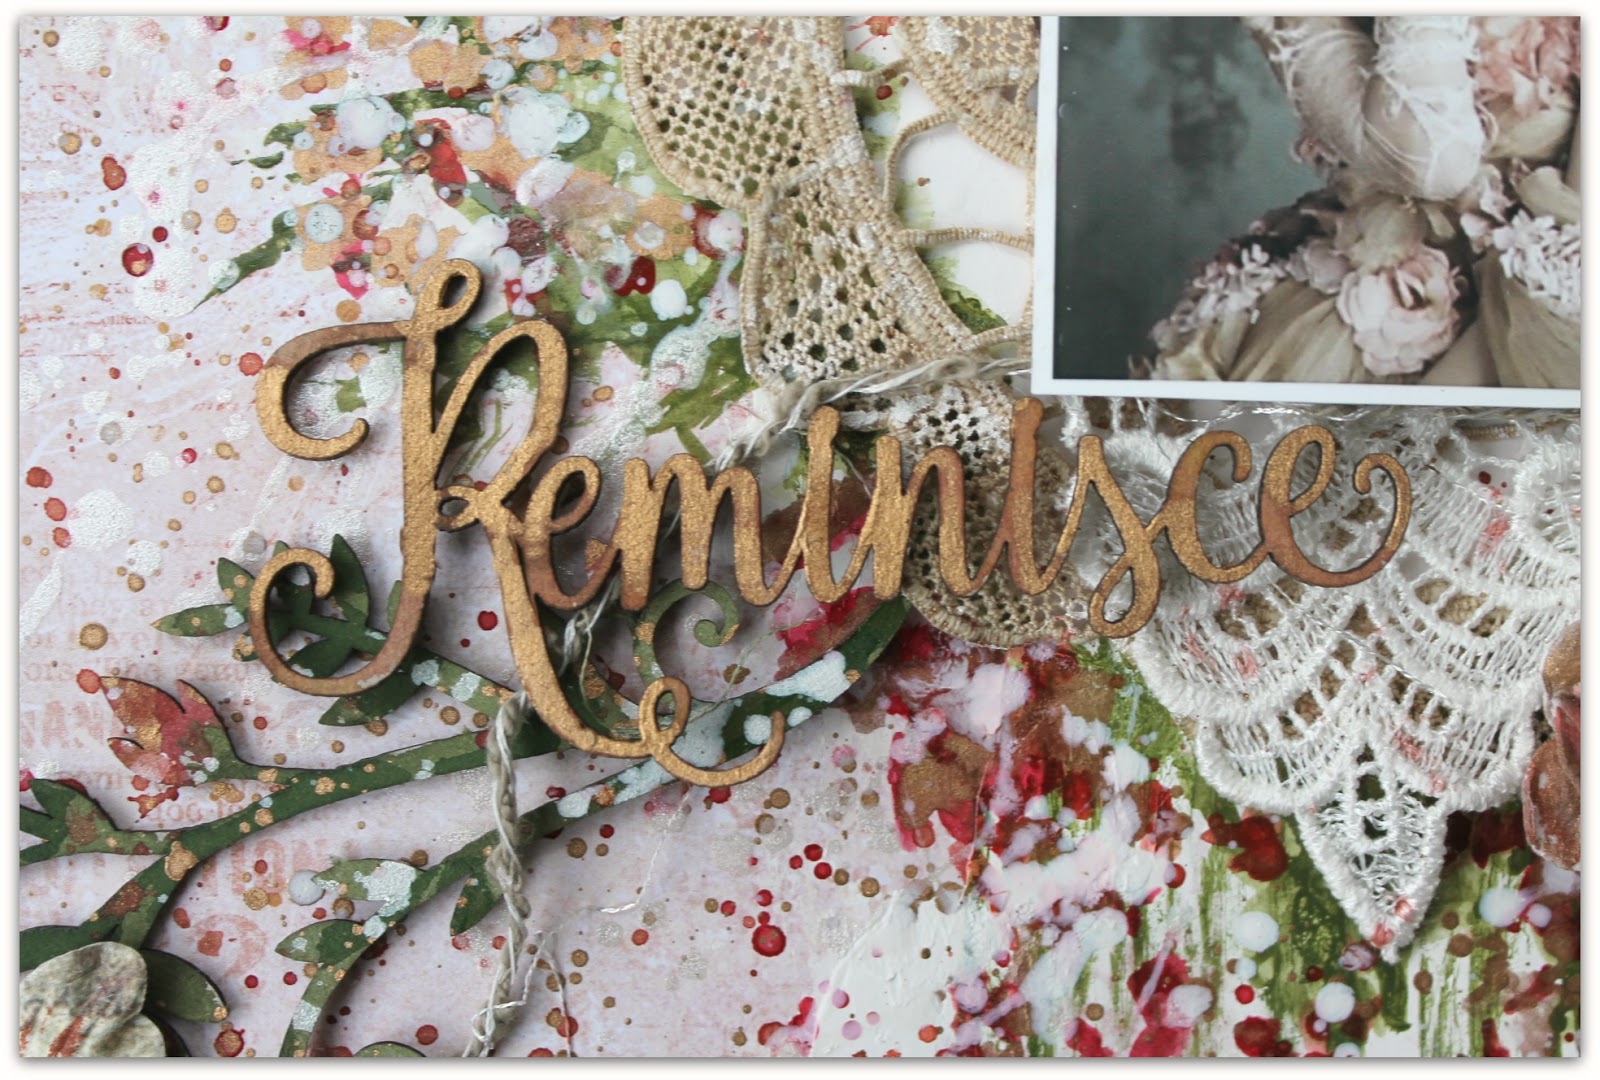
 My first layout features papers from the Serendipity collection.   I used the Contemplation paper for the background and added some random stamping with the Arcadia Textures and Dreamy stamps.  The layers under the photo are from Calling Cards, Glee and Merriment. I also added flowers from the Courtship Blooms.

I took the Rose Collage chipboard and cut it in half.  I stamped it with some dark red and brown ink and then applied some Tattered Rose distress stain.  I then randomly applied  Dusty Rose Glitter. 


 Here you can see some of the Courtship Bloom flowers.  I added some Turkish Panel Chipboard pieces which I treated in the same fashion as the Rose Collage.

My title Anticipation is from the Serendipity Words 1.  To the right of the picture is the other half of the Rose Collage.


Blue Fern Studios Supplies
Paper:  Serendipity
Contemplation, Calling Cards
Glee, Merriment

Chipboard:
Serendipity Words 1
Rose Collage
Turkish Panel

Imagine Ink Glitter:
Dusty Rose

Flowers:
Courtship Blooms

Stamps:
Brocade Textures, Romantic Textures

My next layout features papers and flowers from Courtship Lane and a treasured family photo.  I used side B of Bourbon Avenue for the background.  Some random stamping with the Brocade Texture and Romantic Textures stamps and some light masking.  Lots and lots of fussy cutting to add multiple layers under my photo.  I used the Main Street, Concert Hall and Calling Cards papers.  Scattered about you will find flowers from Courtship Roses and Courtship Blooms.


On both sides of my layout I used Organic Vine Corner chipboard which I embossed with Lilac and White embossing powers.  Tucked beneath the photo are pieces from the Spring Trinkets chipboard which I embossed with White and Fuchsia embossing powders.

The title was embossed with a mixture of White, Fuchsia and Mystic Plum Embossing Powders.

Blue Fern Studios Supplies
Paper:  Courtship Lane
Bourbon Avenue, Main Street,
Concert Hall, Calling Cards

Chipboard:
Spring Trinkets
Organic Vine Corner
Everlasting Love

Imagine Ink Embossing Powder:
Lilac
Fuchsia

Flowers:
Courtship Blooms
Courtship Roses

Stamps:
Brocade Textures, Romantic Textures

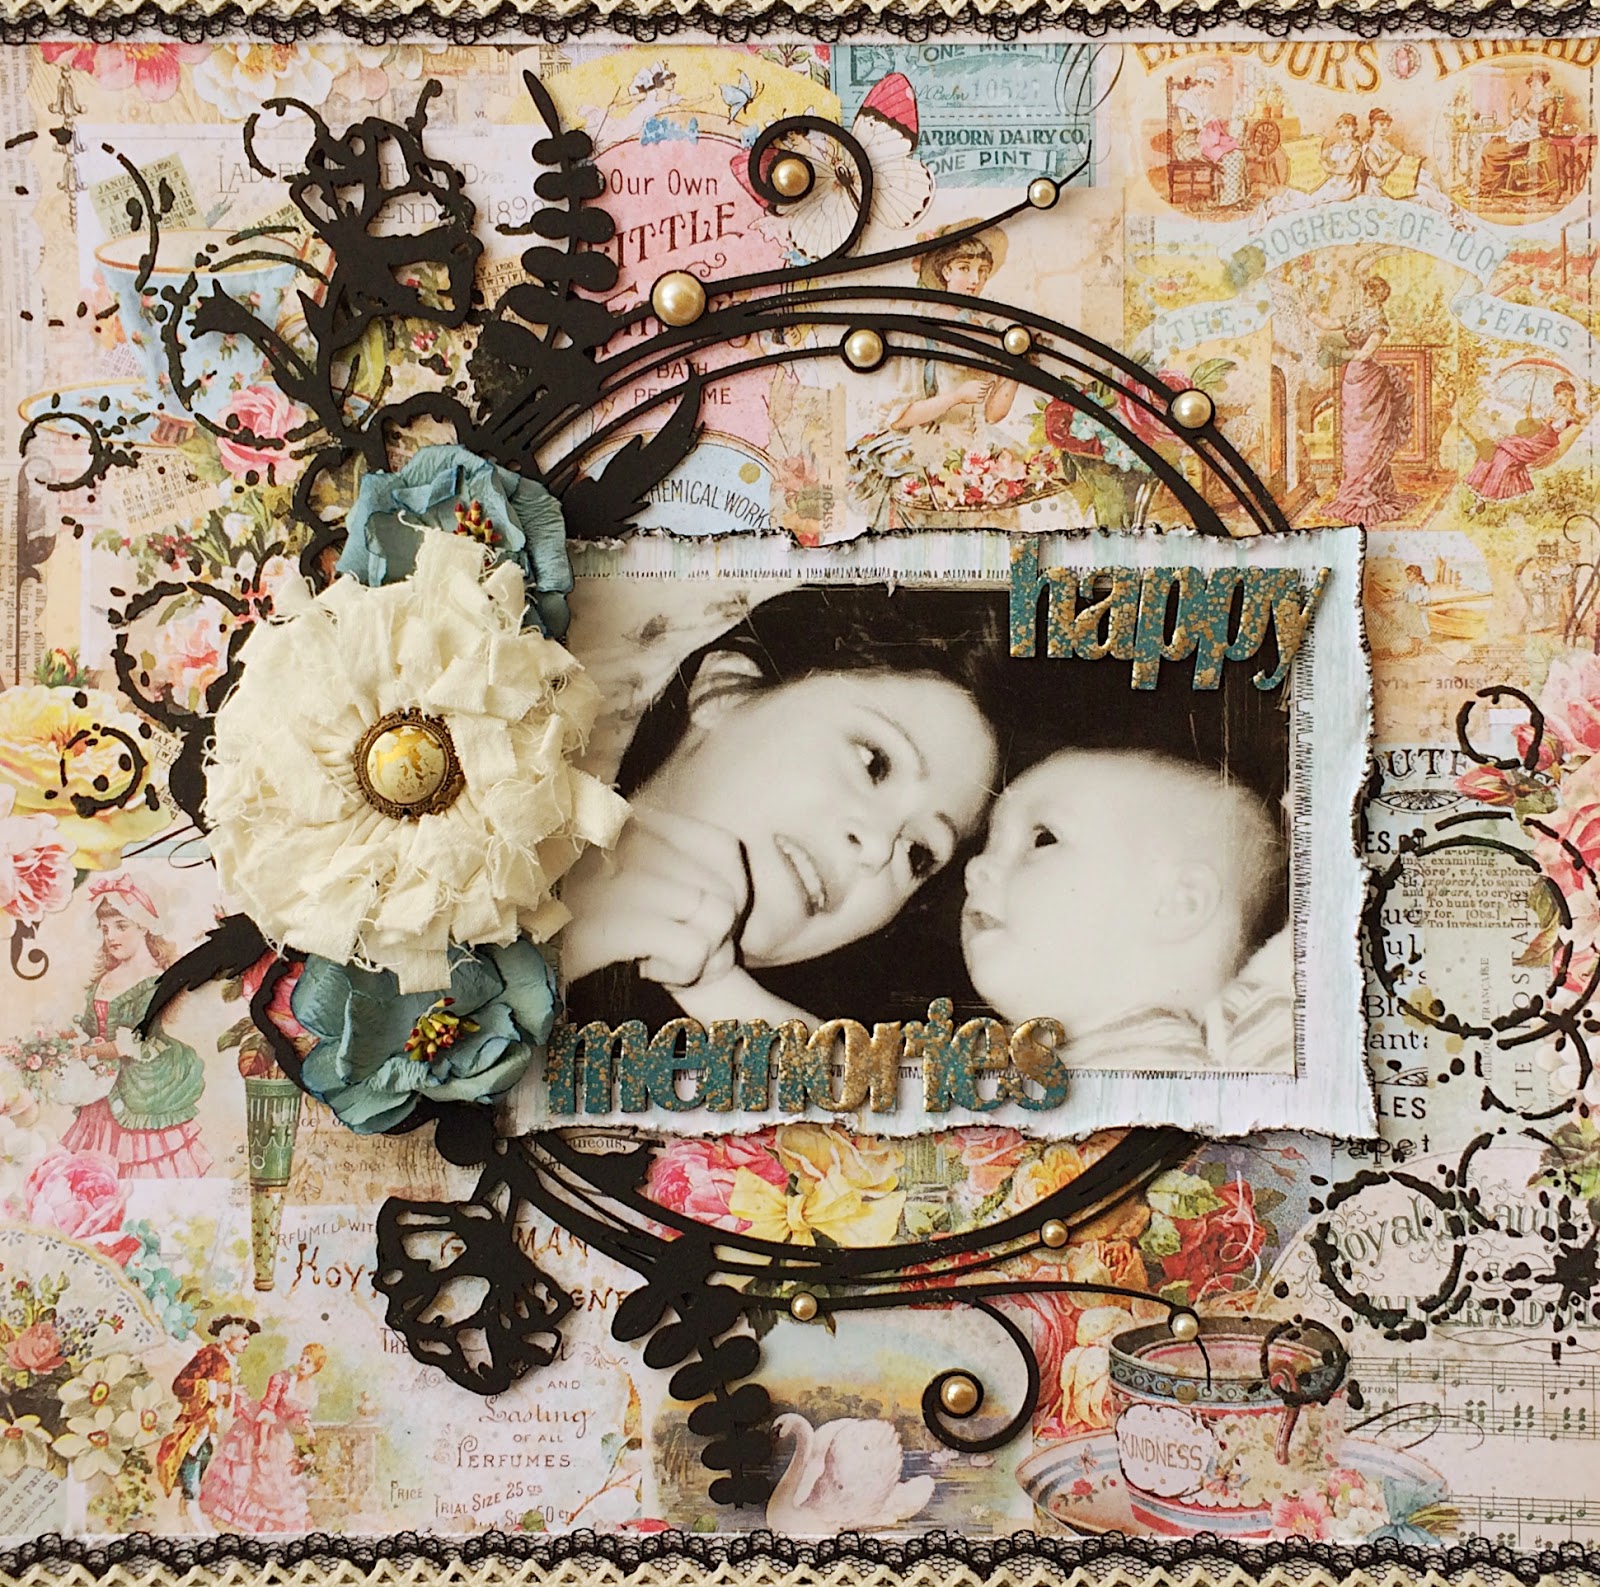
My final layout was created for the April Sketch Challenge.  

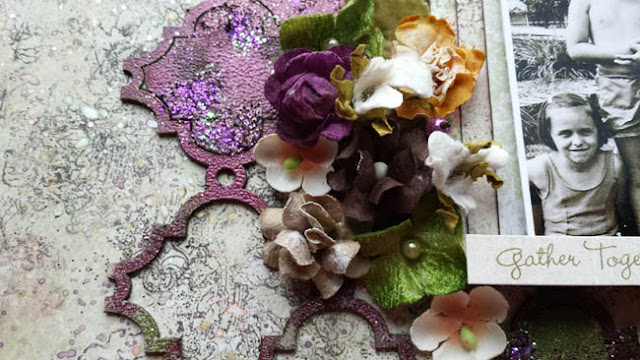
I chose to scrap a photo of my mom, sister, brother and I from way back when.  I used the Lovers Lane side B paper for my background and the Parkway paper to create layering under my picture.  Lots of stamping on my background using the Dreamy, Romantic Accents and Arcadia Textures stamps and paint splatters.


I used a mixture of the Sage, Honey and Garnet embossing powders on the Tangier Page Panel chipboard,  along with some Peridot, Merlot, Pyrite and Grape Glitter.


Here you can see some of the new Courtship Bloom Flowers in brown and tan.  For those  interested that cute little girl in the picture is me!

To the right of my photo I used the Lace Heart Border which I embossed with the Sage and Honey embossing powers.  I added some gold microbeads and Peridot glitter.

My title is from the Captured Words chipboard set.  I went a little crazy with the embossing using a mixture of Sage, Honey and Garnet embossing powers along with some Pyrite glitter.

Blue Fern Studios Supplies
Paper:  Courtship Lane
Lovers Lane, Parkway

Chipboard:
Lace Heart Border
Captured Words
Tangier Page Panel
Imagine Ink Embossing Powder:
Sage, Honey & Garnet

Glitter:
Peridot, Merlot, Pyrite, Grape

Stamps:
Arcadia Textures
Dreamy
Romantic Accents

Flowers:
Courtship Blooms

I hope I have inspired you!
Thanks for stopping by!
. . . Debbie

Tuesday, February 23, 2016

Serendipity Inspiration by Pascale

Hello Sweeties,

Today I'm up on Blue Fern Studios blog with three new projects. The first one showcase a photo of a work of art from the 2015 exhibit in the Castle of Riveau (France).


I started to protect the background as well as the chipboards with a layer of clear Gesso. I covered the Roman clocks with black gesso. Then I stamped them with the Arcadia Textures stamp and embossed them with the Ginger embossing powder. Finally I added some teal color.


I embossed the Organic Vine and the Spring Branch with different colors of embossing powder to give them some texture. I added some Garnet embossing powder on the "flowers" of the Organic Vine and when the powder was still hot I covered it with Merlot glitter.


Having glued all the embellishments, I added more colors and Merlot and Caribbean glitters.


Blue Fern Studios products used:

Serendipity papers - Imagination, Reminescence
Chipboards - Organic Vine, Spring Branch, Roman Clocks Set - Small
Imagine Ink - Embossing Powders - Verdant, Sage, Seven Seas, Ginger, Garnet
Imagine Ink - Glitters - Merlot, Caribbean
Stamp - Arcadia Textures


The second layout showcase another photo of work of art I've taken in Pussigny (Indre-et-Loire, France) during the Pussifolies 2015. The Pussifolies is an annual event (in June) where painters have one day to achieve a paint (4 x 2 m). The canvas are hung in the streets, on the wall of the house and everyone can see how they work. 


Again I started with a layer of clear gesso on the background and the chipboards. When the background was dry, I added more blue and gray colors; Then I added a design with the Arcadia Textures stamp and Pearl embossing powder; the result is really subtle.  


I painted the title with white gesso and different shades of blue. Then I used the Arcadia Stamp to add a design and I embossed it with the Pearl embossing powder. The blue color showed through the embossing. I colored it again with a darker color to add some contrast.


I covered the Chelsea Vine with a brown primary element. Then I embossed the leaves with the Verdant embossing powder. I added more primary element on top on the leaves and heat them again to melt the primary element with the embossing powder. I covered the branch with Crackle Accent.


I painted the Quatrefoil Panel with the same brown primary element and covered it with a Graphite paste. Then I covered it randomly with a Graphite paste as I want to see the brown color underneath.

Blue Fern Studios products used:

Serendipity papers - Glee, Fascination, Reminisce, Calling Cards
Chipboards - Serenpidity Word 1, Chelsea Vines, Quatrefoil Panel
Imagine Ink - Embossing Powder - Pearl, Verdant
Stamp - Arcadia Textures


The third layout showcase the "Big Clock Gate" of La Rochelle (France). 


Like previously, I covered the background with clear gesso. Then I added some random stamping with the Brocade Texture stamp.


I covered the brick wall panel  as well as the brick part of the Flourish Medley with white gesso, I used a sponge as I want to obtain some texture. When dry, I colored it with Burnt Umber.


I colored the leaves of the Flourish Medley with different shades of green. When the colors were still wet I added Verdant and Sage embossing powders and heat set them. I followed the same process on the die-cut leaves using the Verdant embossing powder on the rose leaves and the Sage on the sprig leaves.


Blue Fern Studios products used:

Serendipity papers - Inspiration, Fascination
Chipboards - Flourish Medley, Shabby Brick Panel
Imagine Ink - Embossing Powder - Verdant, Sage
Stamp - Brocade Texture

Sunday, February 14, 2016

Two mixed media layouts with video tutorial by Wilma Voermans

Today I present you the two layouts I made with the new Serendipity collection.
Newly I do not only scrap for keepsakes.
I love scrapbooking , but most of my familypictures are in project life albums. 
More pictures and more journaling, and it is my big fun to make my own cards.

But.....I still love scrapbooking on 9x12 and 12x12.
And I will still do familyphotos 
But when I see a beautiful picture somewhere online I just scrap it .
No more bad feelings that it is not a keepsake.
I keep them for myself  , after all it is a hobby..

Enough  talking , here is my first layout


I can tell you how and what I did, but if you want to know.....
Here is the start to finish video. Which will show you the whole process.
Chipboard used: Serendipity title and grid pieces .

I hope you have time and fun to watch .


***********************

The second layout is also made with the Serendipity collection.
The background paper is called merriment.
Normaly I work many hours on a layout.
Well...working is a big word :) 
But I think  add something, drink coffee, add something, etc etc.
This layout ;  I cant believe I did it.....was made in one hour!!
It was difficult, to just add without thinking and not go through my stash for hours.
But I saw the sun going away , and I really wanted to make a bright picture for this post.
I am not comfortable to rush, but today it just worked out.

For both layouts I used the Serendipity words as a title.
All the color you see is done with bright Japanese watercolor.
On the title aswell .

I used it because watercolor dryes quick .
The flourish is the organic vine.
I had fun with this new collection.
Thanks for visiting the blog.

x Wilma x


Tuesday, March 24, 2015

Celebrate Love - with Love Story

Hello!
My Love Story collection is cut and used to the very last pieces. What a fabulous collections, isn't it?
For my post tpday I have prepared two cards and a layout.
The cards were made for the wedding anniversary occasion and of course Love Story was a perfect choice:


Chipboards: Damask panel, Marrakesh panel, Organic vine


Chipboards: Tattered Diamond Bits, Roman Clock Set small

For my layout I have used a diagonal composition, creating the flow across the page. Combining chipboards, lace, flowers and paper pieces give a nice variation for the eye.


Chipboards: Folkart frame, Damask panel, Memory frames (1 piece of the set)
Stamps: Forever

Thank you so much for stopping by today!
With love from Zaneta aka Zanka

Monday, November 3, 2014

2 Layouts and a Gatefold album by Lisa Gregory

Hi There, Lisa here, welcoming you to November! That  means 3 more designs from me to inspire you.

For this first layout, I was in a purple kind of mood. I used Ombre Dreams paper in  Joyces Dream. I loved the purple and blue tones in the paper. I did a little masking with molding paste and chose sprays to enhance the colors. I mounted the paper on a piece of corrugated cardboard and did some distressing  around the edges.


Surrounding the photo I used Tattered Diamond Bits chipboard that were sprayed with spray in 2 colors. I also took apart the Organic Vine chipboard and used it in 2 places on the layout.


I took 1 piece from the Gingers Poppies Set and used embossing powder on it. Then I sprayed it with spray for added color and shimmer.


 I tucked some of the Tattered Diamond Bits in between the paper and cardboard in my peekaboo spots around the edges.


For my next layout I wanted to go for the golden theme of Autumn. I used the Montage Collection in Invitation.


I heat embossed gold embossing powder on the Royal Monarchs butterfly. Then I used some German Gold Glass glitter on spots of the wings. Once it was set. I glued on some rhinestones in different colors. It looks like jeweled brooch. This brooch was my inspiration. I didn't want to distract from the beautiful intricate details of the Monarch butterfly, so I only added a few rhinestones.

 I treated the Treasured Floral Frame  the same as in the butterfly.


I heat embossed the Blessings chipboard from the Spiritually Speaking set. 


This next project is a 6x6  Gate Fold album. I found I could use the word cutouts on the inside along with some room for journaling, or photos, or both!

I used the Blue Fern Garden paper collection in Boudoir for the front, back and inside covers.


The inside tiers were made from a variety of tags, small pictures and wording  from Ombre Dreams and Montage.


 I created 3 tiers to the Gate Fold album. There is plenty of room to add pictures and journaling.


 The backs of each section would be perfect to place small photos.


I added a small clasp closure to keep the album closed. The Spring Frame was heat embossed using  embossing powder. There is a gold undertone that simply shimmers in the powders and the coverage on chip board is amazing!


Thank You for joining me today for my November Blog post. I hope you visit us often as the Design Team always has gorgeous inspiration for you. Don't forget our Sketch Challenge as well as the arrival of the new Blue Fern Studios paper collection "Sanctuary"!! We are very excited!!
 xoxo


Monday, October 20, 2014

More Montage Layouts with Rae

Hello everyone! Today I'm sharing three layouts I have made with the Montage paper collection.


"Sweet as Honey" Layout


I used a handful of papers from the Montage paper collection to create this layout, and ripped the papers to create dimension. I had fun playing with these light colors, adding a lot of white with the ripped edges, doily, frame, and bunting!

Here is a close up of the Twilight Garden Frame. I primed it with a heavy layer of gesso, then sprinkled glass filler over it to give it a sugared look. I use the same technique on pieces of the Organic Vine that I cut up and tucked under the flower cluster.


The title is from The Latest Buzz set. I treated it with multiple colors of embossing powder to get this look.


I used the same technique on this small piece of doily bunting.

"Happy Memories" Layout


I just adore this piece of Montage paper, Mercantile. It's a very busy pattern, so I tried to keep my design simple by adding black accents and also choosing a black and white picture that wasn't too busy.

Here is a closeup that captures both pieces of chipboard I used.


For the Large Circle Frame, I simply painted it with one coat of black chalkboard paint, allowing hints of the natural color of the chipboard show through the paint. I added some pearls to the circles in the design, and some flowers over the flower silhouettes on the frame.

The title is two pieces from the Chunky Word Set that I treated using some multicolored embossing powder.


Untitled Fall Layout


Again, I used Montage paper, but added a piece from the Ombre Dreams collection for the layers under the picture. I found this picture on Pinterest. 

Here are two closeups of the Floral Wreath that show the distressing of the piece. I sprayed the chipboard with water, and separated the edges to create a level of dimension and "realness" of the leaves and flowers. Once it was curly, I dried it with a heat gun, then added some green and brown mists.


I cut a piece of the Country Picket Fence to add to the bottom corner, and scraped it with a distress ink pad to get that finish.


Lastly, I added a bird from the Little Birds Set. I used brown and gold embossing powders.

Thanks for checking out my projects! Have a great day!