Showing posts with label Ombre Dreams. Show all posts

Sunday, January 31, 2016

Featuring YOU!

We hope you have enjoyed the month of January when each of our designers introduced themselves and shared a few layouts.  They are awesome, aren't they? We were also excited to bring you a new paper collection - Serendipity, along with coordinating stamps, chipboard, embossing powder and glitter.

We love what our Creative Team has been working on, but we also love seeing how fans of Blue Fern use our products!  So today, we would like to feature some layouts that we have found on your blogs, Facebook, and online galleries.  You're sure to find some awesome inspiration!

Melissa Willick shared this lovely journal with us on our Facebook page .
She has used the Blue Fern Love Story collection.


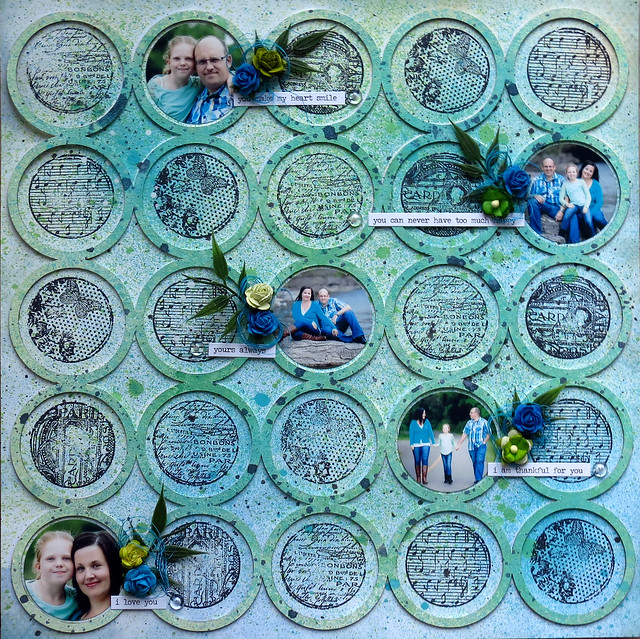
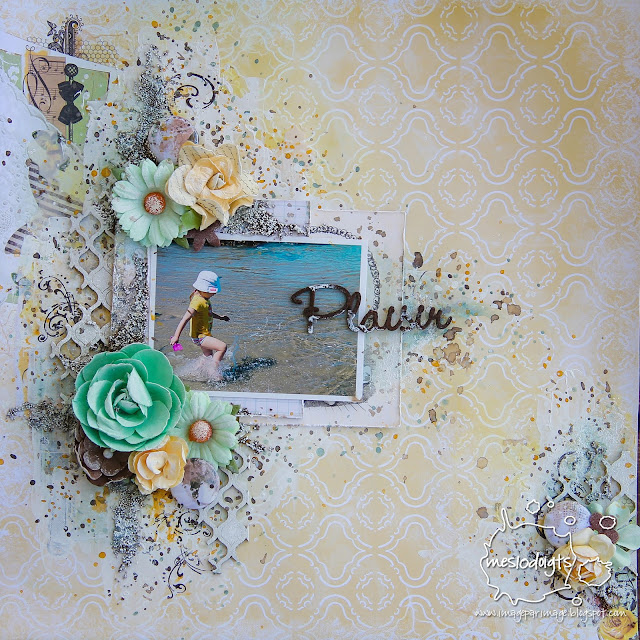
This layout was created by Tanya Palamarchuk using our Ombre Dreams collection.  We love the soft, dreamy look!


We found this layout created by Shizuka Hirano in an online gallery.  How adorable is this?  Shizuka used paper from the Frolic collection.


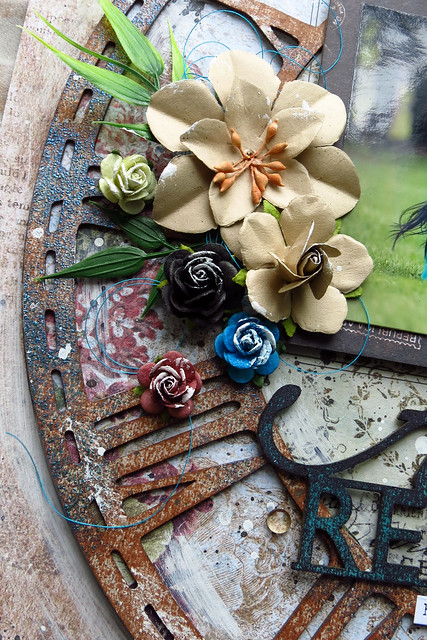
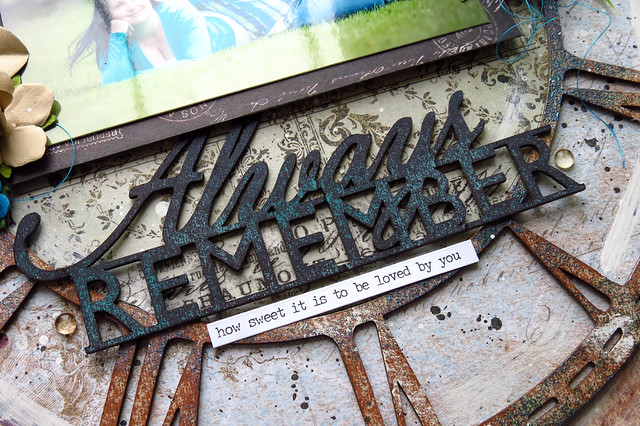
Tonya Gibbs describes this layout as one of her favorites, and we can certainly see why!   The layers she has built against the black background of this paper from the Love Story collection is stunning.  Tonya also used the Paisley & Vine chipboard set, and some Blue Fern texture stamps.  She even has a video on her blog, showing how she created this layout!


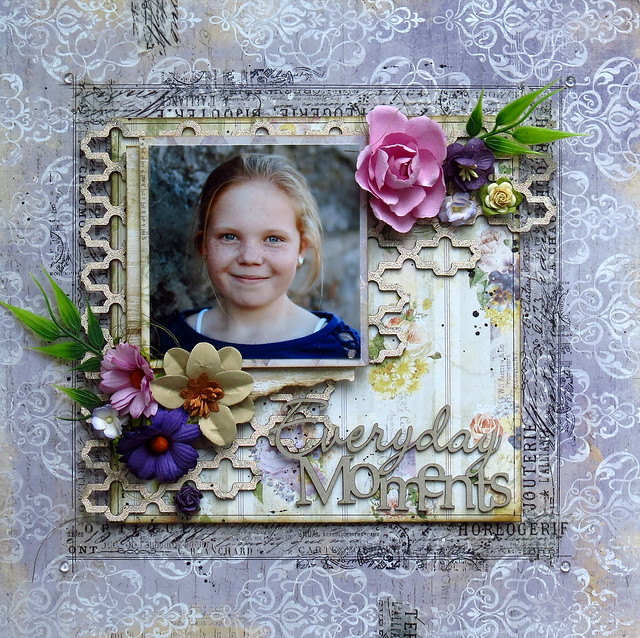
Paper from the Autumn Anthology collection (of course) was perfect for this layout created by Mgiov and uploaded to an online gallery.  What a beautiful way to remember their annual fall photo shoot.


We found this layout on Nadine Carlier's blog and fell in love with it.  What an awesome use of Blue Fern paper (Autumn Anthology) for a little boy page!


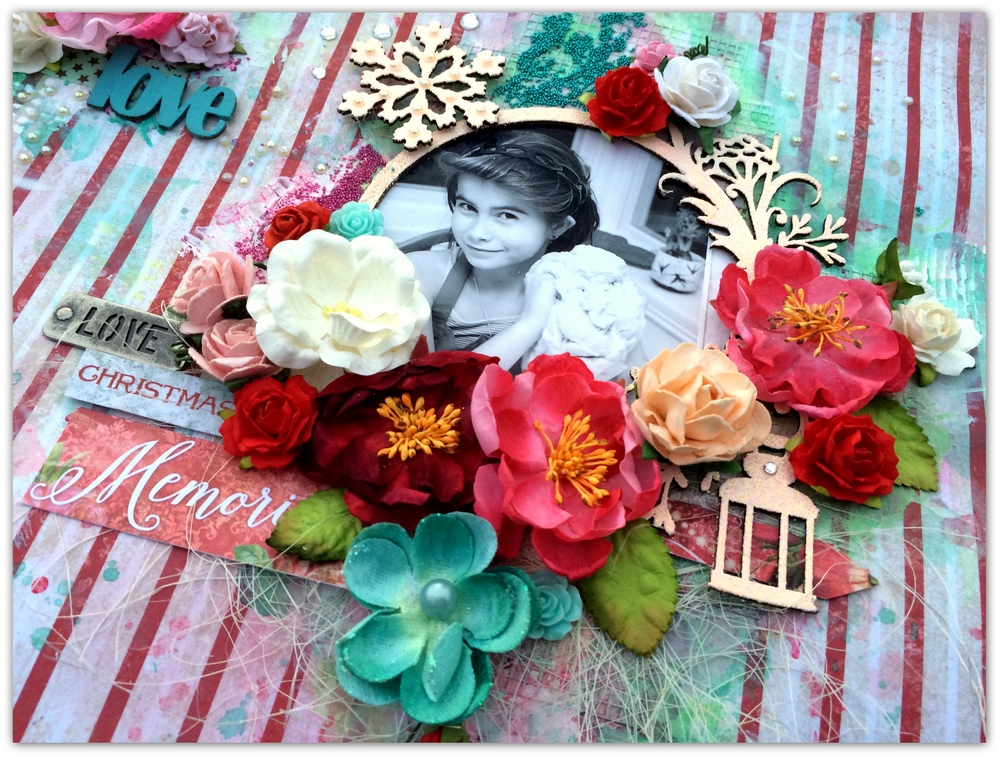
And last, but not least, we found this beautiful Christmas layout created by Dollscrap using paper from the Vintage Christmas collection.  The doilies are amazing and add a special touch to this vintage-inspired layout.


So, that wraps up a fantastic start to 2016 at Blue Fern Studios. 
We hope you will leave some love for these amazing women!

Thursday, January 21, 2016

Three layouts by Marie-Josee

Hello, Blue Fern Studios fans!

I am really happy to be back on the Blue Fern Studios for the third year. It will be very exciting with all the new products and paper collections!


My name is Marie-Josee, I am 40 years old and I live in Gatineau, Quebec, Canada, with my husband and my daughter. I have been scrapbooking since 2006. I love to create layouts, but I also create cards, mixed media projects and altered art.

You can see my work on my blog, Les créations de mariemily, or on my Facebook page, also called Les créations de mariemily.

I will now show you the three projects I created with three differents paper collections.

"Everyday Moments" layout

For this layout, I used the Déjà Vu paper collection.

I also used a piece of the Turkish Panel chipboard.


I altered it with Blue Fern Studios embossing powder (color Petal). I applied the embossing ink directly on the chipboard, and I sprinkled the powder here and there without covering the chipboard completely.


I did not alter the Everyday Moments chipboard because the color fitted with the rest of the layout.


"Always Remember" layout

For this layout, I used the Sanctuary paper collection.

I also used a piece of the Roman Clock Set - Large, the biggest one, as the focal point of my layout.


Here's how I altered it.

First, I added brown ink to the chipboard with the pad, leaving some bare spots here and there. Then, I added embossing ink randomly, only in some spots, and I used Blue Fern embossing powder (color Fern) to add touches of color here and there on the chipboard.

Then, I added gesso here and there with a dry brush.


I altered the title with a black ink pad, also leaving some bare spots. Then, using teal spray ink, I added more color to the chipboard.


Circles layout

For this layout, I used a paper from the Ombré Dreams collection and the Jumbo Rings panel. I put the panel on my paper and used a pencil to draw the inside of the circles. Then, I set aside the paper.


I primed the chipboard with gesso, and while it was still wet, I sprayed green ink on it.

While it was drying, I stamped the inside of the circles with the Blue Fern Studios round stamps. Then, I glued my chipboard to the paper and added more spray ink.

Here are some details!


Thanks for looking, and have a great week!

Marie-Josee

Monday, January 18, 2016

Two Inspirational Canvases- By Keren Tamir


Hi Everyone,
Its Keren here and I'm really happy to be back once again on the Blue Fern Studios Design Team for another year.
I'm so grateful for this opportunity and I'm looking forward to creating alongside many talented designers.

Here is a little bit about myself:


My name is Keren Tamir, I live in Canada and I’ve been scrapbooking for 13 years.
I love to create and experiment with many different mediums and techniques. My style is always evolving and that’s one of the things I love about this art.
 One of the main reasons I started scrapbooking was to preserve memories and photos for my children. However, over the past couple of years, I’ve diverted myself into the mixed media world and love combining them both together. I’ve developed my own mixed media style, which I love sharing with my students. I love to create and I’m passionate about what I do and that’s why I love to teach techniques of mixed media and art.
I’m delighted to join Blue Fern Studios Design team for a third year. To see more of my art please visit my blog at: http://kerentamir.blogspot.ca
I hope you enjoy my creations!!

<<<<<>>>>>

I've created two 6x12 canvases today.
Both used the Ombré Dreams- Ginger's dream for the background. I cut the paper in half and used each half for one of the canvases.

Here is my first project:

"Dream"


The flowers petals are made out of canvas and were first sprayed with Imagine Ink Winter green, then shaded with other greens and yellows.
The centre was created by layering one radiant burst chipboard, one bohemian flower chipboard and one paper flower. 


The stem was created using the Arching leaves chipboard which were painted in lime green acrylic paint and then stamped with the textured circles stamp. I also used the brick pattern from the Essencial textures stamp aroung the edges.
Finally I used the Dream chipboard for the title.


<<<<<<<<<<<<>>>>>>>>>>>

My Second Canvas today is titled:

"Love"

For this canvas I used the Shabby brick bits and the daisies collage chipboard pieces. They were painted with lime green and teal acrylic paints.


I cut out a couple of pieces from the Ombré Dreams- Dream cards paper as a background for the Daisies collage.
Then I painted the Love chipboard title in black and added it over the centre piece.


I used the Textured Circles stamp to create some music note's pattern in the background.
I also used the Imagine Ink winter green spray toad some colour drips under the main image.


Thank you so much for visiting the Blue Fern Studios blog,
Have a wonderful day!!


Monday, December 21, 2015

Bente's December farewell

Hi there friends.
Today is my last post here on the Blue Fern Studios blog, but it's definitely not the last 
time you'll see me creating with these gorgeous products. 
So we won't say Goodbye but instead Au Revoir. :-)

Today I have a  couple of pages and some cards to share .

For my first page I picked one of the pretty new papers from the  Vintage Christmas collection.


I also have some close ups of the details:


I used the Petal embossing enamel to treat my chipboards. That gorgeous round piece is called Twilight Garden Frame. I gave the Shabby snowflake (part of a set) the same treatment. 
I love the look of those tiny half pearls that I added to it!


On my background I used the Winter Mint and Cotton Candy Imagine Ink mists. I also used gesso and microbeads as well as a few paints.


For a title I used one of the designs on the Christmas cards sheet together with the word Christmas from one of the bottom strips.


I love the look of the strict stripes with the soft colourful blooms.


On my next page you'll see a familiar face :-)  
(Yup that's me  in one of the rare photos of me that I like. :-D, I know I've scrapped it a couple
 of times already LOL)

I used the Juliannas Dream paper from the magical Ombre Dreams collection
Such a beautiful and feminine collection, and so versatile too! I always love the combination of yellow with purple. I can't say why I love it so, except I find it sooo,sooo pretty!


And even here I have close ups to share:


I painted most of my chipboard pieces purple and gave them a lick of gesso on top to make them a bit more shabby.The Chained Bits look great here down the side of my photo. They are a good background for layering any kind of embellishment.


The Timeless Floral corner adds so much to a page. It's so great because you can turn it
any way you want so it will work in any corner 


I wanted a title thet was not too overpowering so I went with a single chipboard word that I painted and clear embossed. 


I added a some punched and die cut greenery as well.

And to round things off I have a couple of simple Christmas cards that I'd like to share with you.


The first one I made with one of the cards from the Christmas card sheet and added the bottom strip from a sheet down the sides. I used the Petal embossingpowder again.
The Framed Winter words are perfect for a card front.


On my second card you can see that even other non-christmassy collections can be used for seasonal cards. My background here is from the Montage collection, but the top sentiment is from the
Vintage Christmas collection of course. I added some bits from the Chain link 
chipboard panel that I painted a dark red. I used a little of the Cotton Candy Imagine Ink
on the background and  a stencil on top.


That was all from me! I want to a big THANK YOU to Leslie and Valerie for having me.
It's been a pleasure!!

I hope you all have a wonderful peaceful Christmas time wether you celebrate or not.
Merry Christmas and Peace on Earth!

Saturday, November 14, 2015

Two layouts , two different collections by Wilma Voermans

                          I cant believe it is already a month ago my last blogpost was on.
                                              And only 6 weeks untill Christmas!
                           But let us first say goodbye to fall , my most favorit season.
                                               Fall in Switzerland is so beautiful .

                             Lets go over to my first layout I would love to share with you.


When I start a scrapbookpage, I never know what I am going to do excactly.
I grab a picture, and choose the papers.
For this paper from the Love Story collection I had a masculine page in mind.
Well, as you see it ended up as a feminine page.
The picture I used was not that great in the start, a lot going on in the background.
But my daughter in law has beautiful eyes , so I decided to use just that part.


The chipboard piece I used is the crosshatch frame .
I first embossed it in red, but I changed my mind and dapped it random with black patina.
Here and there I left a little red peeking through .

On my background I used the glitter Phoenix , I just spread here and there on my wet gesso.
In real life it gives a great effect!
*******


The second layout I like to share with you is light as spring .
My daughter asked for a layout with this picture.
I think it is perfect for the Ombre Dreams collection.
I made this layout after the beautiful November sketch, a design by Michele Singh.


The chipboard piece Tech panel is versatile.
I choose it to get some grunch feeling and tone down all that sweetness :) 
I am a big fan of the chipboard negatives.
They give the chipboard sturdyness for shipping.
But they also give me fun and crazy shapes, I never throw them away!
Here I took out the circles from the tech panel , colored them ,
 a few doodles and there you have small embellishments


The techpanel piece is just painted with silver/iron colored paint .
To match the iron my granddaughter holds her hands on in the picture.

*******

Thank you for visiting the Blue Fern blog today and have a great weekend!
x Wilma x


Sunday, October 25, 2015

Look What We Found!

Have we told you how happy you make us?  Well, we hope you know how much we love seeing what you create using Blue Fern products.  Sometimes we just can't help ourselves, and have to show off some of YOUR layouts that we have found on your blogs.  We hope you enjoy these beautiful projects from your fellow paper-crafters.

Have you heard the rumor that purple is a difficult color to use?  It's SO not true.  Anna Rogalska's beautiful layout using this elegant purple paper from our Deja Vu collection is proof that you have absolutely no reason to be afraid of purple. 


Анастасия Миронова also used purple accents on her very colorful layout.  
The paper is from the Ombre Dreams collection.


Karine Gagnon created this artistic layout.  We love the background she created, 
and how well her photo stands out.  The paper is from the Montage collection. 


We found this very sweet layout by Michelle on her blog.  There are so many 
beautiful details to love about it.  The paper is from the Sanctuary collection.


Kavitha's layout, using paper from the Frolic line, is so soft and dreamy.  
What a gorgeous mix of embellishments!


These five layouts are so very different in style, and show just how versatile Blue Fern paper is.  
Thanks ladies, for your awesome inspiration!