Friday, February 14, 2014

2 projects by Evgenia Petzer

Hello ladies! Its Evgenia Petzer with you today and I want to share 2 of my new projects with you.
First up is a fabric cover for a CD. I love to take photos and this one was a gift for one of the girls' photos that i took.

She loves lavender color so I made it using these shades.

Blue Fern chipboard used:
doily bunting, Lattice Fence and Berry Stems

Some detailed photos:
 The fence is covered with a paint and then i applied the glossy accent and sprinkled some microbeads on top.
 And inside it looks like this.

 And my second project for today is the card for my son's friend. She is turning 6 this weekend and we are going to a birthday party and will give this card to her.
Blue Fern Studios chipboard used:
Berry stems, Bits of Honey

And some close ups:
Bits of honey in yellow of course:)


Thank you for checking my projects, hope I have inspired you to go and play a bit with your BFS chipboard:)

And don't forget to play in our sketch challenge this month, you still have half a month to join:)

Thursday, February 13, 2014

Two layouts with Blue Fern panels by Marie-Josée

Hello all,

Today, I will show you two layouts I created with the Blue Fern panels. I love the panels: they are great if you want to add texture and interest to your backgrounds. Here are two differents ways to use them.

Be sure to come back here on February 16th too; I'll be featuring a tutorial to show how to create your own mixed media background, again with a Blue Fern panel.

Without further ado, here are my layouts.

"Beauty" layout
 

Do you love birds and snowy owls? I do, and I am particularly lucky to have two hanging around very close to my house this year. I go see them almost every day and I take lots of pictures! :) Here's one that was taken at the beginning of February.

I used the Harlequin panel to create the background of this layout. I glued it to a 12 x 12 piece of chipboard and covered the whole thing with gesso.

First, I sprayed various mists in the opposite corners.


Then, I altered some parts of the chipboard with two different colors of Gelatos.


I also added a bit of texture with a stencil and modelling paste.


"Family" layout


For this layout, I used the brand-new Number Grid panel, which was released in December. I used the big one, but there is also a smaller version.

First of all, I primed my panel with gesso and let it dry.


I chose a few significant numbers in the grid and colored them with Silks Acrylic Glazes to make them stand out. I then put the relevant pictures beside those numbers. I also used my Silhouette to cut some words and create phrases with my numbers.


Then, I used pieces of the new Blue Fern Garden papers here and there under the grid.


I also added various embellishments and words here and there.


Wednesday, February 12, 2014

Shadowbox and two layouts

Hi! Maja here today to share with you some projects I have made. It´s just a couple of days left to Valentines day so my first creation out is a little shadowbox with love... The chipboards are painted with gesso and acrylic paint.


BFS products used Gabrielle Butterfly and Memory Frames

Next out is a layout of me and my hubby using the new gorgeous "Blue Fern Garden" papers. Love the colours and patterns in theese papers. I cut the beaded sting in two halves and put some chalk on it, some glossy accent and glitter. I treated the Charmed Page Dangles in the same way.


BFS products used are Beaded Strings, Charmed Page Dangles and Tweet Friends.


Finally a layout with lots of fuzzy cutting and layers with emellisment and papers.  I treated the chippies with chalk and Glimmer Glam.


BFS products used are Circle links and Dare To Dream.

Thanks for stopping by and happy Valentines day to  all of you Blue Fern lovers =)

Monday, February 10, 2014

2 Bright and Bold Layouts

Hello, Jackie here today to share my February design team projects, including one with the new Blue Fern Garden papers. I was so excited to receive these papers; they are so beautiful I almost couldn't bear to cut into them. Almost. I did get over it, and had a lot of fun in the process.


I love the lattice pattern of the Love Letters paper, and started by cutting it out with an X-acto knife, then used the pattern on the background Signature paper dictate how I trimmed the lattice. I wanted to leave the lovely birdcage and doily in the bottom right and the flowers and flourishes in the top left corners visible.


I glued the lattice down, then applied all my media overtop to make it an organic part of my background.

Lots of Blue Fern Studios chipboard scattered throughout. Frames are a great way to highlight a focal point on your photo; here I printed a second copy of the photo and fussy cut my son and the swing out of it and adhered it over the frame to bring movement to the picture. Of the three of us in the picture, there is no doubt who is the focal person (even more helpful when the photo is not particularly flattering of my eldest son and I). I started by rubbing a candle on the chipboard to create a bit of a resist, then painted and splattered on various coordinating colours of watercolour paints for a fun, artsy feel.


In addition to the lattice, there are lots of layers of paper and media on my background. I didn't want to cover these completely with additional layers of paper, but did want to add some additional bulk behind the photo; the Shabby Brick Bits were ideal for this purpose, and grounded the photo and cluster while allowing the background to peek through. I simply painted the chipboard with two coats of gesso, then added stamping and splattering.


Your chipboard doesn't always have to be the focal point of your layout. I needed a little something to bulk up my cluster, and this butterfly, painted randomly with watercolours, fit the bill perfectly.


With such a busy background, I wanted to make my title bold and simple to help it really stand out. A simple coat of black watercolour paint did the trick. I mounted the title on top of the flowers in my cluster with some wet adhesive.


Products Used

- Blue Fern Garden Signature paper
- Blue Fern Garden Love Letters paper
- Blue Fern Garden Calling Cards paper
- Shabby Brick Bits chipboard
- Picture Perfect chipboard
- The Optimist Word Set chipboard
- Icons Set One chipboard

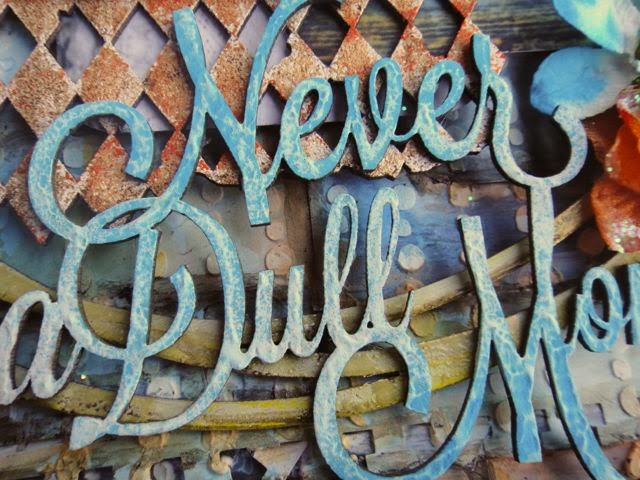
I had so much fun playing around with this next layout. I love this picture of my middle son, and the look of disdain on his face, and wanted to use chipboard to draw the eye in to the photo.


The Graduated Circles were perfect for the task. I started by colouring the piece with a white Gelato, then built up additional colours with Gelatos and finished the whole thing off with random spots of coordinating embossing powder. I would later use the Graduated Circle as a frame for my clusters, which keeps the eyes moving around the centre of the page.


The Tattered Diamond Bits ground the photo within the circle, preventing it from looking as though it is just floating there. I started by heat embossing them with a weathered embossing powder, then added in Gelatos in orange and brown to marry it to my colour scheme.


For the title, I painted it with gesso and my finger, leaving texture behind, then misted it randomly to achieve an ombre effect.


And last but not least, a pop of purple to coordinate with the purple in the photo.


Products Used

- Never A Dull Moment chipboard
- Graduated Circles chipboard
- Tattered Diamond Bits chipboard
- Seaside Seashells chipboard

Thank you for stopping by today! 

Sunday, February 9, 2014

Valerie Shares a Little Bit of Love

Hi all.  It's February, so it's only natural to think of love.  My parent's just celebrated their 60th wedding anniversary.  Instead of a card, I wanted to make a canvas for them.  I chose the beautiful Ornate Frame to use in the background.  It's a large piece of chipboard, but it works great for a project like this.


I primed the chipboard with gesso, then applied pink paint, and some Shimmerz Dazzlerz.  While it was still wet, I also sprinkled it with white glitter.  When dry, I used some ink around the edges.


I am having such a great time creating with the Blue Fern Garden paper collection.  I love the beautiful colors and attention to detail in the backgrounds.  This is one of my absolute favorites from the collection.


If you're like me, you often have problems coming up with a title, or would like something different.  The Blue Fern chipboard words are the perfect solution.  I wanted this title to stand out against the background, so I painted it brown, and used some dimensional adhesive to lift it off the page just a little.  It really adds some depth, and it's a nice change from alphabet stickers.


Here is a closer look at the heart from the Winter Page Dangles set of three.  This photo also gives you a closer look at the detail in the paper.  I primed the chipboard with gesso, and then painted it with Distress Stain.  It wasn't quite the color I wanted, so I also used some red ink.  It was finished off with a few pearls and some Inka Gold (Old Silver). 


Thanks for stopping by today and letting me share my projects with you.  Jackie is up tomorrow, so be sure to stop by and see what she has been creating.  ~~~Valerie

Saturday, February 8, 2014

My First Post by Leila Cardoso

Hello Ladies

Here's my first post and I would like to say that I am excited to be part of this wonderful team and work with Blue Fern Studios chipboard and papers.


I'm 37, married, mother of 2 amazing kids (12 and 6 years old), my great source of inspiration. I live in Araruama - Rio de Janeiro / Brazil.

I started scrapbooking in October 2010 and never more stopped,. I just love this incredible paper world.

You can see more of my work on my blog: http://lolo-artesanato.blogspot.com.br/

Let's see what I have to show today???

Layout "Adorable"


I painted the chipboard with blue pen "Tombow"...


Blue Fern products used:
-Blue Fern Garden Parlour 
-Blue Fern Garden Timeless
-Turkish bits
-Good vibes


Layout "Treasure the Moment"


I put some gesso on chipboard pieces and them some pink gelatos...


Blue Fern products used:
-Blue Fern Garden Boudoir
-Blue Fern Garden In Bloom
-Blue Fern Garden Calling Cards
-Treasure the Moment
-Eclectic Hearts

If you have not seen the sketch this month, it is worth checking out as it is gorgeous...


Card "Follow your Bliss"


I painted the chipboard with metallic gelatos in gold color...

Blue Fern products used:
-Blue Fern Garden Parlour
-Broken Rings

Thanks for stopping by here today, hope you have enjoyed and been inspired!!!

xoxo

Leila