Showing posts with label Tuscan Window. Show all posts

Wednesday, March 27, 2013

Dress Form; Bird Cage; Nesting Circle; and Tuscan Frame


Hello, Joyce here.  Again, I was bitten by the inspiration bug, but this time the inspiration came from a wide piece of green ribbon with hand sewn flat ribbon roses. I bought this ribbon a year ago at a Scrapbook Expo, and I have not had the heart to cut it up until my BFS dress form accidently fell on top of it.  Then the “Aha” moment came to me… I was going to make a skirt out the flat ribbon roses, but first I have to take the ribbons a part.  Here is the dress form painted with crackle paint; some stencil work and molding paste at the base of the form; and the inspirational ribbon skirt with beads added at the end of each ribbon strand to hold the weight of the curly ribbon down.  This canvas will be given to my teen-aged niece who has just finished painting her bedroom in a soft green color.  I hope she likes it!  


Nesting Circle and Tuscan Frame:

The piercings on the large nesting circle were calling out to be adorned.  The holes in the piercing were the perfect size to weave in some bead work.  The chipboard was painted with white acrylic paint and then a color mist was applied on top of the chipboard followed by a Martha Stewart stencil (her small stencils work perfectly on these chipboard pieces- I also used this same stencil package on the dress form above) with an application of Viva’s molding cream and allowed to dry.  After the molding crème dries, apply another application of your favorite mist and enhance the patterns created with the stencil and molding cream with a watercolor pencil to add more depth. Finally, add a little bit more shimmer using an Inka gold product.  
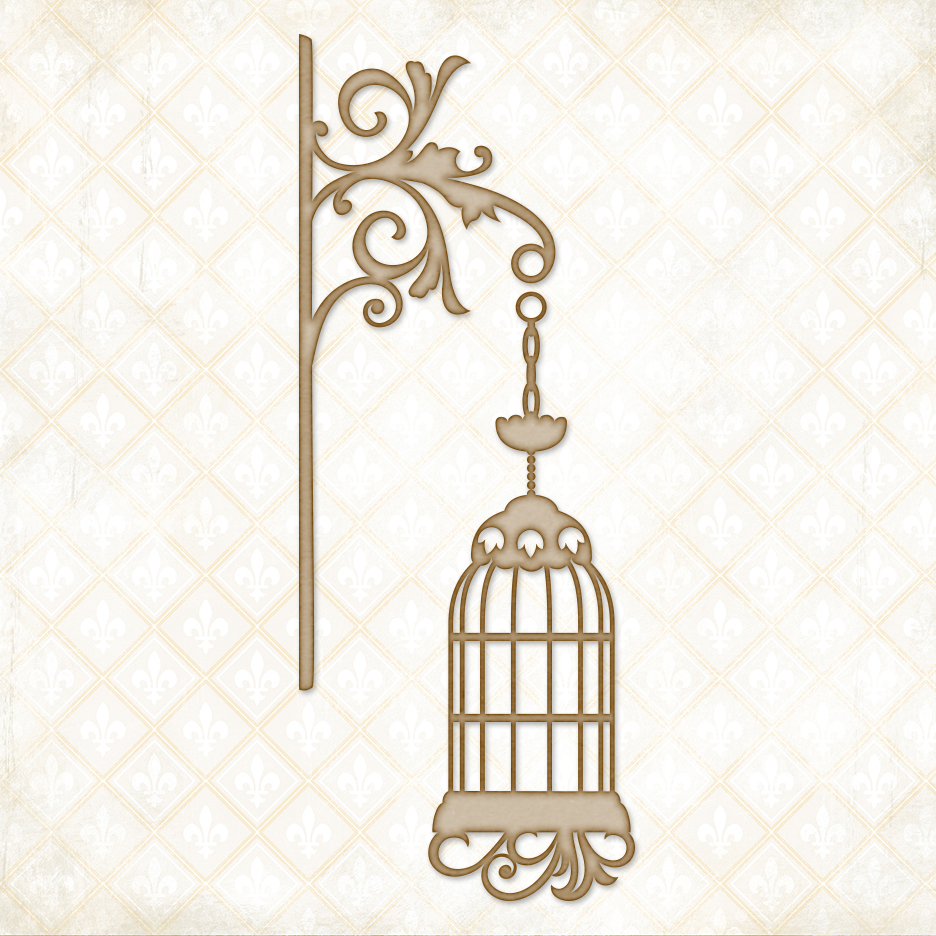


Bird Cage:


To achieve the two-toned color chipboard piece, paint chipboard with a white dauber, and then apply your favorite crackle product to the large surfaced areas of the chipboard only. When the crackle product has thoroughly dried, use a misting product and apply the mist to the small areas of the chipboard.  Some of the mist will flow onto the crackle product which is fine.


TIP: To enhance those lovely little cracks on your chipboard, use a dry and sharpened watercolor pencil.  Hold the pencil horizontally to your chipboard, and press down the sharpened end of your pencil with your index finger on top of the sharpened area and gently rub in a tiny circular motion in a parallel position. Lift the pencil up and use your index finger and blend the color in. Do not hold your pencil in a vertical position.  Do not wet the watercolor pencil because it will render a muddy looking appearance.


Saturday, March 23, 2013

Irene's Projects

Hi everyone! Today I would like to share with you all my March projects using some gorgeous Blue Fern Studios chipboard pieces. I've created a layout, a tag and a card for this month.

First up, is a layout using a seasonal wildflowers piece and an organic vine piece. I've also used a Blooming Beauty word chipboard piece as the title for this layout.


Here are some close-ups on the chipboard pieces.


I've painted the chipboard pieces with some glitter paints.

Here are the chipboard pieces used:

Seasonal Wildflowers

Organic Vine

Blooming Beauty


My second project is a tag. I've used a Tuscan window piece on it.

 Here is a close-up on it. I've used some texture paste to cover it and later misted it with some paints.


Chipboard piece used:

Tuscan Window


My third project is a card using an organic vine corner piece.

Here is a close-up. I've misted the corner piece with some gold paint.


Chipboard piece used:

Organic Vine Corner

Hope you all like today's projects!


Sunday, March 17, 2013

{3} Layouts with Patter

Hi everyone. It's Patter Cross here, and I am glad to be back. Today I am sharing three 8x8 layouts with you. I hope you will enjoy them and find some fun ideas to use. Now let's look at these smaller layouts.

"Keep Faith"
We are finally members of a church in our new town. I am so excited, and of course scrapping a picture of our new church was very important to me. So, here it is (below). For this layout I used the Tuscan Window chipboard as a topper to my photo. I then added the Garden Window shutters to the sides of my photo. I liked mixing the two chipboard sets.

I wanted to leave my chipboard raw as I liked the raw color on the layout. To dress them up, I just stamped on them using brown ink.

Blue Fern Studios Product Used:
Tuscan Window 074752
Garden Window 074691

"Beautiful Iris"
In our new house in October, the irises began to bloom. Kind of late I believe but we moved them from the front yard to the side so I think they were in a bit of shock. But once they came up, wow! I used the Blooming Foliage chipboard on this page.

To create the fun texture on Blooming Foliage, I mixed a bit of glass bead gel with green acrylic paint. I then spread it on the chipboard. While it was still wet, I then misted it with a mix of gesso and water. It has a really fun texture when you touch it but it's hard to tell in the photos.


Blue Fern Studios Product Used:
Blooming Foliage 074851


"Love Always"
And for my last layout, I thought I would share my husband's executive work photo. I don't have a lot of scrapped photos of him so this one is special. I used the Vintage Locks and the word 'love' from the Valentine Word Set here.

I wanted my chipboard to look like leather since this was a masculine layout. To achieve that, I just covered the chipboard in distress ink. It worked very well for the look I wanted.


Blue Fern Studios Product Used:
Valentine Word Set 074646

Vintage Locks 074783

Thanks for joining me today. Blessings,

Sunday, March 3, 2013

Happy Blue Fern Studios Sunday!!

I hope everyone is doing something creative this fine Sunday! It is me, Lisa, sharing some Blue Fern Studios product with you today. Something about birdcages makes me sing!! And the beautiful Fancy Birdcage was just the perfect piece for this layout. I absolutely adore the piece that the birdcage appears to be hanging from. A gorgeous iron scrollwork piece that is the "arm". You can use the bird cage alone, or you can add the arm  and even change the position of that piece so that it stands upright. I played with the position until I was satisfied with the way it sit on this layout.


Here is a close up of the birdcage. I used a Martha Stewart iridescent paint and stippled it on using my finger. When the paint was dry, I gave it a second coat. The result is a beautiful soft stucco texture. I used a pretty vine trim and wove it around the "arm" of the piece that the bridcage appears to be hanging from.


                                                                                           Model: 074677

For the title, I used one of the "words" from the "Good Vibes Word Set". I stippled on some white gesso, then while the gesso was still wet, sprayed it with the same spray I used to spray the background paper, flowers and gauze.

                                                                                                 Model: 07489

My next project is a mini album that I started. I have the cover done, and plan to fill the inside pages with more Blue Fern Studios chip board.

I used 2 butterflies from the beautiful Brigittte Butterfly set. The technique I used on them was a simple heat embossing using  Ranger's Tim Holtz Distress powder in Antique Linen. It gave them a beautiful old stone finish.

                                                                                                 Model: 074387                   

For the Vintage Lock, I heat embossed the piece with gold embossing powder. It has a hammered gold metal finish.

For the lock and keys. I used the same heat embossed gold finish and hung the pieces on a jump ring before I tied it to the seam binding ribbon on the spine of my mini.

                                                                                               Model: 074783


This next layout, I decided to leave the beauty of some of  the chip board in its bare form with a  touch of ink to give it a little dimension.


I split the Blooming Foliage chip board in half and placed a flower in the middle. It makes a beautiful filler for your flower clusters.
                                                                    Blooming Foliage


For the Tuscan Window, I used texture paste and stippled it on the pieces using my finger. When it was dry, I inked the edges. It gave it a weathered look.
                                                                     Tuscan Window


I used the word LOVE from the Good Vibes Word Set. Just a simple brush of ink over it to give it depth was all it needed.
                                                                 Good Vibes Word Set


I will be back throughout  the month with more of my work with Blue Fern Studios chipboard. There are new collections being added all of the time. Thank you for taking a peek today and come back for more inspiration from our fabulous designers.