Showing posts with label The Optimist Word Set. Show all posts

Sunday, April 20, 2014

April Projects with Rae

Happy Sunday! It's Rae with you to share some projects I've made this month. 


Dream Layout

First up, I have my sketch layout. You may have seen it if you have checked out our April sketch challenge. Here is the lovely sketch:


And, here is my take on it using the Blue Fern Garden paper collection:


Here's a closeup of the "Beaded Strings" circle piece. I primed it with gesso, then used a blending tool with Frayed Burlap Distress Ink by Ranger. I finished the treatment by adding some random stamping with a text stamp in archival ink, and placed some bling on each of the "beads."

This piece from the "Ironworks Accents" set fit perfectly at the top of the layout. I primed it with gesso, then added some Ranger "cement" embossing powder, then lightly added some grey chalk ink for added distressing.

The "Blue Fern Flourish" is tucked under the flowers. I used gesso to prime (of course!), then added some green Distress Stain and some olive chalk ink after the stain was dry. 

If you haven't already, play along with us this month with the April sketch: April Sketch Challenge!


Butterfly Tag


For this tag I used three keys from the "Vintage Keys" set. I colored them with silver Izink without priming them first to create a "dull" look to the keys.


I painted this "Bohemian Butterfly" with glossy black paint with a sponge. When it was dry, I glued it to some pink paper, then cut around it. I topped it off with some crystals to accent the body. 


Dream Big Layout

And, the last project I am sharing today is this layout:


I tucked the "Seasonal Wildflowers" under the picture after coloring it with blue chalk ink and sponging on some walnut stain Distress Ink. I layered the different inks several times in random spots, and added some small blooms.

This title is from "The Optimist Word Set." I primed it with gesso, then added some Ranger embossing ink in turquoise. It was a little brighter than I wanted it to be, so I used some brown chalk ink to randomly tone down that blue. 

For the "Doily Bunting" I grazed it with black archival ink, then added some wired raffia along the "string," and then placed tiny blooms on each doily.


Thank you for letting me share my projects with you today! Enjoy the rest of your weekend!

Rae

Thursday, April 10, 2014

Jackie's April Creations

I have two new projects to share today using the gorgeous Blue Fern Garden papers along with some stunning Blue Fern chipboard. Spring is in full swing here, and I couldn't resist playing along with some springy greens, flower motifs and outdoor photos. And for a change - no kid photos (gasp!).


Once again, I loaded my Blue Fern paper down with media. I know I've said this before, but I'm so impressed with how this paper holds up to media. Gesso, mists, paint, ink - I threw them all at the paper.


I love the new Eastern Lantern chippies, and used this one as an elaborate hummingbird feeder. I simply painted it with graphite paint and added some script stamping; the nice thing about such an intricate piece of chipboard is that it doesn't take much.


The birds from the Little Birds set are just too sweet. To add some texture, I dabbed on some Texturez Dazzlerz, then misted overtop.


One of my favourite things about Blue Fern chipboard is all the different titles and words available. I have to admit I am lazy about titles, so having such a large selection of words ready to go is fantastic.

Blue Fern Studios Products

Blue Fern Garden Paper:
- Timeless
- In Bloom

Blue Fern Chipboard:
- Little Birds Set
- Eastern Lanterns
- The Optimist Word Set

The background for my next layout is inspired by a great Irish restaurant we frequent, that has decorative holes in the plaster to reveal the brickwork underneath. The leftover bits from the Shabby Brick Panel have been sitting on my desk, waiting to be used, and they paired brilliantly with the stone viaduct in my picture (which happens to be the one from the Harry Potter movies).


I wanted to keep the bricks understated, but add some subtle texture, so I painted them with super heavy gesso, and once it dried I sponged some on for dimension.


The Manor Hinges were painted, then heat embossed in places with Distress Embossing Powder for an aged patina look.


I love the drama of these Pretty Weeds, and painted them with metallic green paint to make a simple statement in my cluster.


Blue Fern Studios Products:

Blue Fern Garden Papers: 
- In Bloom (x2)
- Timeless
- Calling Cards

Blue Fern Studios:
- Shabby Brick Panel
- All Natural Set
- Pretty Weeds
- Manor Hinges

We always love seeing what you create with Blue Fern Studios products, so please remember to share your projects with us in the Blue Fern Gallery!


Monday, March 24, 2014

Springtime crafts

Hi Guys !
Its Olga here. Today i have for You 3 of my last works with BFS chipboards.

I Made LO with simple composition. As background I use Rings Panel . As a title I use Valentine's Word Set and as element of composition Memory Frames . I really like those frames they look amazing as element of composition and Photo cover as well .


Second work is motivational little canvas in purple:) I used here Shabby Brick Bits as base for my whole composition . I useThe Optimist Word Set and Winter Titles as title and positive message to my work


My last work is optimistic card . Its simple but when You use lots of layered chipboards You don't need other embelishments ;) I use here Broken Rings  as background , Heart Set and banner form Picture Perfect are main elements here  And the The Optimist Word Set as saying 


Sunday, March 16, 2014

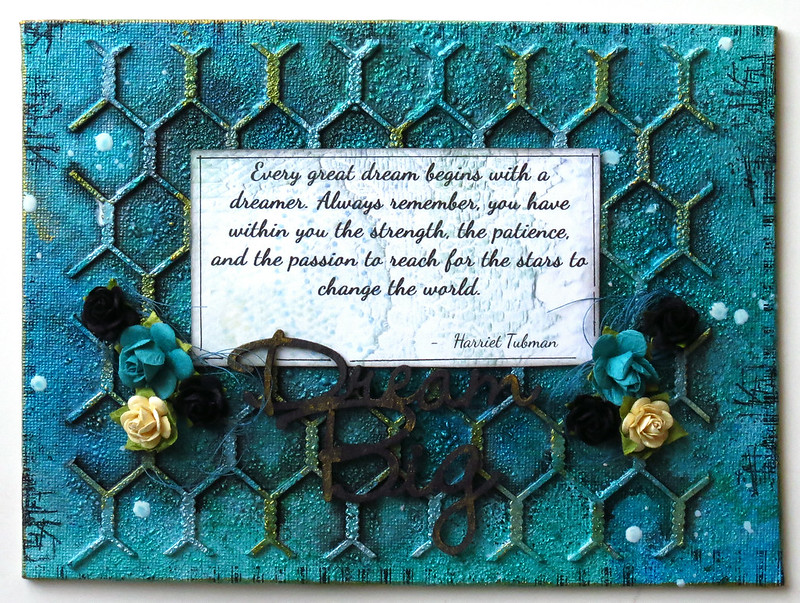
Tutorial - Mixed media canvas by Marie-Josée

Hello all!

Today, I will show you how to create this mixed media canvas in 10 steps.


Supplies:

- Small canvas (I used a 5" x 7" canvas)
- Glue
- Sponge
- Paintbrush
- Heat gun (usually used for embossing)
- Paper towels
- Stamps
- Black ink
- Piece of a Blue Fern panel or any other Blue Fern chipboard (I used a piece of the Chickenwire panel)
- Blue Fern words for the title (I used the "Dream Big" phrase from The Optimist set)
- Quote of your choice written by hand or printed on a piece of paper or cardstock
- Gesso

- 2 or 3 differents colors of Silks acrylic glazes
- Acrylic paint in a color that matches your Silks paints
- Black mist (mine is made with water and Memento ink)
- 1 or 2 mists matching your Silks paints
- Inka Gold paint in Gold and Silver, or any other gold or silver medium.
- Various embellishments (I used flowers and thread)

Instructions: 

First of all, I want to apologize for the ugly background. I was working on my kitchen table and had to use some flyers to protect my table. I hope the bright colors --and the chicken-- won't be too distracting! :)

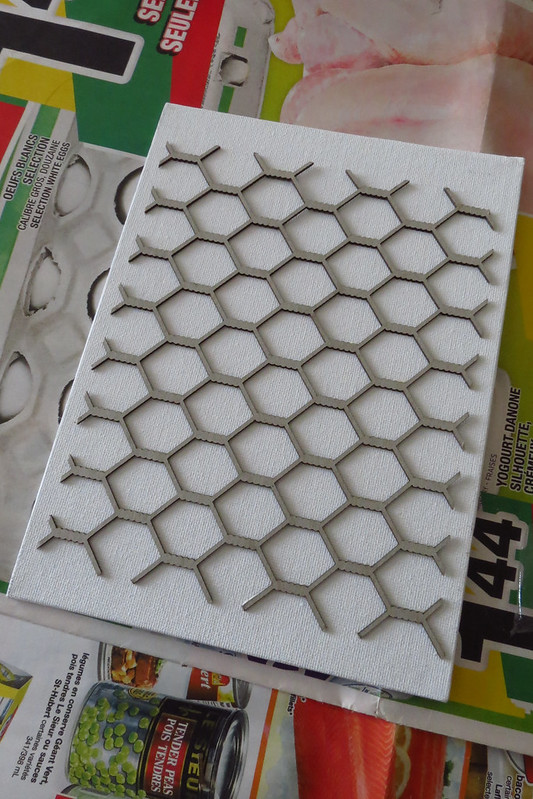
1) First, glue your piece of chipboard to the canvas.


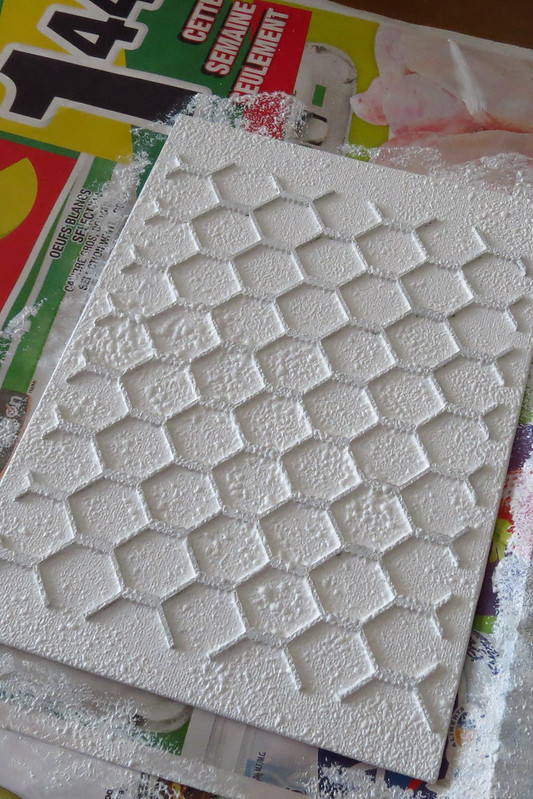
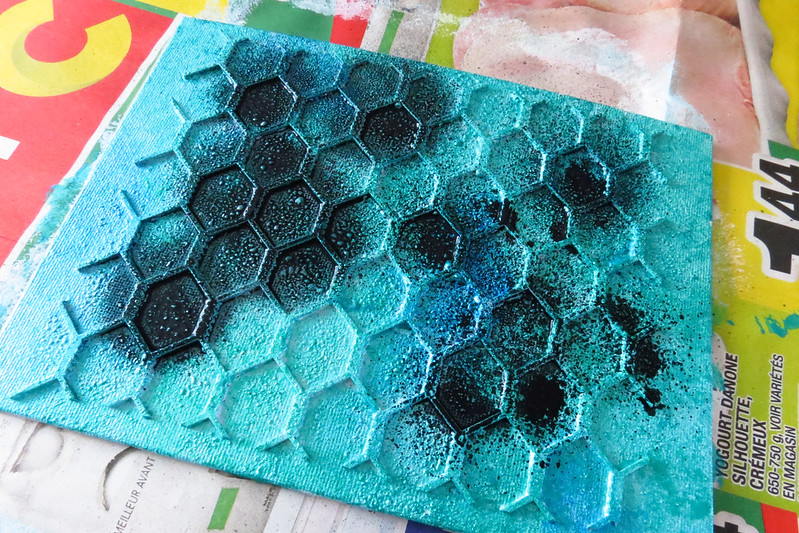
2) Apply gesso with the sponge all over the canvas and the chipboard. Dry with the heat gun to create texture and bubbles. Wait until it is completely dry before moving on to step 3.


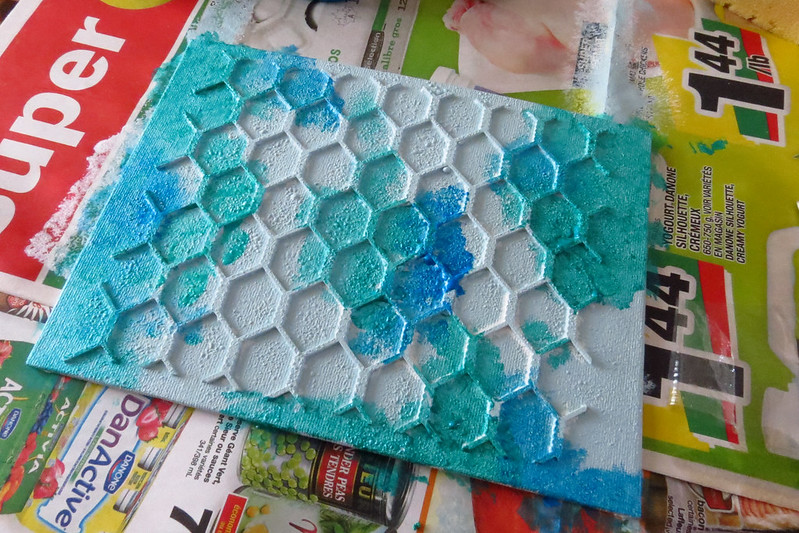
3) Apply acrylic paint with the sponge. As you can see, I used a very light shade of teal. You can use a darker color if you want. Dry with the heat gun if you wish to speed up the process. Wait until it is completely dry before moving on to step 4.


4) Using your paint brush, dab touches of your first Silks color all over the canvas. Don't let the color dry.


5) Do the same with the second color. Ensure the colors overlap. Then proceed with the third color if you use one. -- I'm sorry, I forgot to take a picture of the finished background with the third color. :) -- Once you are done, dry with the heat gun if you wish to speed up the process. Wait until it is completely dry before moving on to step 6.


6) Spray black mist all over your canvas.


7) Immediately after spraying the black mist, use some paper towels to wipe most of it, as if you were dabbing some paint on the canvas. However, try to leave as much black as possible in the creases to add dimension to your project. Add more mist if needed. Once you are done, dry with the heat gun if you wish to speed up the process. Wait until it is completely dry before moving on to step 8.


8) Spray the other mists all over your canvas. Dry with the heat gun if you wish to speed up the process. Wait until it is completely dry before moving on to step 9.


9) Apply both colors of Inka Gold with your finger on the chipboard. If your Inka Gold is dried out, like mine, just dip your finger in water. This will dilute the Inka Gold and you will be able to add color.


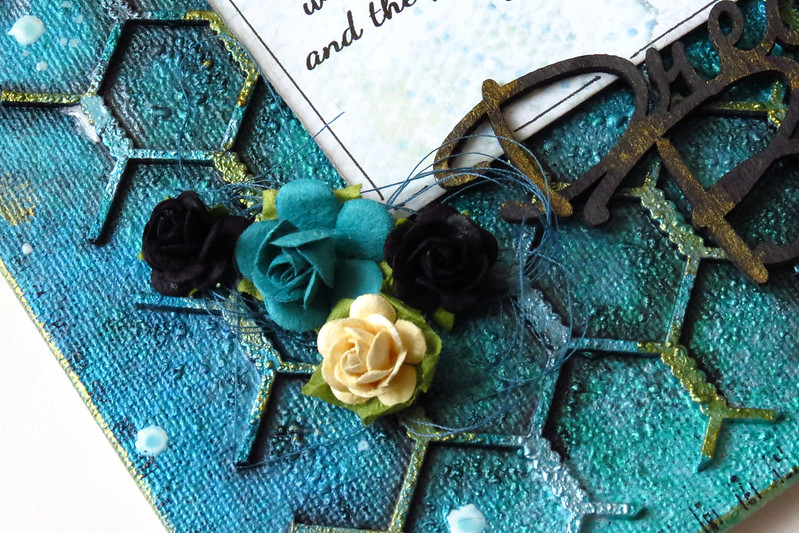
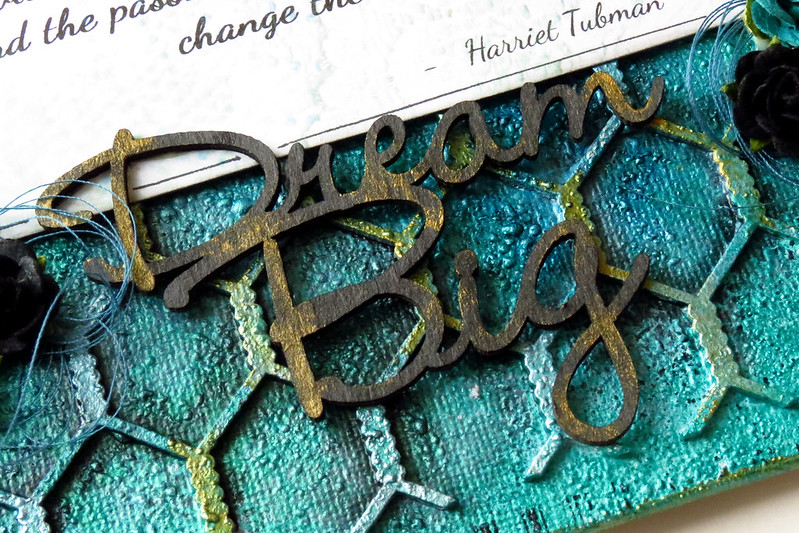
10) Use the black mist to color your title. Add a touch of Inka Gold to it. Glue the quote, the title and the embellishments on the canvas. Stamp some details with your stamps and black ink around the canvas.

Here's the end result:


And some close-up views:


Wednesday, February 26, 2014

Blue Fern Garden papre layout and card Yuko


Hello! Yuko here!
New paper "Blue Fern Garden" is very beautiful!!!
I love these  papers and chipboards!


I made the layout using this beautiful paper and chipboard!


【CAPTURE the moment】
Vintage Keys

The texture was attached to the paper of pasteboard with modeling paste,
 and pan pastel colored. 


The paper was cut off in the shape of a lattice. 


The chipboard of this title is easy-to-use in a very good size. 
It was processed with texture paste and acrylics paints. 


And one more layout.


【dream】
Heart Borders
The Optimist Word Set
 Tattered Diamond Bits

Even if a paper is very thick and it processes it in mist etc.,
a favorite does not curve!


I painted the crackle paint to this title.


 And I made ​​a card with the remaining paper.


Blue Fern products: Royal Page Baubles


Thank you for seeing! 
Making a layout from this wonderful product from now on enjoys itself, and it is !. 


Yuko


Tuesday, February 25, 2014

3 Times Color and media


Hi, Olga here! I love Chipboards in mixed Media. You can use them in many ways.  I like to use them as main elements. Here I use  Memory frames, This is my Life and "CLICK" from Picture Perfect, as black accents. And Blue fern Bits  as red accents. WIth multicoulor background i have nice looking canvas .


 This is my life i covered with UTEE and get this amazing gloss effect!!


 If you like colors all around You page this one should interest you . I use Circle Groups  first as mask for my background, then as element of my composition. I use also "leftovers" from this chipboard.  I added some Widgetworks and Boys will be Boys element.


If you are curious how exactly i did it i made Step by Step Video with this boyish work


And again chipboard as accents. I had amazing vintage style photos of Young Lady with red accent. I Made vintage style work with red shiny chipboard accents.  I use Winter Page Dangles and Heart set. To add title to my work i use Delightful from  The Optimist Word Set