Showing posts with label Optimist Word Set. Show all posts

Sunday, January 11, 2015

Elena Morgun wiht a video tutorial

Hello!

Elena Morgun here, to share with you my first video as an Educator for Blue Fern Studios, and I am so excited to join this amaizng team!
But first a little about myself:

I'm 25 years old. I live in Ukraine. I am a happy mother to 2 lovely kids.
Scrapbooking is a huge part of my life, and it is more than a hobby by now. I can not imagine my day without scrapping. I am happy to share my tips and knowledge in my tutorials.
I am constantly learning new things. I am playing with new techniques and materials all the time. I am open to the experiments and you can often see their results in my creations. One of the most distinctive characteristics of my style is that I love mixing dark grunge accents with the tender flowers and lace.
I’m delighted to be joining Blue Fern Studios on this new journey!

I hope you enjoy my creations!

You can also find me HERE on my blog and HERE on my Youtube Channel.

Layout "Sunshine"


Blue Fern Studios products used:
  • Paper - Sanctuary: Bountiful
  • Chipboard - Panels - Rings Panel
  • Chipboard - Textures - Turkish Bits
  • Chipboard - Shapes - Vintage Keys
  • Chipboard - Words - The Optimist Word Set
And I have new card to share with you.
Blue Fern Studios products used:

  • Chipboard - Flourishes - Damask Flourish (2)
  • Chipboard - Shapes - Vintage Keys
  • Paper - Montage - Calling Cards

I hope I have inspired you today :)

Take care,
Elena Morgun

Friday, October 24, 2014

colors and pastels 3 LO by Olga

Hello !

Lately I often use yellow. Lots of yellow. In this work I use Ups and Downs Panel and arrows from it. I use combination of sweet photo of my little dude :) As title I use sentence from Optimist Word Set and some Filmstrips.

For this one I use one of my summer nature pictures .  I used here Checker bits and Jeweled page dangles as elements and Dream Big sentence from Optimist set as title.  Dangle is covered with glitter I really like this look that transparent glitter gives on works ! I used also BFS papers from Ombre dreams collection


Here I also used summer photo and soft pastel colors from Ombre dreams. I really love this collection!
One of Capture Words sentences is title of my work . one graduated circle and one of pettie butique frames fill up my composition.

Friday, October 10, 2014

A layout, a canvas and a card with Jackie

Hello! It's Jackie with you today, sharing three projects for October.

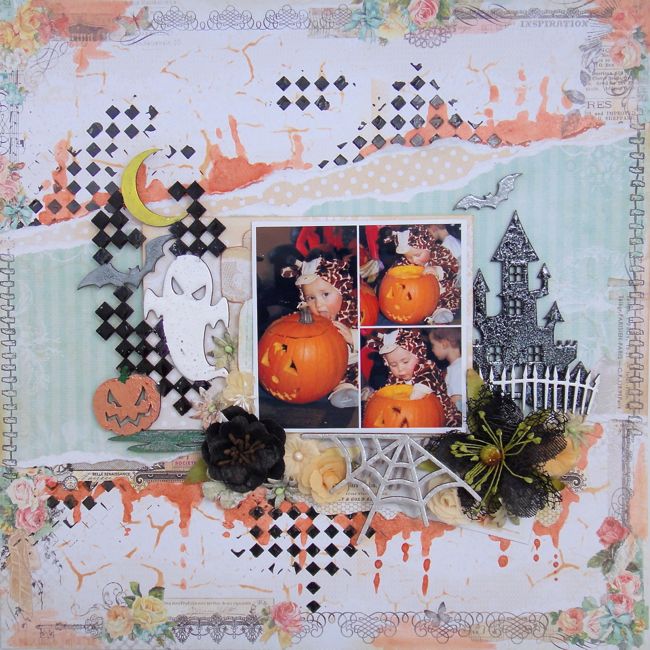
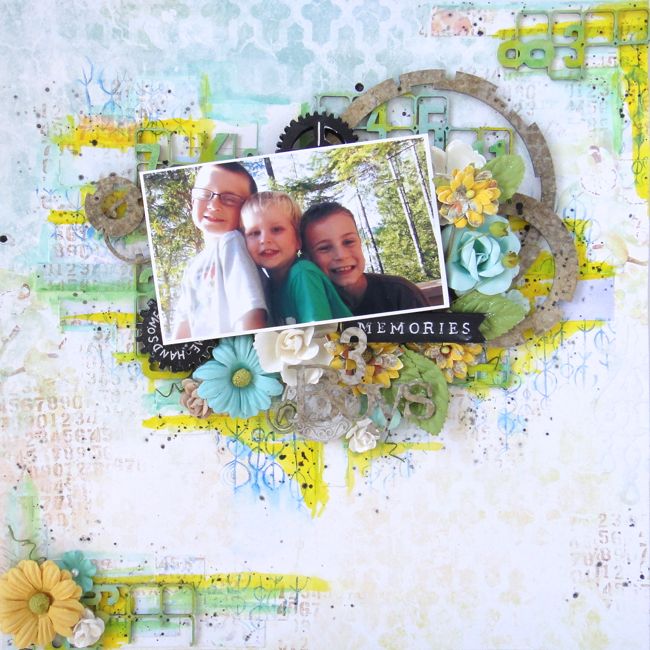
First up is a Halloween layout using the new Montage collection. I love how versatile these papers are - a little strategic layering to cover the more non-Halloweeny elements (in this case the fairy on the Fairyland paper), some thematic paint colours and you're off to the races. Paired with Blue Fern Studios' Halloween chipboard, and you have the makings of a spooktacular layout.


The Halloween Collage chippy is so cool - it just had to be the centrepiece of my layout. I treated it with a combination of painting (the moon, pumpkin and the green base of the grass) and heat embossing (for the ghost, bat, checkers and atop the painted grass) using one of my favourite techniques for the heat embossing - painting on the embossing ink with a fine paintbrush to allow me to use several colours on the same embellishment.


Once I'd painted the grass green I wanted to give it a little texture, so I use the same silverizing embossing powder I'd used on the bats, but sparingly this time, to give the illusion of dew on the ground.


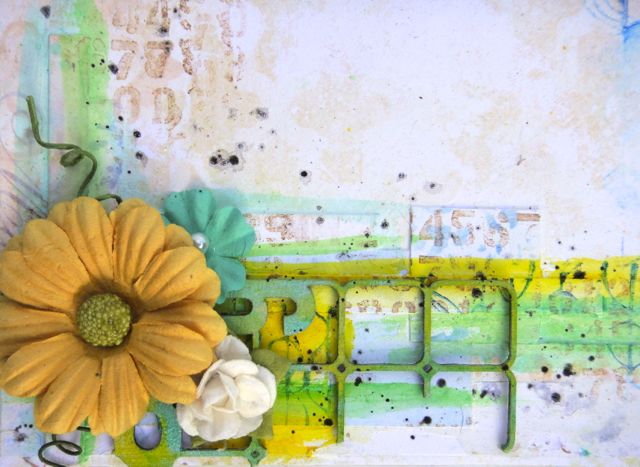
Carrying over the diamond pattern of the Halloween Collage chippy to the background using a checker stencil rotated to create diamonds rather than squares and glossy black paint helped to marry the chippy to the Montage papers and give the whole layout a more Halloween-y feel. I added some sparkly orange watercolour paint and black and orange flowers to complete the transformation.


One of the Cobwebs chippies, painted white and heat embossed with a shimmery powder, was great for filling in a gap in the cluster while letting the details in the fussy cut piece from the Society paper peek through.


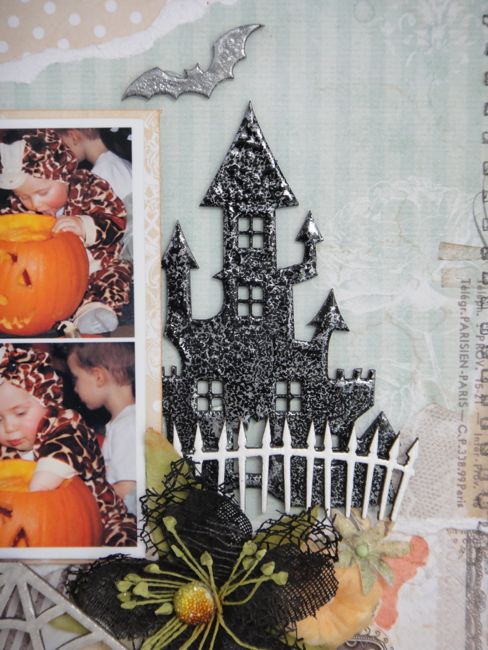
The Creepy House chippy was heat embossed black, and then sparingly with silverizing embossing powder for a worn, pitted appearance.

Blue Fern Studios Products:

Montage papers:
- Fairyland
- Society
- Now and Then

Chipboard:
- Halloween Collage
- Creepy House Set
- Cobwebs

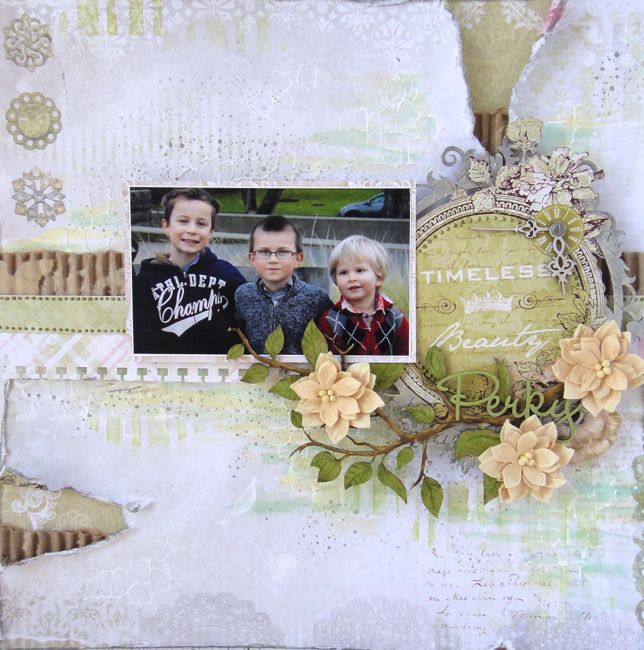
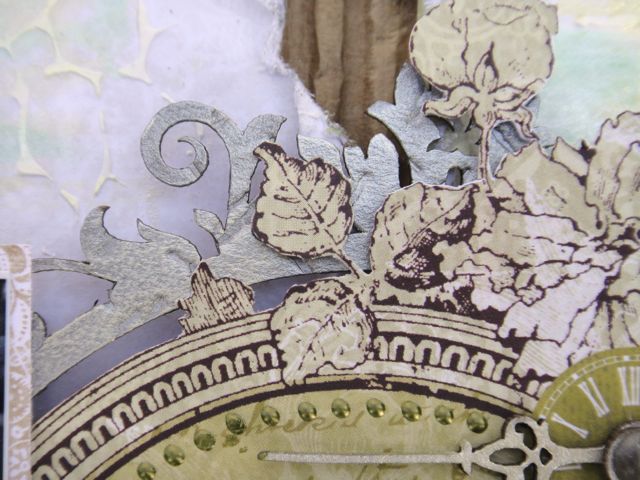
Next up I have a card created from a piece of leftover pattern paper from the layout above. I am loathe to cut into a fresh piece of 12x12 paper to make cards, but I'm always eyeing my scraps to see what leftovers I can use for cards. When I was tearing the strip of Now and Then paper, I was sure to save the lovely fussy-cuttable image from the flip side of the paper. I wanted to keep the background fairly simple to highlight the incredible details from the paper, so I used a piece of watercolour paper which I painted with complementary colours, then added some stencilling and flicks of black ink. I left the Turkish Bits chipboard naked for a bit of extra contrast.


Blue Fern Studios Products:

Montage papers:
- Now and Then

Chipboard:
- Turkish Bits

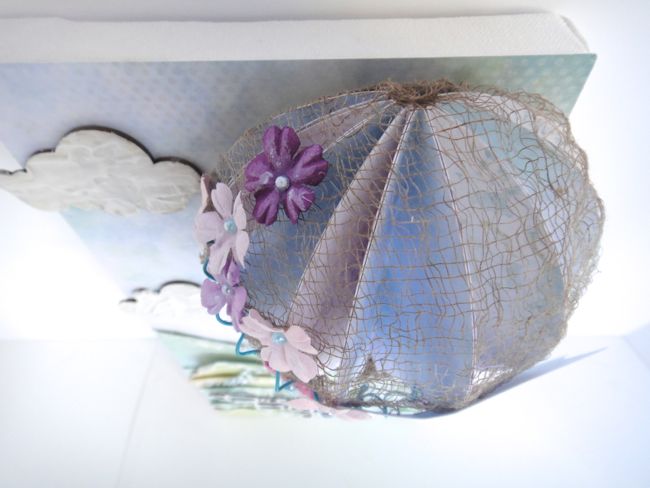
My third project is a whimsical 6" x 12" canvas featuring the bottom half of the Olga's Balloon set. The two pieces are designed to be layered together, but I chose to go "off label" in my usage as I wanted to add crazy dimension to my canvas. Never fear, the top piece will find a loving home on another project!


To get the 3D balloon, I traced the shape of the balloon part (the second image in the graphic below) 8 times onto Charlotte's Dream paper (it took 2 sheets) and cut these out, then folded them in half, alternating sides so that 4 pieces have the blue side and 4 pieces have the flowered side showing. I then adhered the negative sides together.


Before I adhered my paper balloon to the chippy I set about altering the lines and the basket. For the lines I painted them with a couple of shades of brown, and touched them up with white gesso once dry.

For the basket, I trimmed a scrap piece of Ombre Dreams paper to the exact size of the basket, and then sprayed it with a gold/brown. I then set about weaving my basket out of wire thread. It was finicky work, and I'll admit I burnt myself several times on my glue gun. I adhered the thread to the left and the bottom and then wove each individual strand, fastening it to the opposite side at the end. It is imperfect, and I love it! A little touch of gesso for aging, and I was ready to adhere my balloon to the chippy.


To add detail to the top of the balloon, I created a net out of gauze coloured with mist, and adhered wire and flowers, as well as a banner from the Dream Cards paper.


To build my background, I started with a piece of Susan's Dream paper trimmed to the size of the canvas then set about creating my landscape by tearing hills from Ginger's Dream.


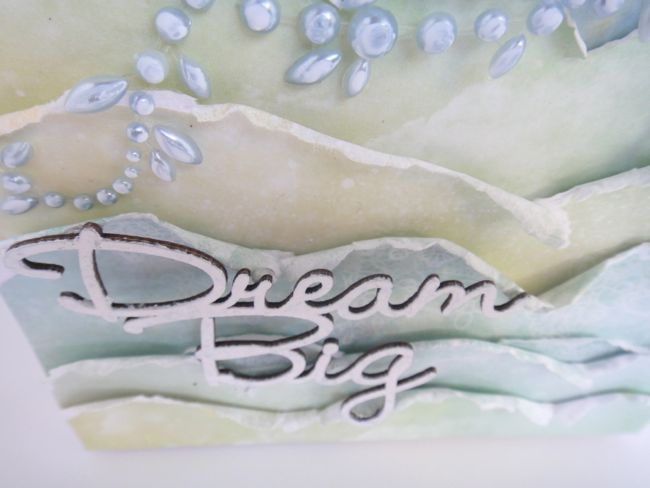
What would a scene of a hot air balloon be without drifting clouds? To create texture on the Cloudy Skies chippies, I used some snow texture paste.


Blue Fern Studios Products:

Ombre Dreams Papers:
- Susan's Dream
- Ginger's Dream
- Charlotte's Dream x2
- Dream Cards

Chipboard:

- Olga's Balloon
- Cloudy Skies
- The Optimist Word Set


Sunday, August 10, 2014

Jackie's August Creations

Hello Blue Fern Fans! Jackie with you today to share my August creations with you.

We are experiencing an amazing summer here on the West Coast of Canada, and the long, hot, sunny days, and the sunshine and blue skies inspired the colours for this first layout.


One of the things I love about Blue Fern's panels is the ability to cut them apart into pieces that I can spread throughout my layouts. For this layout I started with the Number Grid Small, which I primed with Gelatos then coloured randomly in blue, yellow and mint green, and cut apart into one big piece to back my photo and two smaller pieces for my corners.


These little bits look good embellished with flowers or just on their own.


On both of my layouts this month I've layered on several layers of chipboard. Because chipboard is so lightweight and can be altered in so many ways, it is easy to make a striking composition using several different pieces. On top of the Number Grid I placed some of the Techno rings. To get the water-stained effect, I first sprayed the rings with a couple colours of brown mists, then stamped overtop with a number stamp.


For my last layer, the title, I cut one of the 3s out of the Number Grid and cut the "Boys" from the Boys Will Be Boys chippy.


Blue Fern Studios Products

Ombre Dreams papers: 
- Ginger's Dream
- Charlotte's Dream
- Susan's Dream
- Shannon's Dream

Blue Fern Studios Chipboard:
- Number Grid Small
- Techno Rings
- Boys Will Be Boys

My second layout has a softer palette, inspired by the colours in my photo.


I started by adding some texture to the background inspired by the printed images on the paper with paint, texture paste and stamping. I love how multilayered the images on the papers are - it makes it so easy to add custom background work.


 For this layout I also layered multiple chippies. The top layer is the word "Perky" from The Optimist Words set, which I treated simply with green chalk ink.


 The next layer is the Spring Branch, which I painted with several colours of chalk ink to create dimension for the bark and leaves before adding a couple of flowers.


My last layer is the Floral Clock. I fussy cut the "Timeless Beauty" section from a second sheet of Timeless paper, and used the clock hands from the Floral Clock to top it off. The Floral Clock itself is behind the paper, providing an ornate frame.


 To add a little dimension to the Floral Clock, I first dry embossed it, then painted it with several colours of metallic paint.


Blue Fern Studios Products

Blue Fern Garden papers:
- Timeless x2
- Picnic
- Calling Cards
- Parlour

Blue Fern Studios Chipboard:
- Spring Branch
- Floral Clock
- The Optimist Words set

Thank you so much for stopping in today. Remember to keep sharing your Blue Fern Studios creations with us - we love to see what you create with our products!

Friday, July 18, 2014

Round & Round Circular Designs- by Keren Tamir


Keren here and its my turn today on the Blue Fern Studios blog. I have an all around theme this month which is "Circles". I have used different circular designs this month to create each of my layouts. I hope they inspire you to create with circles and love them just as much as I do!!!

First up is:

"Good Vibes"

I used the Ombré Dreams- Leslie's Dream paper as a background for this layout.


I just love using circular designs on my layouts and I tried to incorporate different circle motifs in each of these layouts. I also used stencils and stamps to create different textured circles in the background.


I framed this cute photo of my daughter picking strawberries in the field with the treasured floral chipboard frame. I primed it with gesso and then colored it with markers.


Then I added circles from the Circle Group set which were coloured in yellow marker. finally I added the Good Vibes title on the side because she's truly just so happy here!!


<<<<<<<<<<<<<<>>>>>>>>>>>>>>

"Joy"


For this layout I used the Techno rings to frame the photo of my daughter painting and one of the words from the Ombré Dreams- Dream Cards paper.  First I primed them with gesso, Then I painted them with gelatos and added some stickles glitter. I also stamped them with a circular stitched stamp (which is the same stamp used on the background). Finally I created white lines on them with a white acrylic marker.


I used the Ombré Dreams- Joyce's dream and matched all the embellishments and inks to it.


my daughter had so much fun using the dropper to create splatters on the page. It gave me so much joy watching her and so I used the Joy title from the Good Vibes chipboard word set.


<<<<<<<<<<<<<<<<<>>>>>>>>>>>>>>>>

"Natural"

I used the Ombré Dreams- Susan's Dream as the background for this layout and added some layers with the Dream Cards paper.


Finally I want to show you the layout I created for the July sketch challenge. I also happened to use a circular motif so I thought I'd share the design.


The small circle flourish chipboard frame was perfect to frame this natural looking photo of my daughter.


I also used the bohemian flowers, little birds and a frame trinket to to add to the natural look. Finally I added the natural title from the All Natural word set.


Thank you so much for visiting the Blue Fern Studios blog today. You can still enter the July sketch Challenge Here

Have a wonderful day!!

Keren