Showing posts with label Laughter Happy Smile. Show all posts

Friday, January 16, 2015

January projects by Karita Vainio

Hello!
It´s Karita Vainio here with you today, 
and this is my very first post as a Blue Fern Studios designer.
I´m very excited about this new journey with a new amazing team and especially with the gorgeous products.


 Here´s something about me:
 I´m a bit over fourty years old. Mother to a three amazing children, two grown up boys and one teenage girl
Also I´m a wife to a kind and supportive man. We´ve been together 25 years now.
We live in southern Finland, close to our capital city, Helsinki.
We live in a small house, which we build 10 years ago.
I love to decorate our little home and in the summer I spend my time in our small garden, which is my favourite place to be and enjoying the summer.

I love creating things. I love to make layouts and cards, and sometimes I also make art journals and canvases.
I think my style is romantic mixed together with shabby and mixed media styles.
I love to use different textures in my projects and  my motto is more is better.
I´ve been crafting and scrapbooking like 7 years now and I feel like my journey has just began :)

If you like my work, you can find my blog here:

---------

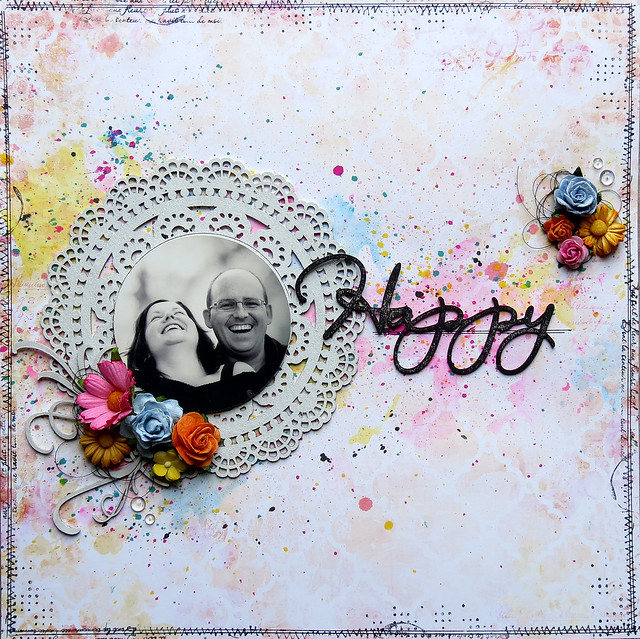
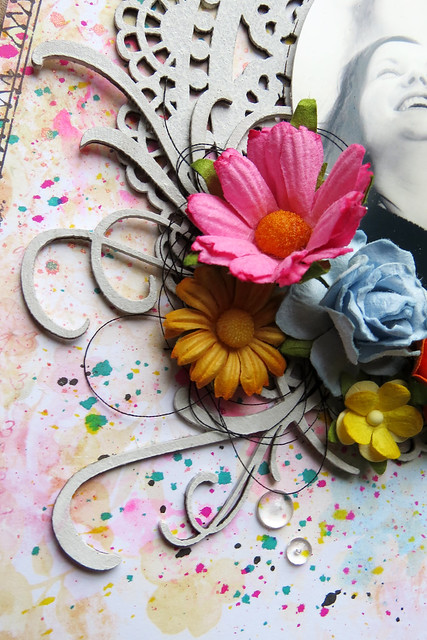
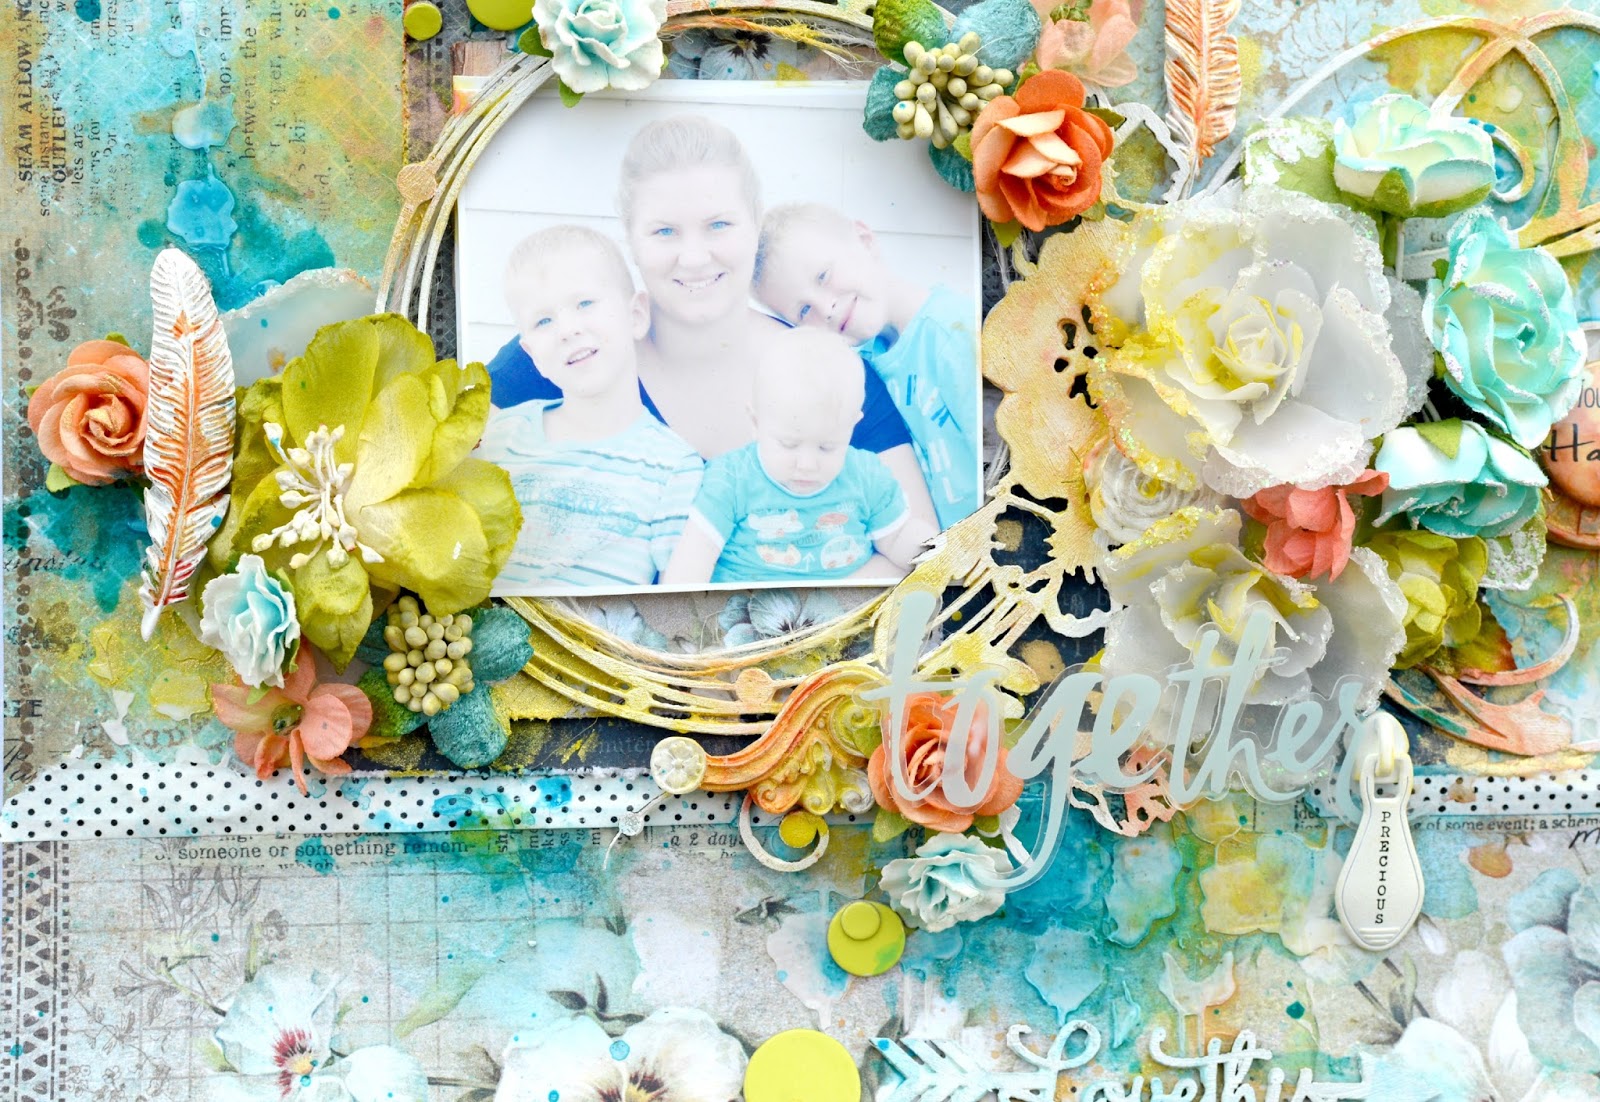
My 1st project is made by following the January sketch. 


For this layout I´ve used the Correspondence and Botanical Garden papers from the new Sanctuary collection.
And the beautiful chipboards I´ve used are Notebook Edges, Arrow Words and Smile.

I´ve added white gesso on the papers and chipboards and after they dried I started adding some paints and mists.


Paper: Sanctuary collection: Correspondence, Botanical Garden
Chipboard: Notebook Edges, Arrow Words, Smile


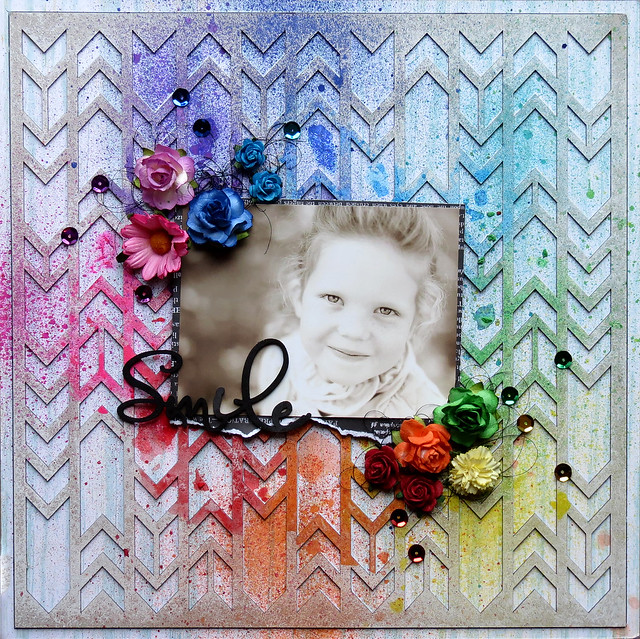
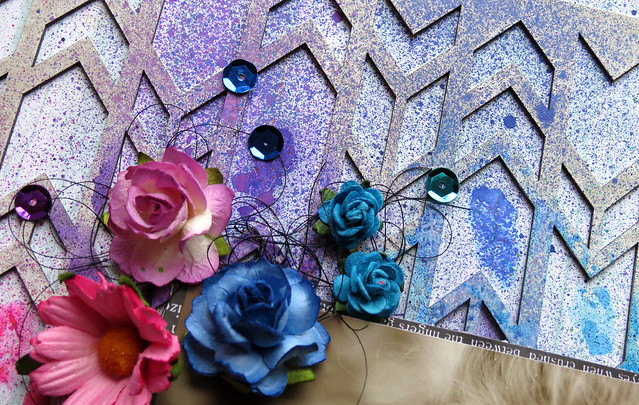
And here´s my 2nd layout..


I`ve used the Botanical Garden and Garden Plaza papers from the Sanctuary collection.
And the great chipboards are Shabby Flakes and Roman Clock Set - small.
I´ve cutted the paper on the top a bit smaller than the bottom one and punched the edges from here and there to give a grunge effect.


Paper:  Sanctuary collection: Botanical Garden, Garden Plaza
Chipboard: Shabby Flakes, Roman Clock Set - Small


My 3rd project for this month is a canvas.

Paper I used for this canvas is Boudoir from the Blue Fern Garden collection.
Text is cutted from the Calling card from the Sanctuary collection.
And I just loved these gorgeous chipboards called Jasmine Collage and Checker Bits.

For this canvas I used lots of gesso and modelling paste.
And mists and paints.


Paper: Blue Fern Garden Collection: Boudoir, Sanctuary Collection: Calling Cards
Chipboard: Jasmine Collage, Checker Bits

I hope you liked my projects...
Thank you for visiting here and see you next month!

-Karita-

Tuesday, January 13, 2015

Three layouts by Marie-Josée Hamel

Hello, Blue Fern Studios fans! I am so glad to once again be part of the Blue Fern Studios design team this year. Last year was amazing and I am sure 2015 will be just as fantastic, with tons of new products to work with. I am grateful to have the chance to share my projects here with you each month and I hope you will find them inspiring.

You can also visit my personal blog, Les créations de mariemily (in French and English). There, you will find many more projects I create with Blue Fern Studios chipboards and papers.

Without further ado, here are the three projects I want to share with you today.

"Memories" layout

For this project, I decided to go with the industrial look and to use NO flowers, a big challenge for me! :)

I started with the Circuitry and Software Pieces chipboards, which I glued to my background, the Calling Cards paper from the Sanctuary collection.


Then, I applied a thin coat of gesso with a sponge and sprayed various colors of ink all over my chipboard.

I also stamped lots of patterns, using various stamps and black ink, on top of the chipboards and on the background.


I altered the Faucets and Hooks and Keys chipboards with black ink and added them to my layout.


I put the Memories frame from the Memory Frames set on top of my photo.


"Happy" layout

For this layout, I used the Leslie's Dream paper from the Ombre Dreams collection for my background, which I altered with Gelatos and various mists.


While it was drying, I altered the Ruth's Doily chipboard as well as two pieces of the Mini Flourishes chipboard set with white gesso. I also stamped black archival ink directly on the word Happy, from the Laughter, Happy, Smile chipboard set. Here are some close-up views of those pieces.


"Smile" layout

For this layout, I used the Fairyland paper from the Montage collection for my background.

 
I glued the Ups and Downs Panel on top of it, on which I applied a tiny coat of white gesso. I used diluted Gelatos to add splashes of color. Then, I sprayed eight differents colors of mists on top.

The title is made with the word Smile from the Laughter, Happy, Smile chipboard set, altered with black spray ink. Here a few close-ups of my layout.


Thursday, January 8, 2015

January Design Team Projects by Melinda Thompson

Hello!

I am so excited to share with you my very first projects as a designer for Blue Fern Studios.


My name is Melinda Thompson and I am from Australia and live in a growing country town called Emerald right in the heart of Central Queensland.  Its dry and its hot and our summers last for around 8-9 months of the year and we only have an odd week or two where we experience cold weather. And even then its not cold compared to what others experience...we may only need to pull out the ugg boots and jumpers!

I am married to my best friend for nearly 15 years and have 3 adorable, but full of life, boys who are the centre of my life and who I mainly scrap about.

I started scrapbooking when I took maternity leave from my job to have my first baby and it just grew from there.

A bit about my scrapbooking style:

- Even though I have 3 boys which means I am constantly surrounded by cars, trucks and lego and all things noisy and dirty, my pages are super girly and feminine.  I will nearly always use flowers and usually alot!

- I am inspired by colour and will even scrap using pink on a boys page...after all its my art :)

- I love texture so my pages are very dimensional they never fit into albums.

- The backgrounds to my layouts are always created using lots of mixed media techniques and products.

Looking forward to joining the Blue Fern Studios team for 2015!

You can find more of my work and follow me on my blog:
www.minseverydaymoments.blogspot.com


My 1st project was using the January sketch.  For the background of this layout I have used the paper Garden Plaza from the Sanctuary Collection and created some layers behind my photo using the Calling Cards also from the Sanctuary Collection.


I have used a stunning Tattered Butterfly, the Notebook Edges and the word Laughter from the Laughter Happy Smile pack.  With each of my chipboard pieces I coat them with Gesso first and then in this instance I have given them a light covering with some paint and mist.


Paper: Sanctuary Collection: Garden Plaza & Calling Cards
Chipboard:  Notebook Edges, Tattered Butterfly, Laughter


My 2nd project I used the Ombre Dreams: Gingers Dreams paper for my background.


I have used a couple of pieces of Graduated Circles...love these! I have tucked them in an around my layers behind my photo and covered them with mist and paint. The stunning La Plum chipboard piece was lightly painted and then dipped in glitter.


I have also used a piece from the Nested Circle pack, cut it in half and placed at the top and bottom sides of my layout.


Paper: Ombre Dreams: Ginger Dreams & Dream Cards
Chipboard: Graduated Circles, Nested Circle, La Plume


For my 3rd project I was drawn to the gorgeous vintage background of the Meadows of Time paper in the Sanctuary Collection.  But in my usual style I brightened things up!


I cut the bottom section off and turned it over to reveal the beautiful flower pattern that was on the reverse side.  I have used the Small Circle Flower Flourish as well as one of the Corner Flourish.  Down the bottom edge of my layout I have included one of the Arrow Words "Love This".


Paper: Sanctuary Collection - Meadows of Time, Bountiful
Chipboard: Arrow Word, Small Circle Flower Flourish, Corner Flourish


Thank you so much for visiting, I hope you enjoyed my projects...see you next month!

Melinda

Wednesday, January 7, 2015

January Projects by Ulrika Blomfelt

Hello!

I´m so happy to share my first work as a Blue Fern Studios designer with you all!


My name is Ulrika Blomfelt aka LillBlomman and I´m a swedish girl who loves all about scrapbooking! I started scrapbooking in April 2006. I live in a cute yellow house next to the woods and still close to our capital Stockholm. Here I live with my very loved hubbie our for a long time longed for son Viggo and a very cute but a bit crazy dog. I became a mother late in life and after that my scrapbooking ment even more for me! You will see lot of Viggo in my work because he´s the one I scrap most about. 

I love to create in all scrapbooking gengres! It´s too fun to just choose one of them. I love to pick out just the right color combination for a project and then continue my work. My style is a romantic mixed-media style but it can change from one project to another. I love to try new techniques and try to develop in my art all the time. I´m so proud to been asked to design for this company and thrilled to work with all amazing supplies. I´m looking forward to design with all the amazing and talented girls and spread the joy of crafting during 2015!
You are also very welcome to my personal blog at: www.lillblommanskapar.blogspot.com

I love making cards so I have two cards and two layouts to show you today.
For my card I used Sanctuary Bountiful and Sanctuary Calling Cards.

I painted the Natural Sprigs first in one shade of green and then I added a thin coat paint with glitter in it.

I used a lovely quote from Sanctuary Calling Cards paper inside of the Roman Clock set.

My next card looks totally different from the first but I actually used the same papers.

To create my sign I used the Damask Panel. First I painted it with Gesso. Then I added a rub-on sentiment. I also gave it a coat with Crackle Paint and light blue fluid chalk.

I painted Mini Flourishes with black acrylic paint and then I added a coat of Glossy accent.

For my layout about my boy and all his Christmas presents I used Sanctuary Botanical Garden and Meadows of Time.


For my Graduated Squares I wanted lots of texture. After Modeling Paste and Acrylic Paint I added some glass glitter.

This is my take on January sketch. I love to add gold to my work and here I mixed the gold with black and lilac.

As background I used Sanctuary Birdsong Melody. First I gave all my Chipboard pieces a coat of Gesso. On my Fancy Signage I used Gold Acrylic Paint and then I sprinkled over with Gold Rush Glass Glitter. On my Happy word Chipboard besides black Acrylic Paint I added Charcoal Art Sugar.

On my beautiful Butterflies I wanted lots of Gold flakes!

Hugs from Ulrika!

Saturday, December 20, 2014

Sanctuary Projects with Rae

Hello all. It's Rae, sharing my last projects for BFS! It's been an exciting year for me, and I feel so honored to to have been a part of this team! I made all of these projects with the Sanctuary paper collection.


"Remember" Layout


This is my layout that I made for the December Sketch Challenge. You still have time to play along!

I am absolutely obsessed with cemetery statues. I took these pics a few months ago at a huge cemetery here in Denver, and I knew they would be perfect for the Sanctuary papers!

Here's a closeup of two pieces of chipboard that I layered (the ornate frame and a piece of the small Roman clock set). On the ornate frame, I used embossing powders and chalk ink to get that effect. I pressed my black archival ink pad on the clock piece, and used some gold paint.

Untitled Layout

I love all the rich colors in Sanctuary collection and how they are paired with such soft complimentary colors, so I wanted to play with all of them for this layout.


Here's a close up of the small spring iris piece. I treated it with a heavy layer of gesso, then randomly sprinkled clear embossing powder over it, and dried it with a heat gun. Once dry, I used some acrylic glaze paints and water to get this effect.

You can also see the Boston lattice- nothing fancy there- just a coat of gesso!

I used some of the Bohemian flowers from that set under the flower cluster, along with a key from the vintage key set. I used a platinum embossing powder and once it was hot, I pour small amounts of black embossing powder over it, so it only slightly melded on to the platinum.

I used the same technique on the manor hinges.


"Smile" Card

For this card, I used the Bordeaux Layered Frame. I traced the bottom piece on to the Conservatory paper, then adhered it to the chipboard, and filed the edges for a clean look.


 In this close up, you can see the top layer of the frame- I used several colors of embossing powders, layering them to achieve this effect.

I did the same thing with the "Smile" title. 


I hope you enjoyed taking a peek at my projects today, and this past year!

Congrats to the new Blue Fern Studios design team- it's going to be an amazing year!


Rae