Showing posts with label Ginger's Poppies. Show all posts

Sunday, March 27, 2016

March Inspiration by Elena Volchkova

Hi everyone! Today my three works will remind you of spring and romance. I wish you the most beautiful spring!

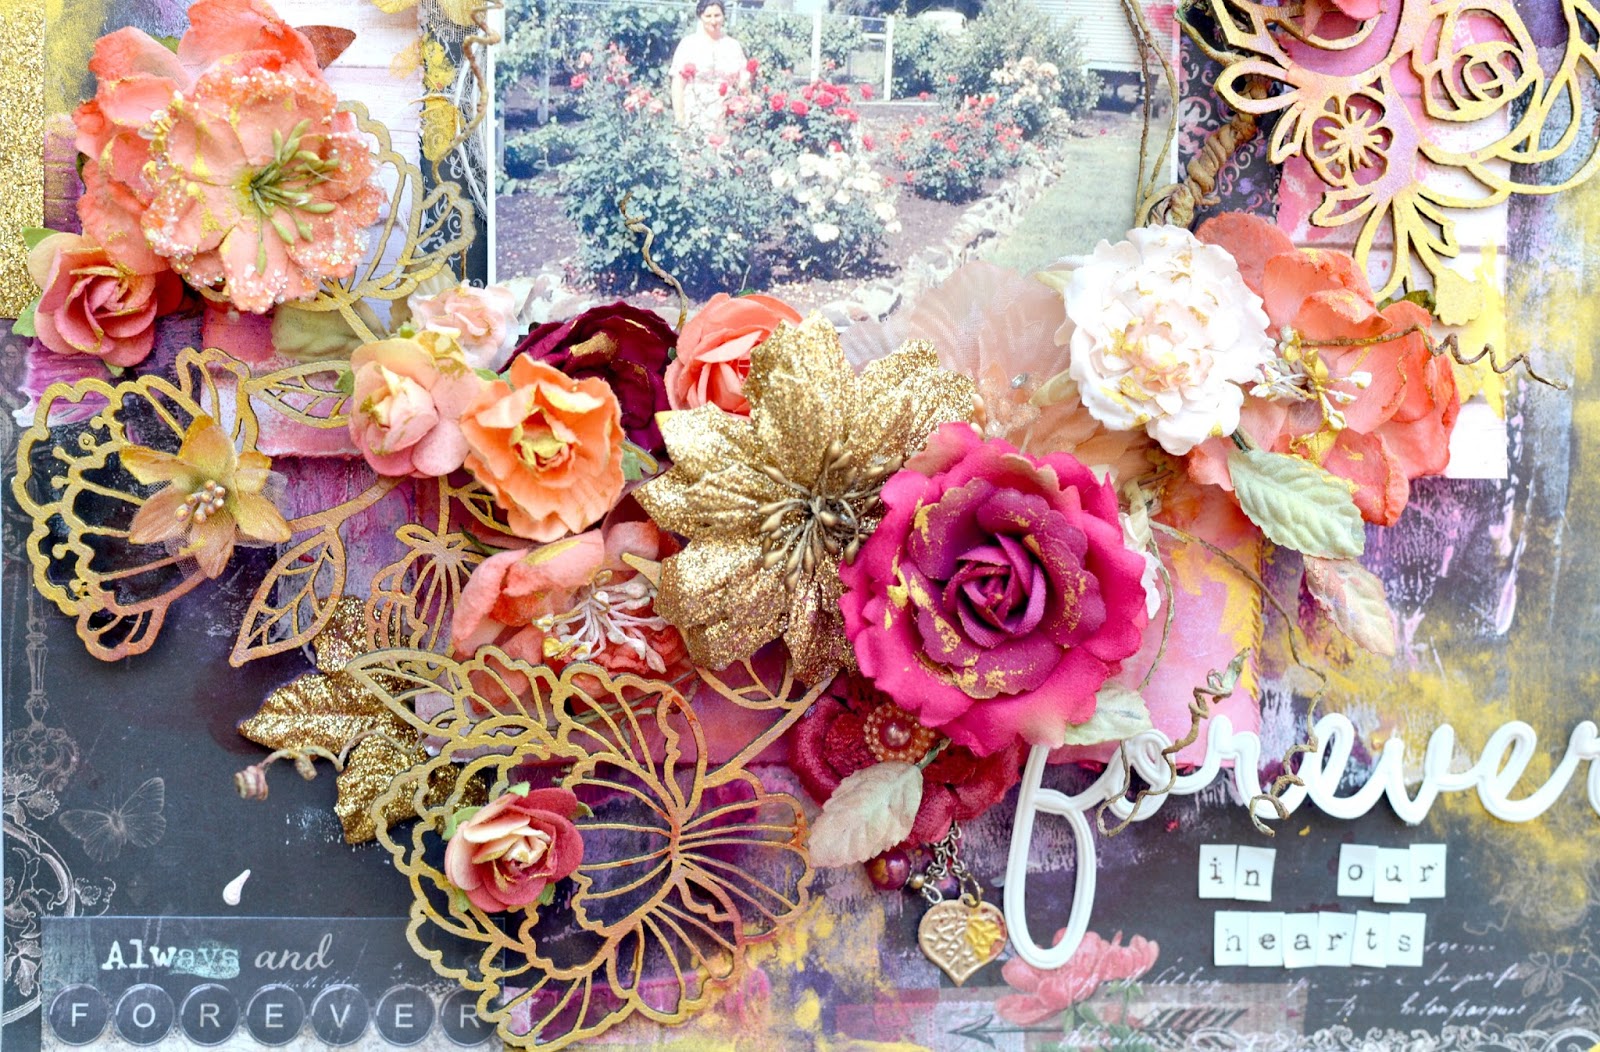
Tropical paradise layout

The first page about my vacation. About the place wh is so beautiful! About happy and joy :)


I used the Ombre Dreams paper as my background. Such light and airy! Chipboard Floral Lattice Bits continued the theme. Colored to turquoise wiht Sea Mist embossing powder and glitters - Blue Ice and Dijon colors.


In this layout, I used a lot of flower. They continued flower in the photo and create the same tropical paradise. Lovely Courtship Blooms and Courtship Roses embellish corne with chipboard Sunshine (The Optimist Word Set). It was covered with mixture of Imagine Ink embossing powders in Honey and Copper.

Stamp Forever with Copper Imagine Ink embossing powder helps to make an interesting background.


On the layout a lot of glitter. I used these three shades - Dusty Rose, Blue Ice, Dijon.
Now all sparkles and shimmers :)


Do you have pictures of travel? Exactly! You can easily repeat the mood of my layout
using products Blue Fern Studio:

Paper: Ombre Dreams - Ginger's Dream
Chipboard: Floral Lattice Bits, The Optimist Word Set
Stamp: Forever
Imagine Ink Embossing Powder: Honey, Sea Mist, Copper
Glitters: Dusty Rose, Blue Ice, Dijon
Flowers: Courtship Blooms, Courtship Roses

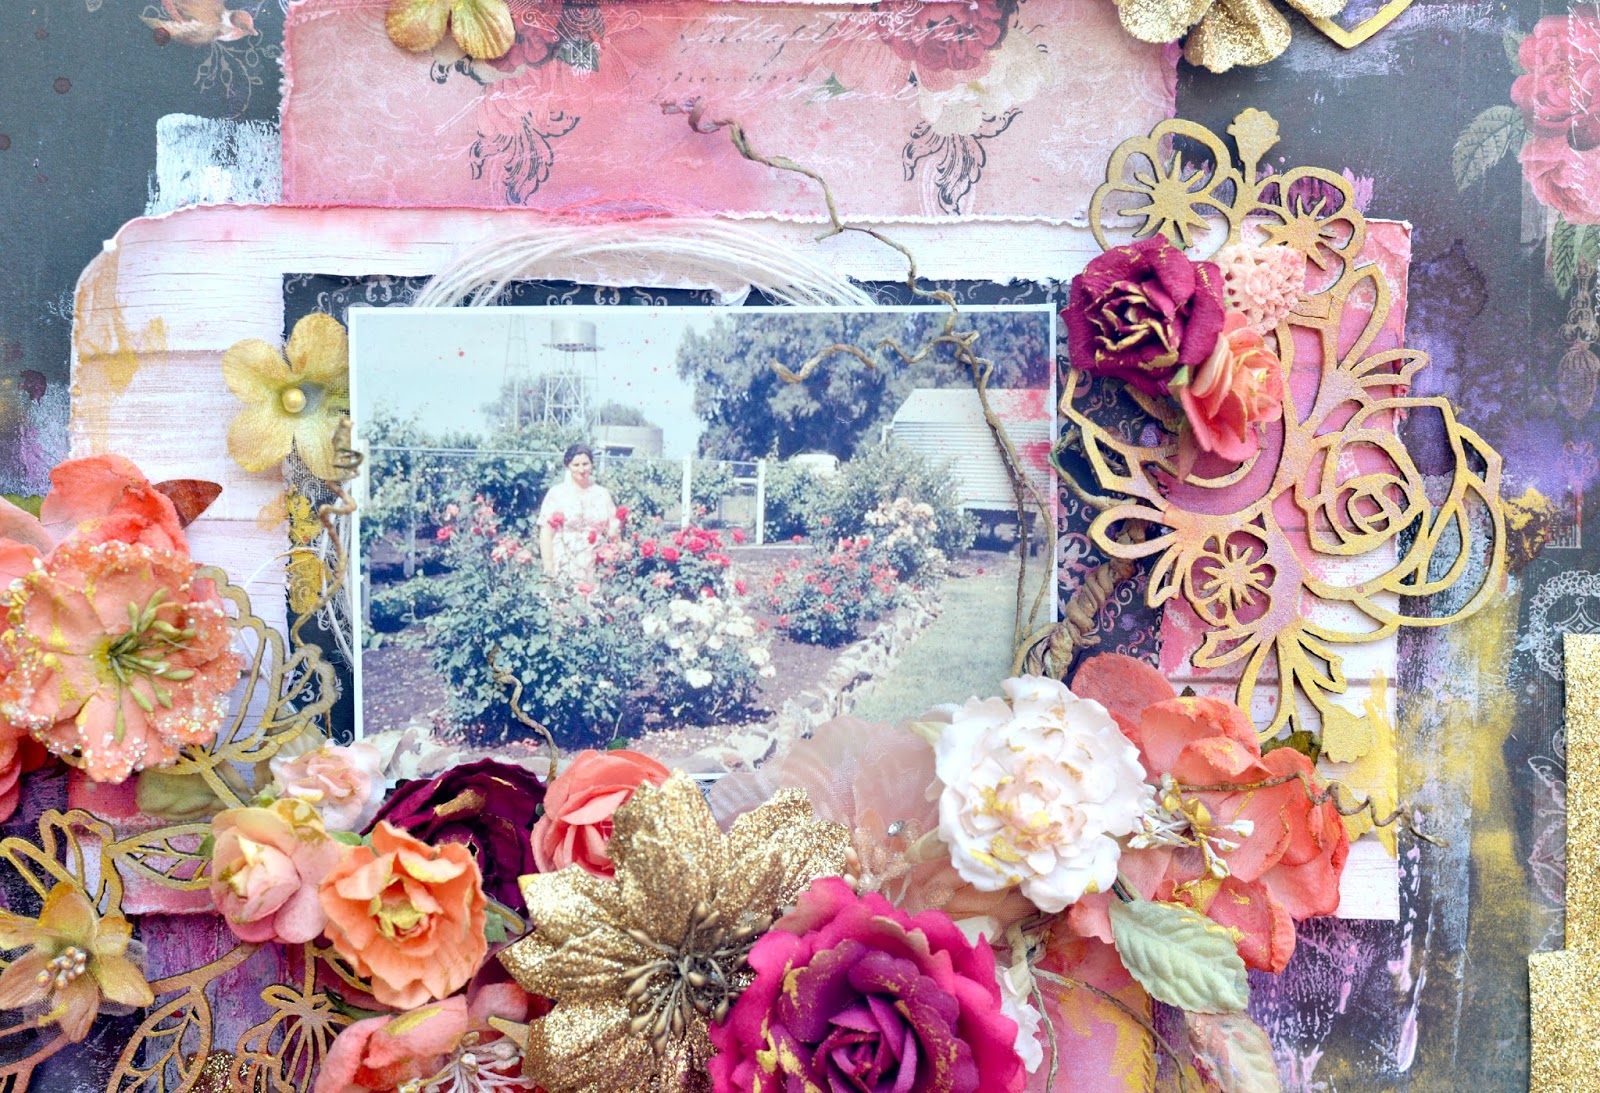
Walking in the gardens layout

My second project of March you can already see. This layout I have made for the Blue Fern March sketch. It's about romance of a country house, a walk in the garden with Courtship Lane collections. 


I used the Vintage Edges and Arcadia Textures stamps with Imagine Ink Iris embossing powder to create some details on my background.

Little Rabbit (All Natural Set chipboard) a wonderfully complements the mood of a summer day.


Here I used the Imagine Ink Celestial embossing powder to color the chipboard word "Fascination" (Serendipity Words 2). And to add some Imagine Ink Iris embossing powder to accent.


I cut a few pieces of paper to layer under my photo, I distressed all the edges. I also added Whimsy Flourishes Chipboard,  lace, cotton rope, paillettes, flowers and berries. 


Blue Fern Studio Supply List:
Paper: Courtship Lane - East Plaza
Chipboard: All Natural Set, Serendipity Words 2, Whimsy Flourishes
Stamps: Vintage Edges, Arcadia Textures
Imagine Ink Embossing Powder: Celestial, Iris, Lilac, Lime, Sage
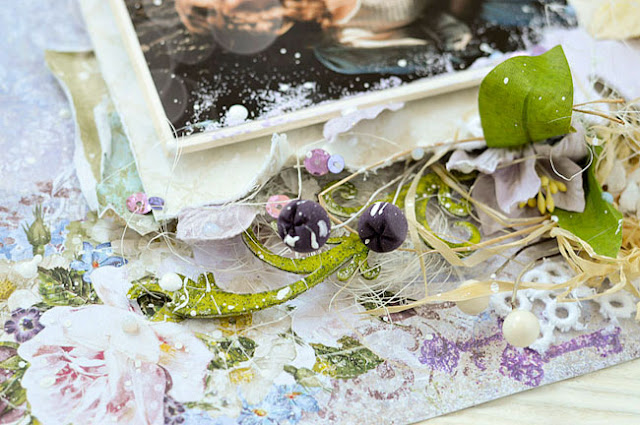

Lace layout

And my third project - canvas, decorated in a light and lacy style. Lady in the photo likes to create lace and I wanted to show her passion in this work.

Layering paper Town Gossip from Courtship Lane collection. Distressed all the edges. Color aсcents added  Lilac and Petal Imagine Ink Embossing Powder: 
You can see pieces of vellum decorated Weathered Doilies Stamp with Lilac and Petal Imagine Ink Embossing Powder.


Chipboard Ginger's Poppies was covered with Imagine Ink Petal embossing powders.


Blue Fern Studio Supply List:
Paper: Courtship Lane - Town Gossip
Chipboard: Ginger's Poppies
Stamp: Weathered Doilies
Imagine Ink Embossing Powder: Lilac, Petal

I hope you enjoy viewing my projects. See you next time :)
Hugs, Elena

Wednesday, September 23, 2015

Sandi's September Creations

Hello, Blue Fern fans! 
Sandi here with you today sharing my September projects. 

My most recent Design Team package contained the new Autumn Anthology collection, papers, chipboard, stamps and oh, yes, the new Imagine mists! Two of my September projects were already done but I managed to get one Autumn Anthology project done for this time around. More coming next month as I adore these papers and matching chipboard, mists and stamps! 

"Lucy @ 33"

I haven't done a "Lucy" layout in a few months, so I was definitely feeling the urge to scrap a photo of her. I chose the Penmanship paper and some matching Calling Card notes for a photo mat and title.  I prepared my background with gesso, stenciling and the new Essential Texture stamp along with a hint of the Leaf mist applied with a sponge. 


The Shrine Frame was gessoed, spritzed with a gold mist and then embellished with some random dark gold embossing powder as well as some clear embossing powder.  I didn't allow the gold embossing powder to completely melt. I left it with some grainy texture. Love the result! The Ginger's Poppies are one of my favorite BFS pieces! They are so intricate and unique. Here I have gessoed them and added touched of distress ink for color. I also colorized the leaf portion with the new Imagine Leaf spray mist. 


Just another close-up of Ginger's Poppies. 


My Garden Lattice Bits on the right were perfect for adding a little something along the edges of my layout. Here they were primed and spritzed with more of the dark gold, tea-stained mist.  This is also a great close-up of the Essential Textures stamp and the new Leaf mist. A few flowers, pearls and it was done. So fun! 

Blue Fern Studios products used:
Paper:
Autumn Anthology Penmanship
Autumn Anthology Calling Cards

Chipboard:
Ginger's Poppies
Garden Lattice Bits
Shrine Frame

Stamps:
Essential Textures

Imagine Mist:
Leaf

***

"The Best Day Ever"

Next, I used more of the Frolic collection to create a wedding layout. I've scrapped this photo before but gave it away, so maybe this one will be mine. I tore a few sheets of the Frolic paper to add layers and change up the look of the Frolic Allegro paper. Then I applied my mixed media, including the new Imagine Mist in Persimmon along with a gold from my stash. There will be new mist colors coming out with each new paper collection from what I understand.


The Butterfly Damask chippy was cut in half and used a layer beneath my photo. I've primed, inked and randomly embossed it. The Arrow Word set provided my little subtitle "Love This" which was primed and spritzed. Lots of paper layers beneath the photo just because I love layers.


Of course, my title was the fabulous Best Day Ever chipboard title. This time I painted it and then sponged it with white paint to shabby it up. The Frolic Dans le Jardin paper provides lots of great butterflies to fussy cut and add as embellishments! Get an extra of that one!

Blue Fern Studios products used:
Paper:
Frolic Allegro
Frolic Secretary
Frolic Adorn
Frolic Calling Cards
Frolic Dans le Jardin

Chipboard:
Arrow Word Set
Best Day Ever
Butterfly Damask

Stamps:
Halftone

Imagine Mist:
Persimmon

***

"Adorable"

Last is the layout I created for our September Sketch challenge. And yes, that is myself when I was about 2 years old. I've used the Frolic Mercantile paper as my base and kept the mixed media pretty simple on this one .. just heavy gesso and stenciling. 


I've treated all four pieces of chipboard the same for this project. The Destiny collage, Celebration Hearts, Princess Window, and the Adorable title from the Good vibes word set were all primed, misted and treated with distress ink to finish them. I wanted a very monochromatic feel to the chippys so that they almost blended with the paper. 


Loving the Celebration chippy on it's own in the upper right corner .. so sweet for a "toddler baby" page. 

Blue Fern Studios products used:
Paper:
Frolic Mercantile
Frolic Secretary

Chipboard:
Destiny collage
Celebration Hearts
Good vibes word set
Princess Window

***

Thanks for coming by the Blog today.

Don't forget to join in on the Sketch challenge! We'd love to see your creations!

Until next time …

Sandi

Thursday, June 11, 2015

Inspired by Elena Morgun

Hello, friends!
It's Elena Morgun here today. Glad to see you here, I hope you are having great sunny days!
Today I'll be inspiring you with the layout and step-by-step video tutorial, and mixed media canvas.

"Happy" layout

For the background I used a paper from Love Story Collection. I love this kind of papers! Wonderful background to make a photo stand out. This shot was made while my kids were going crazy:) It's very difficult to take a photo with both of them, but I am trying my best.
All the details of creation process you can watch in step-by-step video tutorial.
Enjoy!

A few details:
Blue Fern Products Used:
Paper
- Love Story: The Grand Ball
- Déjà Vu: Tresors

Chipboard
- Ginger's Poppies
- Postage Frames
- The Optimist Word Set

Stamp
- Journey
- Forever
- Halftone
- Texture 1
- Widgets


The second project for today is the mixed media canvas.
I created the background with the help of paper scraps, adding texture paste, stamping and spraying. Oh, I how I enjoyed playing with colors and textures!
Canvas turned out quite dimensional. I think, it's going to look nice on the wall.
A few details:
Blue Fern Products Used:
Paper
- Déjà Vu

Chipboard
- Postage Frames
- The Optimist Word Set
- Rings Panel

Stamp
- Journey
- Texture 1


Hugs,
Elena Morgun 

Sunday, March 8, 2015

March Projects using Love Story by Melinda Thompson

Hi Everyone :)

Another new month so another lot of new projects which I am happy to share with you all!
This month I focused on the Love Story Collection papers.  Love how you can achieve so many looks from the one collection of papers.

Here are my projects. For this layout of our adorable puppy, I have used papers from the Love Story Collection - The Grand Ball, Amazing Heart and Calling Cards.  My chipboard has been treated with Gesso first and highlighted with inks, mists and paints. I just kept adding until I was happy with the effect.

 "Sweet Girl"

I love to layer up my chipboard as well to give lots of depth and texture to my project.  And using negative bits from the packs are awesome if you want to create a confetti look.


Paper Collection: Love Story
Chipboard: Garden Daisies - Large, Negatives from the Broken Rings set, Daisies Collage, Splattered Circles


 My second project I was inspired by the richness of the papers in the Love Story Collection.  The photo in this layout is of my late Grandmother who has been gone 30 years last year.  I was only a 4 years old when she passed away and don't have any memories of her. I love that this photo is of her in her much loved rose garden and I was immediately drawn to the gorgeous floral pieces of chipboard to use in this layout.

 "Forever in our Hearts"

The chipboard pieces are simply painted in some gold acrylic paint and then I randomly added some colour in different places for extra interest.


Paper Collection: Love Story
Chipboard Collection: Dresden Corsage, Gingers Poppies, Eclectic Hearts,


Thanks so much for stopping by today...happy crafting :)
 Melinda

Saturday, January 24, 2015

First DT projects by Zanka

Hello!
It's my turn to welcome you on BFS blog for the first time! My name is Zaneta Glowa aka Zanka. I'm truly happy to cooperate with BFS and I'm looking forward to this new scrappy adventure!
I'm coming from Poland but nowadays I live in Sweden, I moved here more than 10 years ago. 
I discovered scrapbooking in 2010, an amazing world has opened its door to me and took me by the storm. 
At work I’m all fact and figures but I'm happy to take an escape to creativity when I have some spare time. I can slow down after a busy day, think through the things that happened -or sometimes just forget everything and make some mess ;)
I’m trying to explore different expressions and styles, although I’m most often staying within a romantic, feminine stream. I love to add a mixed media touch to my works. My key discoveries during my journey so far have been: stamps, gesso and Twinkling H2Os, all of these still remaining the first choice in my toolbox.
You are warmly welcome to visit my blog at 
www.mysweedplace.blogspot.com

So this is me:


For my first layout I used Sanctuary collection, I've fallen in love with the rose images!

Chipboards : Quatrefoil panel, Tattered diamond bits.
When you get your chipboard panels, most of them are still including the cut bits which you normally pop out. I discovered that those loose bits are perfect as embellishments themselves! I decorated mine with gesso, ink, stamps and  covered them with glossy accents.

For the second layout I picked Ombre papers.
Chipboards: Hello Summer, Ginger Poppies


The chipboards are gently treated with gesso and watercolours, the same which I also used in the background.

My third layout was already presented with the sketch reveal. Once again, I used the Sanctuary collection.
Chipboards: Captured Words, Graduated Squares, Spring Branch 


Here's probably where I've spend most time on altering the chipboards. 

For the title, I only added some white accents, otherwise I let the elegant,  original colour of the chipboard to be seen. 
On the frame, I have used texture paste and goldfinger paint. The branch is coloured with wax crayons and acrylic paint. 


That's all from me today, thank you for spending some time with me here !


Zanka / Zaneta G

Wednesday, December 10, 2014

Two Takes on Sanctuary - Bright and Vintage

Hello Blue Fern fans! Jackie here with my last post for Blue Fern Studios. It has been an amazing year, and I have been very honoured to be a part of this team and to experience Blue Fern's incredible growth over the past year.

It's amazing looking back over the past year to see how much Blue Fern has grown, releasing not only its first paper line, but four gorgeous and unique paper lines. As soon as I saw Sanctuary, I couldn't wait to get it into my hot little hands. It is exactly what I look for in a paper line, a perfect mix of vintage and bold colors. This month I've taken Sanctuary in two different directions, preparing a layout that embraces its vintage color palette, and a second layout that embraces colorful mixed media.

For my first layout I piled on the paint and color. I started by layering strips of Sanctuary papers along with washi tape and drywall tape, then added watercolor paints in blues and pinks, stencilling with crackle paste, rub ons and splatters of white paint.


The Notebook Edges are perfect for tucking into layering. I sprayed them with two shades of gold mist, and tucked them in before adding inking to my page edges and my white splatters, helping to marry them to the rest of the page.


To offer some balance to the busy background, I kept the treatment of the Crossing the Lines, Circuitry and Arrow Words chippies simple, coloring them with chalk inks.


I wanted to make a bold statement with the Ginger's Poppies chippies; I started by coloring them with chalk ink, then added embossing powder (because the embossing powder I was using is semi-translucent, I wanted to have some color on the chippy rather than having the color come out muddied). I love the way they shimmer!


Blue Fern Studios Products

Sanctuary papers: 
- Meadows of Time
- Garden Plaza
- Botanical Garden

Chipboard: 
- Notebook Edges
- Crossing the Lines
- Arrow Words
- Ginger's Poppies


- Circuitry


I loved both sides of the Botanical Garden sheet, and I really wanted to combine the two sides on one layout. To create the layered effect in the center and avoid wasting paper, I tore a strip from the center of the page. I punched strips of the B side out of a second piece of paper, and layered those underneath my torn strip, and mounted the whole thing on corrugated cardboard.


I added a thin layer of modeling paste through a stencil and misted it with a blue-grey mist to complement the background, then added some patches of green mist.

To create the lacy, textured look on the Boston Lattice chippie I melted fusible webbing onto the piece, then sprinkled it with two colors of embossing powder.


The Mini Flourishes and My Bike chippies were painted with sparkling watercolor paints.


Blue Fern Studios Products

Sanctuary papers: 
- Botanical Garden x2

Chipboard: 
-Mini Flourishes
- Boston Lattice
- My Bike


I have greatly enjoyed my time here at Blue Fern Studios, and I thank Leslie for having me on the team. I look forward to seeing Blue Fern's continued success!