Showing posts with label Frolic. Show all posts

Tuesday, January 19, 2016

My first projects for Blue Fern Studios - Karolina Czajkowska

Hi everyone! I am so excited to be here today with my first projects for Blue Fern Studios. 
Such an honor and a pleasure to be able to be a part of this fantastic team!


First, let me introduce myself. It's the most difficult moment, because I'm not really good in talking about myself. My name is Karolina Czajkowska and I live in Poland in one of the biggest city Łódź. I'm 26 and I'm an architect. I finished my study 1,5 year ago. 

I started my scrapbooking adventure 4 years ago and definitely it was a love at the first sight ;)
Scrapbooking is a huge part of my life, and it is more than a hobby by now. I can't imagine my day without scrapping and I am very sad when life and obligations do not allow me to go to my crafty space. One year ago I started to lead classes in Poland and abroad and I do love it! I think I'm mixed media girl. I'm pretty sure that this is the best way for me to find myself and my own style. And what my style is?
I still don't know, but defenitely it's not a clean&simple style ;)

You can find me on:

I created 2 layouts and a winter canvas to share with you today:


Layout "Delightful love"

My first layout is very soft and girly, I think. In the picture you can see two little ladies - my goddaugters. They are so cute, aren't they?


This page based on paper from the Love Story collection. I started my work of covering the entire background under my composition with using clear gesso. Then I made a composition using papers from Déjà Vu collection and of course I added some chipboard pieces.


I chose three chipboards - this one which you can see in the background its's a smaller piece of the Quatrefoil panel. First I used it like a stencil and then I covered it using mists and water paints in pink, lavender and warm beige colors.


I covered two smaller chipboards, a frame with "Love" inscription and "Delightful", using two embossing powders - very soft Cotton Candy and more contrasty Mystic Plum.


In the next step I added some flowers and embellishments of course, to make my projects and a composition richer. Then I added some color mists with paintbrush around my composition. Finally I decided to stamp a background a little bit.

Blue Fern Studios Products Used:

Papers: Love Story collection - The Grand Ball, Déjà Vu collection - Petites Cartes and La Plume

Chipboard: Quatrefoil Panel, The optimist word set, Memory frames

Embossing Powders: Cotton Candy, Mystic Plum

Stamps: Essential Texture 


Layout "Happy Way"

My second layout is defenitely more colorful with a lot of my favourite turquoise. I like to treat layouts a little bit like art journal pages - I mean: telling some story, capturing thoughts and feelings, not only pictures and memories.


I really like to create layouts on the dark background - this makes the colors "explode". This time I chose a beautiful paper in the deep navy blue color from the Sanctuary collection. I love a pattern of this paper. I prepared a photo and then I knew which colors I had to use. I have combined papers from two different collections - Ombre Dreams and Frolic and when I decided where my composition will be, I covered this area with gesso. I also used a modeling paste and stencils. In the next step I reached for a stamp with text and a pearl embossing powder. I wanted to connect it to the pattern from a basic paper.


On my layout you can find two chipboard pieces - the smallest circle from Beaded Strings set and beautiful Ironworks medley. Both of them I covered with a lot of different embossing powders to make a colorful embellishments, matching to my vision of this project. Then I added some light turquoise paint on all gaps.


After adding flowers and color mists around my composition, I stamped again using two stamps sets - this time with a black ink.


Blue Fern Studios Products Used:

Papers: Sanctuary collection: Bountiful, Frolic collection - Petits Moments and Friendship, Ombre Dreams collection - Dream Cards
Chipboard: Beaded strings, Ironworks medley
Embossing Powders: Garnet, Heavenly, Fern, Azure, Mystic Plum, Iris, Honey,
Glitter: Caribbean
Stamps: Essential Texture, Halftone
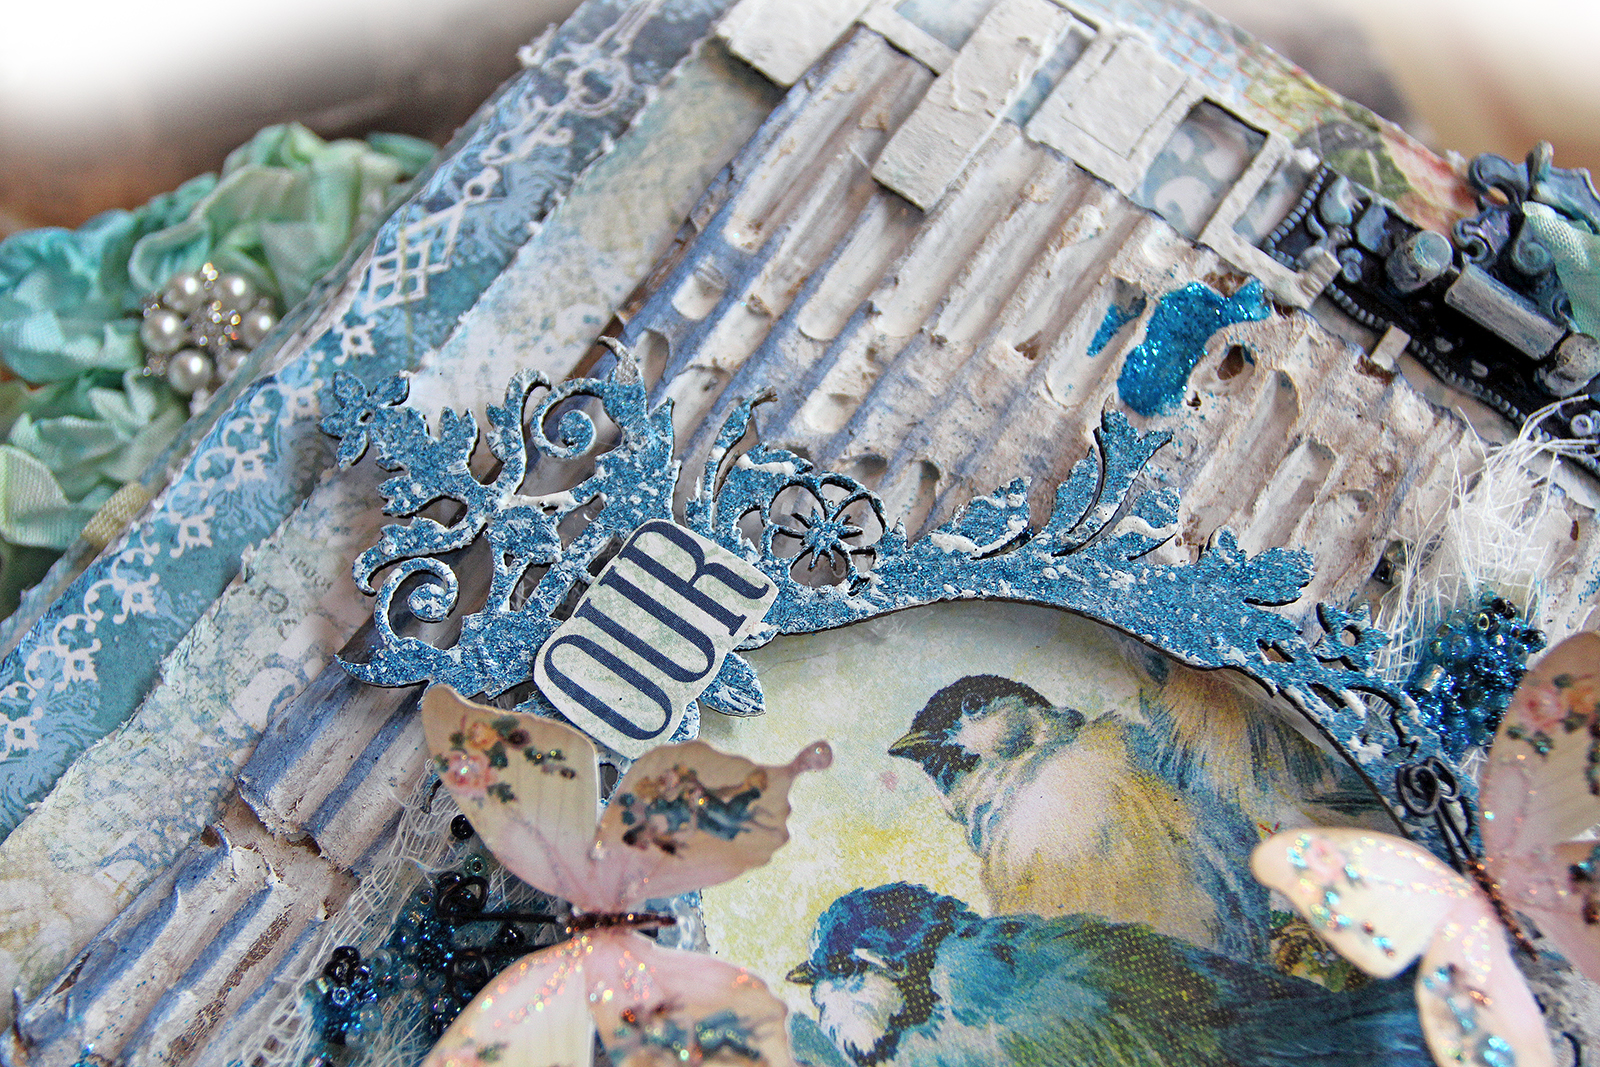
"Winter time"

My third project, which I would like to share with you today is a winter canvas. I know that Christmas time is gone, but we still have winter and maybe it's not my favourite season, but I really like winter projects!


In the background you can see old book pages. I really like this vintage effect. The next layer is a little piece from the Mini rings panel. I sprayed it with a dark brown mist and arranged it in such a way as to stick out from both sides of my composition. Next I built a very dimensional composition with papers from three different collections Déjà Vu, Autumn Anthology, Paisley & Vine and chipboard frame.


On the close-ups you can see all shades of my frame. First I covered frame with gesso and next I mixed gesso with a blue pigment and with using sponge I started to dabbed on blue accents.
I also added some stamps.


Smaller flakes I covered with white acrylic ink to make a very shiny surface. Then I added some translucent glitter. As a result, my project is more sparkling.


In the background you can also find some stamps and little black dots.


And finally a deer - this handsome gentelman would be a main point of my canvas. First I treated a chipboard with white gesso and then I distressed the edges.

Blue Fern Studios Products Used:

Papers: Déjà Vu collection - La Plume, Autumn Anthology collection - Mercantile, Paisley & Vine collection - Vineland
Chipboard: Winter Deer, Snowflake frame, Shabby flakes, Mini rings panel
Stamps: Essential Texture


I hope I have inspired you today. See you next time :)

Hugs,
Karolina

Wednesday, January 6, 2016

My First Projects for Blue Fern Studios: Cathi O'Neill

Hi, I am so excited to be here today with my first projects for Blue Fern Studios!


My name is Cathi O'Neill and I am an American who wandered the world and married an Irishman. I have been living in Ireland since 1997. I live in a beautiful village on the Shannon River with my DH of 20 years (wow, that makes me feel old!) and my two beautiful daughters, Aine (onya) 13 and Aisling (ashling) 11, who are the subject of many of my projects!!

I have always loved crafting since I was a little girl. My grandmother taught me to knit and crochet and I remember sewing Barbie doll clothes with her on her front porch! I am a knitter and quilter as well, but have recently in the last few years found cardmaking and scrapbooking, and an obsession was born!! Barely a day goes by when I haven't done something crafty!!

I would say my style is a mixture of vintage, shabby chic with a hint of mixed media, you will often see me using vintage images! I hope you will come visit me at my blog at http://celticknotted.blogspot.com.


My first project uses the amazing new paper line, Blush. I have chosen a gorgeous vintage image that had just a tint of pink and blue in it...I used those to guide the layout's colors. I chose the beautiful Sweetheart paper for base of my layout.


I used many of the cut out cards and titles from the Blush Calling Card paper, layering them up! You can also see the Postal Textures stamps here in the background, I used Walnut Stain distress ink to make a weathered and distressed stamping background.


You can see two of the chipboard pieces I used, the gorgeous Floral Medley Frame and the Bits of Honey pieces. I used the Imagine Ink Sage and Bonny Blue on the frame leaving some sections plain for an overall distressed look. The Bits of Honey pieces were embossed with the Bonny Blue and I added some Walnut Stain distress ink to age them a little.


I used lots of yummy flowers from my stash in my floral cluster adding a ribbon for extra detail. I finished off the cluster with the heart lock from the Vintage Locks chipboard set.

Blue Fern Studio Supply List:
Paper:
Blush-Sweetheart and Calling Card
Chipboard:
Bits of Honey
Floral Medley Frame
Vintage Locks
Stamp:
PostalTextures
Imagine Ink Embossing Powder:
Sage, Honey, Bonny Blue


My next layout features the gorgeous new Timeless collection and a beautiful selfie my daughter took on my iPad. It is always fun to find new photos to use for my layouts taken for me on the iPad, a selfie addicted girl is great for a scrapper! I have used the Timeless Maçonnerie page for the layout base.


You can see some more layers in this page using the Timeless Calling Cards paper cut outs. Under the photo I have used the middle clock from the Roman Clock Set - Large. I used the Imagine Ink Mystic Plum embossing powder to color up the chipboard, adding some gesso for distressing.


I love the retro font used for the Timeless chipboard! This layout is called Timeless Beauty, which I happen to think my daughter is! I have used Imagine Ink Mystic Plum embossing powder and gesso again to color and distress the title.


I have added some gorgeous flowers and a nest which I think works well with the bird imagery in one of the calling cards. I have also tucked in some tags under the photo cluster. I also used Seedless Preserves distress ink and a stone wall mask to tone in with the papers. I added a bit of blue and brown splashes too.


I finished off my layout with a beautiful handcrafted butterfly by Renea.

Blue Fern Studio Supply List:
Paper:
Timeless -Maçonnerie and Calling Card
Chipboard:
Roman Clocks - Large
Timeless
Imagine Ink Embossing Powder:
Mystic Plum


You might have seen this layout in the challenge post earlier, this is my take on the January sketch challenge. I have used the Frolic Allegro paper for my base. Here is the sketch you can use to play along this month:


I have used the beautiful Royal Monarch butterfly chipboard and embossed it in Imagine Ink Honey and Cotton Candy. I have made a homemade satin and tulle flower and have used the Essential Textures and Texture Circle stamps for my background.


Here you can see lots of layers from the Montage Calling Cards paper and the Turkish Bits and Arrow Words chipboards.


Imagine Ink Honey and Cotton Candy are used here again to color the chipboard. To finish off the layout with my gorgeous vintage ballerina I simply added a little clip to the corner of the photo.

Blue Fern Studio Supply List:
Paper:
Frolic - Allegro
Montage - Calling Cards
Chipboard:
Turkish Bits
Arrow Words
Royal Monarchs
Stamps:
Essential Textures
Texture Circles
Imagine Ink Embossing Powder:
Honey
Cotton Candy

Thank you so much for having a look at my projects for this month. I am so excited to be here!

Monday, January 4, 2016

Welcoming In The New Year With Blue Fern Studios~


Welcome to to the New Year and welcome to my very first Blue Fern Studios Post!!!
To kick things off, I would like to tell you a little bit about myself. 

My name is Renea Harrison aka Reneabouquets in the virtual world, a Southern Girl, born and raised in Tennessee. I have been married to my husband, David for over 25 years, and we have one son, Draven, who went off to college last year. I am the bookkeeper for our local business and owner of the Reneabouquets.com Store and Reneabouquets Etsy.
 I don't just love scrapbooking, I am passionate about it. I love every aspect of this amazing multi-media art. I love the art of the creation itself, from taking the design in my head and getting it out onto paper, to the social aspect of it. I love sharing what I know, and learning what others share. 
As a scrapbook artist, I don't really have any one set style. I tend to scrap whatever mood I happen to be in which can range, from Shabby Chic, Girly Girl, Vintage and Girlie Grunge to Masculine, Grunge, and Mixed Media. 
As an artist, I think that one of my greatest hopes is that I can inspire you to create and can teach you something new that you can take and use in your own work, so let's get started!!

Boots, Beauty & Blue Fern:
I love sliding into a comfortable pair of boots, and for this Design Team layout, I couldn't help, but get inspired by the Swirly Circle Chipboard Frame to create something rustic meets beautiful!!


I started with a layer of Blue Fern Studios Autumn Anthology-Newsworthy Paper, I then took another piece of the same paper and used the backside, tearing and inking the edges to fit my design. Next, I added a layer of corrugated board that I heavily inked and added my photo to.


I took the Blue Fern Swirly Circle Chipboard Frame, inked it up and then randomly heat embossed it with some Imagine Ink Oatmeal Embossing Powder to get a wonderful, rustic look, and layered it over my photo.


I added some lace to add a feminine touch, and then took some branches with moss, made a little stack and wrapped and tied it with twine, added some mini pine cones and popped some of my handcrafted butterflies.


I added some cheesecloth, burlap leaf picks, a large chiffon flower and some more flowers to round out my feminine meets rustic look. 


I then crackle painted some areas around the frame, and inked them, then took a Blue Fern Essential Textures Stamp and did some stamping. Stamping can add a lot of texture and dimension on your layouts and the Essential Textures Stamps are so perfect for adding background noise. 


Here is some more detail of the Yumminess of the stamping. 


In the top corner of my layout, I inked a "Natural Beauty" chipboard piece from the Blue Fern, All Natural Set. I inked in a way that let some of the natural kraft color of the chipboard show through to get a variegated color effect. I then added some more twigs wrapped with twine and pine cones. I took some of the paper pieces left over from the tearing I did and rolled and inked them, then tied more twine around them. I fussy cut out a little bird from the paper and glitter painted him up and then popped him on with foam tape for dimension.


And here you can see all the dimension and texture that you can create using  Blue Fern Products.

Blue Fern Studio Supply List:
Paper:
Autumn Anthology~Newsworthy
Chipboard:
All Natural Set (Natural Beauty)
Swirly Circle
Stamp:
Essential Textures
Imagine Ink Embossing Powder:
Oatmeal

Getting Winterlicious With The Blue Fern Sketch:

Each month Blue Fern Studios has a sketch challenge that you can take part in. Here is this month's January Sketch:


And here is my Design Team take on the sketch:


I decided to work with some papers from the Blue Fern Deja Vu line to get a Winterlicious, frosty look!! I started with a piece of Lustre Paper and then used another piece of the same paper, this time using the backside. I distressed the edges heavily and did some grunge punching. I used a stencil and texture paste to create the snowflakes on the background paper, and  I then added in 2 more layers of Tresors paper, adding sand paste and Glitter Glass to create a Snowy~frosty look.


Next, I took a Blue Fern Chipboard French Ironwork, painted it with crackle paint and then clear emboss inked randomly and heat embossed using the Imagine Ink Mystic Plum Embossing Powder, and added a crystal for a little bling.


The snowflakes were created by taking Blue Fern Chipboard Winter Flakes,  painting them with white gesso, and then heat embossing them with Imagine Ink Icicle Embossing Powder.


To add a little more texture and bling, I then added Silver Microbeads to the tips of the flakes and overlaid them with Snowflake Buttons. 


I created a flower layer at the bottom corner of my photo.


I also popped on some of my handcrafted butterflies for some extra sparkle!!


I love that Blue Fern papers are so high quality and thick that they can handle all of my mediums, textures and layering! Just look at all the dimension that they allow you to achieve.

Blue Fern Studio Supply List:
Paper:
Deja Vu-Lustre
Deja Vu-Tresors

Chipboard:
French Ironwork
Winter Flakes

Imagine Ink Embossing Powder:
Mystic Plum
Icicle

I love creating off the page projects, and one of my FAV things is mini albums. I love creating pages that have little tuck ins for storing memories, and all kinds of unexpected treasures!!


 For this mini album, I used the Blue Fern Frolic Paper Collection,  starting with a layer of Friendship as the base layer and then adding a layer of  Petits Moments


I then added a layer of corrugated board that I added some beads, Imagine Ink Embossing Powder In Cerulean and cheesecloth to grunge it up a bit. I took some pieces of  the Blue Fern Shabby Brick Pieces Chipboard, textured them and added them to my cover design.


Next, I fussy cut out one of the birds from the Friendship Paper and glitter painted him up, then cut out the rest of the bird design and added it to a Blue Fern Majestic Chipboard Frame.


I painted the frame with a coat of gesso and then heat embossed it with the Cerulean Embossing Powder.


Here is a look at all the layering.


Here I created pocket pages with tags using the following Blue Fern Papers:
Frolic Petits Moments
Frolic Veranda


For these pages, I used:
Frolic Friendship and Frolic Petits Moments Papers
there is a pocket that I created using a cut out of the birds design and then created,


a sweet, little sewn booklet from the Calling Cards Paper, 


and a tag that tucks in at the top from the Dans Le Jardin paper.


These pocket pages were created with the Frolic Adorn Paper.


And all the tuck in and tags were created with the Frolic Calling Card Paper.


The last set of pages were created with the Frolic Dans Le Jardin Papers and feature a pocket,


With Frolic Calling Card tags as well as a large tag, tuck in created with Frolic Friendship Paper.


The back side was created using Frolic Friendship Paper.

Thank you so much for joining me for my first Blue Fern Studios Reveal! I hope that you have enjoyed getting to know a little bit about me and also that you have enjoyed my projects. Here is to a New Year full of Creativity, Inspiration and Fun!! Hugs ~Renea

Blue Fern Studio Supply List:
Paper:
Frolic Friendship
Frolic Calling Cards
Frolic Dans Le Jardin
Frolic Petits Moments

Frolic Veranda
Frolic Adorn

Chipboard:
Majestic Frame
Shabby Brick Pieces

Imagine Ink Embossing Powder:
Cerulean