Showing posts with label Directions. Show all posts

Thursday, January 22, 2015

One 2 3 of a Kind Layout Video Tutorial with Einat Kessler

Hey crafty friends! Einat Kessler here with my first video tutorial as BFS video educator. I'm so happy and honored to be joining this talented team!


I'm a mother of two teenage boys and married to a supportive loving husband. We live in Israel close to Tel Aviv. I started scrapbooking when my son was born and have been doing it ever since. As time went by it turned from a hobby to a business and today it's my full time job. Today I also create a lot of mixed media, art journaling, altered projects and interactive designs. I love experimenting and trying new things so my art is evolving all the time.

I'm happy to share with you my first video tutorial: One of a Kind mixed media layout.


BFS products used:
Papers: Sanctuary - Meadows of Time
Papers: Sanctuary - Bountiful
Chipboard: One of a Kind
Chipboard: Printer's bits

My other project is an inspirational canvas. It's a 4X4 canvas that has a statement on it. I'm planning to have one of my studio walls filled with these...


I used the chipboards to create a textured background by covering them with gesso and spraying. Then I used a pen nib with black ink to write on the canvas and chipboard as if they were one.


BFS products used:
Chipboard: Directions

Have fun creating!
Einat
           

Wednesday, November 12, 2014

November inspiration with Maja

Hi all Blue Fern lovers I´m here today to share two layouts and a card made with Blue Fern Studios products. First up is a layout made with papers from Montage paper collection.


Blue Fern Studios products used:

Papers: Montage - Invitation & Mercantile
Chipboard: Treasured floral frame, Picture perfect,Vereanda cage set, Roman clock set small and Bohemian flowers.


My next layout is made with Ombré Dreams paper collection and the lovely Techno Rings.


Blue Fern Studios products used:

Papers: Ombré Dreams- Dream Cards, Susan´s Dream & Ginger´s Dream
chipboard: Directions & Techno rings 


My last project is a little layerd card made with Montage papers and BFS chipboard pieces. 


Blue Fern Studios products used:
Papers: Montage - Mercantile & Bouquet
Chipboard: layering Steams & Veranda Cages.


Thanks for stopping by =)  

Wednesday, September 24, 2014

3 Layouts

Hello its Olga here!


My first work for today is soft Layout with picture of my friend. I use violet Ombre Dreams papers Joyce's and Charlotte's dream  to make layered background. As part of my construction in background I use parts of chickenwire panel, Under composition I put one of Frilly hearts and saying adore from Adore , Love Cherish set


This work is also with photo of my Friend. This time I use pink shades of Ombre Dreams papers I use Shanon's and Leslie Dream and little bit of Julianna's dream in base composition. I added some gauze and Ornate Frame . As title I use chunky words and add one of Ginger poppies under main composition


This work is lift of my last work with tutorial for BFS . I used different colors and elements. I made it wit picture of my son, some direction arrows, arrow Words and seeing Stars for my mom ( she really liked first one ) Base where scraps of green BFS Ombre Dreams papers


Thursday, July 24, 2014

sumertime scrapping

Hello all Blue Fern studios Fans!

Olga here . I'm coming today with 3 layouts I made with using BFS products. All 3 on Ombre Dreams collection . I love it and I can't have enough of it. Perfetly fit me everywhere to feminal and masculine style it is just perfect.

Anyway back to the subject. First work is feminal LO with cat lady .Charlotte's Dream was background of my project.  In composition I use piecies of Dot Grid Panel and  one of Frilly Hearts covered with gesso . As a title I put dreams come true piece


This layout is about summer fun. Those feets belongs to my personal son :) photo was taken on amazing playground after a long day filed with running around, playing pirates and chasing bubbles. I use here last piece of Dot Gird Panel ( one panel I had for 4 works and I still have small piece :) ) I used here also Filmstrip and directions arrows. paper I use here is ginger's dream

On this layout is one of last photos I took in Poland on one of our daily park walks. Yes I know something is wrong with me and making feet photos ;) But I can't stop myself I like them so much . Here Iuse Charlotte's dream as background and made lots of media shadows to better expose my composition. I use piece of awesome small number gird . All black elements are from picture perfect set its awesome set to layouts but also will perfectly fit to any project life projects.

Wednesday, May 21, 2014

Kelly's May Projects

Good morning, Blue Fern fans! Kelly here today.
Have you had a peek at the new Ombré Dreams paper collection? It is absolutely stunning..and I had a chance to create with it in time for my post this month :)

"You Color My World"

I was immediately drawn to the purple/yellow colors in "Julianna's Dream" for my background paper. I added some mixed media work atop that, then layered in strips torn from "Shannon's Dream." My title was cut from the "Dream Cards" sheet.


In addition to the gorgeous new papers, I have used some new chipboard designs, as well, including this Treasured Floral Frame, which was given a coating of gesso and then sprayed with a few pastel mists to match the background colors.


I also cut a few pieces from the Quilted Page Panel, painted with gesso, sprayed with mists, then dusted gently with Primary Elements Artist Pigments for lots of shimmer.
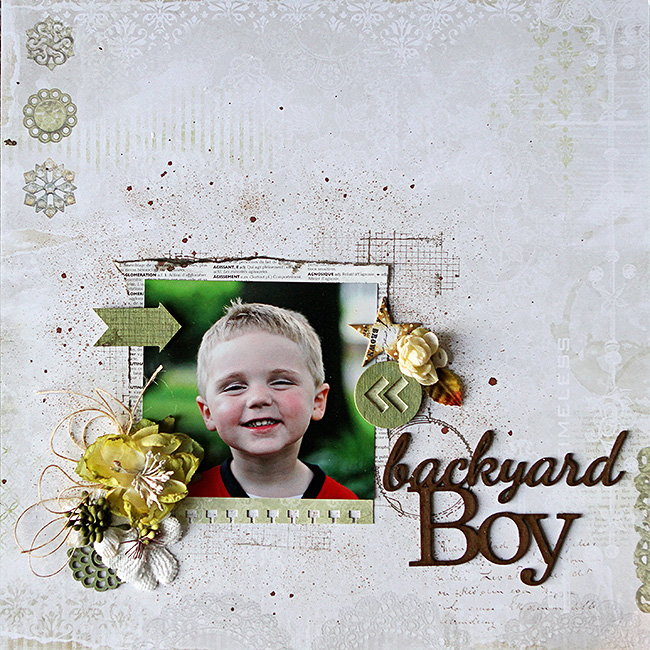
"Simply Beautiful"

This next page is a bit more subdued and simple. I chose the Blue Fern Garden "Signature" paper for my background, as I thought the subtle texture and color was perfect for my photo. I then layered scraps from other Blue Fern Garden papers, cardboard, fabric, and tissue paper for lots of texture.


Above you can see I have used one of the Symphony Corners - Medium, which was embossed with two different embossing enamels, sprayed with mists, then gently dabbed with gesso. Into the cluster I also added bits of the Berry Stems.


At the top corner of my photo, I added one of the Symphony Corners - Small. This piece was treated the same as the other, and once again I tucked in pieces of the Berry Stems here and there.

"Dream"

This last page, I simply pulled various scraps from my stash, (including a few of the cut off strips from the bottoms of Blue Fern Garden papers!) and layered up my background. To really draw focus to the photo, I framed it twice using Circle Links and Beaded Strings. These were both given a coat of a few colors of chalk ink, then painted using Silks in various colors. The photo doesn't quite capture it, but they are super shimmery!


On either side of the photo I have also added an arrow from the Directions set. These were treated the same as the frames.


Blue Fern Studios products:
Directions
Beaded Strings
Circle Links
Blue Fern Garden Paper Collection
Ombré Dreams Paper Collection
Berry Stems
Symphony Corners - Small
Symphony Corners - Medium
Treasured Floral Frame
Quilted Page Panel

Thank you so much for looking through my projects today, have a great day!
*Kelly*

Friday, May 9, 2014

A Little Title Love

Hi everyone!  It's Valerie here today with a couple of layouts for May.  Do you sometimes struggle with titles?  I do, so I pulled out a couple of Blue Fern chipboard titles, and got started on my layouts. 

For this layout, I chose the Cute Stuff title from the Good Vibes set, and my very favorite sheet from the Blue Fern Garden Collection - In Bloom.  I also took advantage of some strips in my scrap pile to create some dimension in the background.


Here is a close-up look at the sweet title.  I primed it first with gesso, inked it with a light brown ink, and when dry, I used a make-up sponge (an awesome scrap room supply) to apply some Inka Gold.


I also used the smallest circle from the Graduated Circles set of 5 to frame the left side of the photograph.  
After priming the chipboard, I applied some pink ink, then heat-embossed it 
using a frosted embossing powder to add some sparkle.


The Berry Stems and Jeweled Trinkets were painted white and used as accents in the floral cluster.


For my second layout, I chose the Backyard Boy title, and knew just which photo I wanted to use. 
 I'm sure many of you have photos that would fit perfectly with this title.  This title was super easy to alter.   
I applied some VersaMark ink and clear embossing powder, 
then heat embossed it.  The result was this beautiful chocolate brown. 
For the background I have used the back side of the Timeless paper from the
  Blue Fern Garden Collection.  


If you like arrows, you will love the Directions set.  It includes numerous arrows that can be used in so many ways.  I covered this arrow with Distress Ink, then stamped it with a texture stamp.


You can see another of the arrows from the Directions set in this close up, as well as the gloss that the embossing powder left on the title.


And here is a little flower from the Bohemian Flowers that I tucked in behind a flower. 
 It's a great assortment of 12 flowers. 


That's all from me today.   It was awesome to begin my layouts with a title and not have to worry about it at the end.  Give it a try!