Hello everyone, welcome to the Blue Fern Studios blog :-)
I
have three layouts to share today. The first one is made using the
Tranquility collection and features a photo of my son on one of our
sailing trips:
I
love wood-patterned papers! And I used three wood desings for the
background of the layout. To mat my photo, I also used the Crackle Bits
chippes heat-embossed with 14 Karat ep:
Then I embossed the fascination, serenity and stillness words with the Breeze ep and used them for the title of my page.
Another
chipboard piece I used is the beautiful Seaside Charms piece. I used
two embossing powders to add colour to it: Copper for the "charms" and
Oatimeal for the rest.
Then I completed my design with Tranquility flowers, real seashells, pearl beads, cheesecloth and glitter :-)
Fascination, Serenity, Stillness:
Papers: Tranquility: Contentment, Calm, Jubilation, Calling Cards
Chipboard: Crackle Bits, Serenity, Calm, Hushed; Peaceful, Stillness, Contentment; Serendipity Words 2; Seaside Charms
Flowers: Tranquil Blooms
EP: 14 Karat, Breeze, Oatmeal, Copper
Glitter: Pyrite
My
next two layouts feature the beautiful Attic Charm collection, filled
with soft pastel colours and vintage images. It's perfect for sweet
gilry projects, like this page :-)
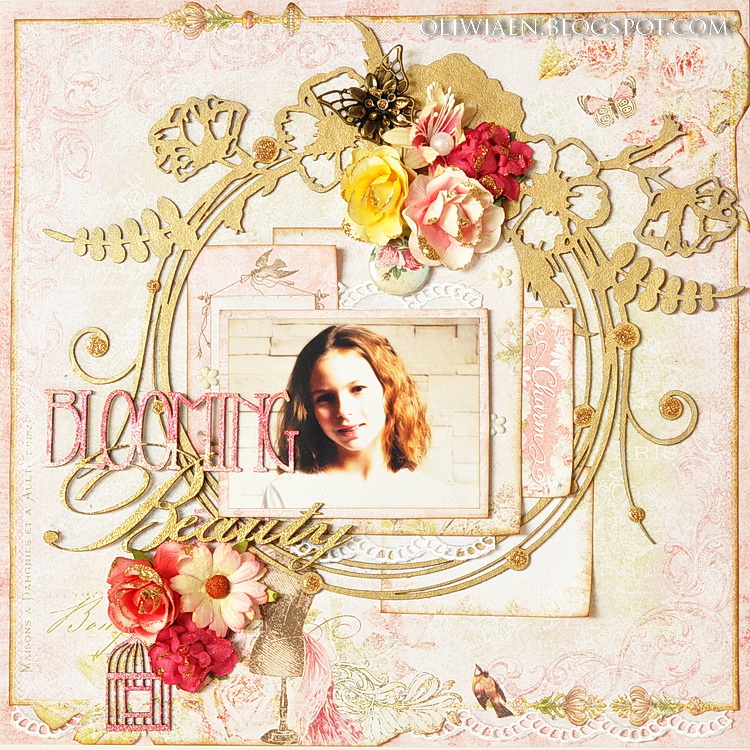
I layered two pink papers and arranged layered calling cards to mat my photo.
I added pieces of lace in between the layers for a more delicate, romantic look:
I
used the beautiful Circle Flourish Large piece as a frame for my photo.
I painted it with golden acrylic paint and added some flowers from
various sets to match the chipboard ones:
For
the title I used the Blooming Beauty piece: I used an embossing pen to
trace along separate words and embossed the Beauty with 14 Karat and the
Blooming with a mix of Fuchsia and Petal.
I added more flowers down the page and a birdcage from the Veranda set to make a cluster with the printed mannequin image:
Blooming Beauty:
Papers: Attic Charm: Calling Cards, Attire
Chipboard: Blooming Beauty, Circle Flourish Large, Veranda Cage Set
Flowers: Attic Charm Daisies, Attic Charm Glitter Roses
EP: 14 Karat, Fuchsia, Petal
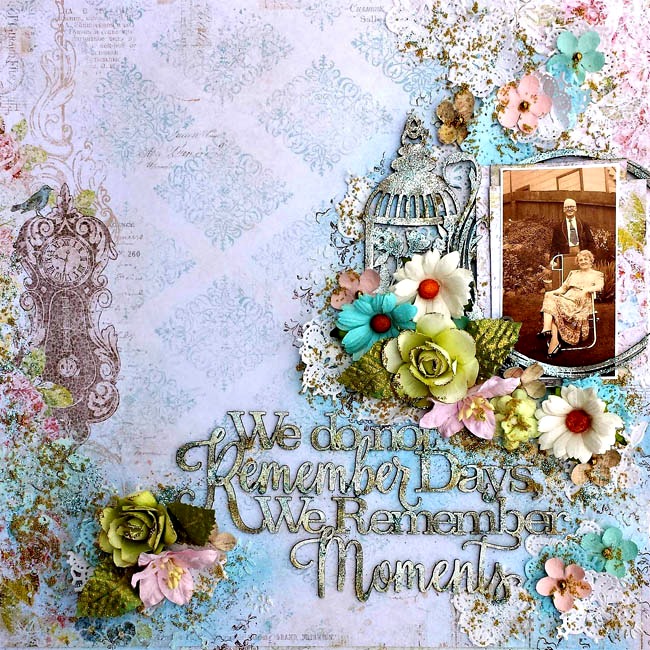
But the Attic Charm collection is not only for girly projects :-) I selected the ecru and soft blue papers for this boy page:
I
first layered the Curio and Haberdashery sheets and added some stamping
in the background with motives from the Beads&Chamrs, Forever and
Deja Vu stamp sets:
I
used the middle clock from the Roman Clock Set Large, coloured it with
mists, applied upon the Sachet paper, cut out and used it as the frame
for my photo:
The
title for the layout is the Loving You piece coloured with mists and
glitter, added some clock hands from the clock set and completed my
design with pieces from the Cogs and Gears set and Tranquility and
Courtship flowers:
Loving You:
Papers: Attic Charm: Curio, Haberdashery, Sachet
Chipboard: Loving You, Cogs and Gears, Roman Clock Set Large
Stamps: Beads&Charms, Forever, Deja Vu,
Flowers: Tranquil Roses and Lilies, Courtship Roses
EP: Ginger, 14 Karat, Ebony, Breeze
That is all for today, thank you for visiting and I hope you have been inspired :-)
Showing posts with label Crackle bits. Show all posts
Saturday, July 16, 2016
Friday, June 24, 2016
Three Tranquility Layouts with Karine
Hi there, Blue Fern Studios fans,
I hope this post finds you well and that summer is arrived in your part of the world. I'm sharing with you today three layouts I did in the past week or so. I used one of the last collection: Tranquility. I think it's my favorite collection ever!
For this layout, I stepped out of my comfort zone. Orange is a scary color for me, but this Keepsakes paper from the Timeless collection is so beautiful, I couldn't resist.
My main chipboard piece is the Circle Vine. I coloured it with brown ink, and then partially embossed it with Imagine Ink Honey and Chili Powder embossing powders. I just love how it turned out.
As for my background work, I used the Serendipity stamp with brown ink and the Garden Frolic stamp with orange ink. I also used some withe and gold texture paste, to add interest to the background. Brown ink drops complete the work.
My title piece is simply coloured with brown ink.
I must say, my layout is also inspired by the beautiful orange flowers, part of the Tranquil Blooms set. I just can't get enough of those gorgeous flowers. I also used some of the Courtship Blooms.
My second layout features the Contentment paper from the Tranquility collection. When I got the collection, I wanted to create something special with this paper. It is just gorgeous. I decided on a layout about me, since I rarely use a picture of me.
For the background, I wanted to match what was already in the paper and that reminded me of sand or some rough texture. I used some stone effect medium with a stencil or simply applying it with a palet knife, and while it was still wet, I sprinkled some Imagine Ink Seven Seas and Honey embossing powders and heated it. I LOVE the result.
I did the same thing with my chipboards (the Crackle Bits). Look at this texture!
My title piece comes from the Serenity, Cam, Hushed set.
To mat my photo, I used the Jubilation and the Calling Cards papers, also from the Tranquility collection.
To embellish, I used two large flowers and some pale yellow lilies from the Tranquil Roses and Lilies set.
To add a bit of interest to my background, I partially stamped using the Serendipity Medley and the Making Plans stamps with blue ink, and the Postal Textures stamps with grey ink.
My last layout features the Stillness paper from the Tranquility collection. I mated my picture with the Serenity paper, also from the Tranquility collection.
I wanted a masculine feel to this one, so I used the Grid Pieces on which I used clear crackle medium and some brown paint to make the cracks stand out more. I love the result. It matches the grid pattern in the paper. I also used a grid stencil with modeling paste and a grid stamp, along with the Texture 1 and Making Plans stamps sets.
Look at the texture on the chipboards pieces.
My title is part of The Optimist Word set. I left it raw.
To embellish everything, I used the Tranquil Blooms (green) and some Courtship Blooms (kraft and dark brown). Aren't those flowers simply amazing?
I hope you have a great day.
Karine
I hope this post finds you well and that summer is arrived in your part of the world. I'm sharing with you today three layouts I did in the past week or so. I used one of the last collection: Tranquility. I think it's my favorite collection ever!
All You Need Is Love
For this layout, I stepped out of my comfort zone. Orange is a scary color for me, but this Keepsakes paper from the Timeless collection is so beautiful, I couldn't resist.
My main chipboard piece is the Circle Vine. I coloured it with brown ink, and then partially embossed it with Imagine Ink Honey and Chili Powder embossing powders. I just love how it turned out.
As for my background work, I used the Serendipity stamp with brown ink and the Garden Frolic stamp with orange ink. I also used some withe and gold texture paste, to add interest to the background. Brown ink drops complete the work.
My title piece is simply coloured with brown ink.
I must say, my layout is also inspired by the beautiful orange flowers, part of the Tranquil Blooms set. I just can't get enough of those gorgeous flowers. I also used some of the Courtship Blooms.
Blue Fern Studios products used:
Keepsakes paper (Timeless collection)
Serendipity and Garden Frolic stamps
Chipboards: All You Need is Love and Circle Vine
Imagine Ink Honey and Chili Powder embossing powder
Tranquil Blooms and Courtship Blooms flowers
Serenity
My second layout features the Contentment paper from the Tranquility collection. When I got the collection, I wanted to create something special with this paper. It is just gorgeous. I decided on a layout about me, since I rarely use a picture of me.
For the background, I wanted to match what was already in the paper and that reminded me of sand or some rough texture. I used some stone effect medium with a stencil or simply applying it with a palet knife, and while it was still wet, I sprinkled some Imagine Ink Seven Seas and Honey embossing powders and heated it. I LOVE the result.
I did the same thing with my chipboards (the Crackle Bits). Look at this texture!
My title piece comes from the Serenity, Cam, Hushed set.
To mat my photo, I used the Jubilation and the Calling Cards papers, also from the Tranquility collection.
To embellish, I used two large flowers and some pale yellow lilies from the Tranquil Roses and Lilies set.
To add a bit of interest to my background, I partially stamped using the Serendipity Medley and the Making Plans stamps with blue ink, and the Postal Textures stamps with grey ink.
Blue Fern Studios products used:
Contentment, Jubilation and Calling Cards Papers (Tranquility collection)
Serendipity Medley, Postal Textures and Making Plans stamps
Crackle Bits and Serenity, Calm, Hushed chipboards
Tranquil Roses and Lilies
Imagine Ink Seven Seas and Honey embossing Powders
Perky
My last layout features the Stillness paper from the Tranquility collection. I mated my picture with the Serenity paper, also from the Tranquility collection.
I wanted a masculine feel to this one, so I used the Grid Pieces on which I used clear crackle medium and some brown paint to make the cracks stand out more. I love the result. It matches the grid pattern in the paper. I also used a grid stencil with modeling paste and a grid stamp, along with the Texture 1 and Making Plans stamps sets.
Look at the texture on the chipboards pieces.
My title is part of The Optimist Word set. I left it raw.
To embellish everything, I used the Tranquil Blooms (green) and some Courtship Blooms (kraft and dark brown). Aren't those flowers simply amazing?
Blue Fern Studios products used:
Stillness and Serenity papers (Tranquility collection)
Texture 1 and Making Plans stamps
Grid Pieces and The Optimist Word set chipboards
Tranquil Blooms and Courtship Blooms flowers
I hope you have a great day.
Karine
Wednesday, June 22, 2016
Attic Charm Inspirations with Video Tutorial by Marilyn
Hi everyone! It's Marilyn here with you today to share two projects and a video tutorial with the new beautiful Attic Charm collection.
I cut out and distressed one of the cards from the Calling Card paper. |
I highlighted the title (Happy, Heart, Love chipboard) tracing it with a distress marker. . |
I used the Attic Charm- Daisies and the Glitter Roses. |
Blue Fern supplies: Attic Charm collection: Spring Posy, Calling Cards and Haberdashery papers. Chipboards: Crackle Bits, Happy, Heart, Love Flowers: Attic Charm Glitter Roses, Attic Charm Daisies Embossing powder: Buttercup, Pearl Stamp:Forever Here's the Video Tutorial,take a cup of coffee or tea, sit relax and enjoy it!! :) |
"I LOVE YOU MORE"
I framed the photo with the Shrine Frame chipboard that I embossed with Antique Gold embossing powder. |
I also embossed the title with the antique gold embossing powder that is the "I Love You More" chipboard. |
Wednesday, June 8, 2016
June Inspiration With Debbie, Featuring Attic Charm
Hi everyone! Debbie here with you today sharing three layouts created with the new Attic Charm paper collection, chipboard, and flowers. I really enjoyed working with Attic Charm papers, beautiful colors and details. My first inclination was to use vintage photos on my layouts, but I decided to show how versatile the collection is by using photos of the past and present.
My first layout features the Generation paper and a vintage photo that belonged to my grandmother. Not sure who the people are in the picture, but I love it, as they look so happy. I couldn't help but wonder what the occasion was. I added some texture to the background paper with some masking, misting with the Imagine Ink Sky Mist and some random stamping with the Romantic Accents stamp. I added additional texture with torn pieces of paper doilies, some of which I misted with the Sky Mist, gold microbeads and some 14 Karat embossing power. The layers under the photo are from Calling Cards.
I used two pieces of chipboard here, Treasured Floral Frame and Dangle Bird Ornament which I cut apart. Both were embossed with a mixture of the Imagine Ink Snow, Mushroom and Breeze Embossing Powers, and some Blue Ice Glitter. I also used the 14 Karat embossing power on the green leaves. Love the shimmery look!
Blue Fern Studios Supplies
Paper:
Attic Charm: Generation, Calling Cards
Chipboard:
We do not Remember Days, We Remember Moments
Treasured Floral Frame, Dangle Bird Ornaments
Embossing Powders:
Mushroom, Snow, 14 Karat, Breeze
Flowers:
Attic Charm Daisies, Attic Charm Glitter Roses, Tranquil Lilies
Courtship Blooms
Attic Charm Daisies, Attic Charm Glitter Roses, Tranquil Lilies
Courtship Blooms
Stamps:
Romantic Accents
Mist:
Sky
Mist:
Sky
Blue Fern Studios Supplies
Paper: Attic Charm
Sachet, Mercantile, Spring Posy, Calling Cards
Chipboard:
All You Need Is Love, Floral Spray, Chelsea Vines, Bohemian Flowers
Imagine Ink Embossing Powder:
Sage, Nutmeg, Petal, Melon
Flowers
Attic Charm Daisies, Tranquil Blooms, Courtship Blooms
Stamps:
Serendipity Medley, Romantic Accents
My final layout was created for the June Sketch Challenge.
I used the Curio paper for the background and added some random masking, inking, paint splatters and stamping with the Bourbon Street and Romantic Accent stamps. I used the Calling Cards, Attic Key and Haberdashery papers for layers under my photo. The photo is my dear friend's sweet daughter. I edited it to give it a Vintage look. Clusters of flowers include the new Attic Charm Daisies and Glitter Roses, along with some leaves embossed with 14 Karat Embossing powder. I added two metal butterflies to each side of my photo embossed with Oatmeal, Breeze and Cotton Candy embossing powders.
I placed a portion of the Iron Signage chipboard underneath my photo which I embossed with a mixture of Mushroom, Oatmeal and Breeze Embossing powders. To the left you can see a heart and key which I embossed with Oatmeal and Cotton Candy embossing powers. Tucked beneath the Attic Charm Daisy is the Crackle Bits chipboard, embossed with Mushroom, Oatmeal, Breeze and Cotton Candy embossing power and beneath the Glitter Rose is a Blooming Foliage chipboard piece embossed with Verdant embossing powder. Torn pieces of lace were tucked in various places to give some added texture.
Here I've used the Leafy Rings chipboard embossed with the same mixture of embossing powers as the Crackle Bits. I added some pink and blue micobeads on the chipboard as well as on the background paper.
Blue Fern Studios Supplies
Paper: Attic Charm
Curio, Calling Cards, Attic Key, Haberdashery
Chipboard:
Crackle Bits, Blooming Foliage, Iron Signage, Leafy Rings
Imagine Ink Embossing Powder:
Mushroom, Verdant, Cotton Candy, Oatmeal, Breeze, Cotton Candy, 14 Karat
Stamps:
Bourbon Street, Romantic Accents
Flowers:
Attic Charm Daisies, Attic Charm Glitter Roses
I hope I have inspired you!
Thanks for stopping by!
. . . Debbie
Thanks for stopping by!
. . . Debbie
Subscribe to:
Posts (Atom)