Showing posts with label Blush collection. Show all posts

Wednesday, February 3, 2016

February Inspiration with Jelissa

Hello friends!

We've moved into the second month of 2016, and things are happening fast at home! For those in the northern hemisphere, I hope your days are getting warmer too. And those down under, keep chilling!

I'm up on the blog today to share two creations using the amazing Blush collection. I love this line of papers because of the sweet colors and it's also just perfect for scrapping photos of any kind, not only for Valentine's Day. 

First to show you is this layout of my husband and me. I hardly ever scrap our photos because I'm camera shy and the husband is a selfie addict with our kids. But this photo is just perfect for the papers so I couldn't resist. 


My background paper is "Enamored" - and it truly fits the name! Love the B side so much that I've designed a  workshop just around it. The details and subtle masking makes it perfect for mixed media projects that carry a light touch, which is exactly what I have done here.

Some close-ups:


I used the stamps from Romantic Accents set together with Icicle embossing powder (these two are a perfect match) and created a detail resist over which I painted. You can see that I've used translucent water colors to preserve as much of the background paper as I can.


A lot of fussy cut details under my Flutter Medley chipboard - which I had embossed using Icicle EP and Textured Circle stamp.


Layering the different scraps of papers and journaling cards behind the sweet little girl I've cut out.


The other end of the Flutter Medley chipboard.


My title piece from Clip Frames which I first embossed all over with Oatmeal EP, then using the same stamp, added on another layer of Cerulean EP.

Blue Fern Studios products used:

Imagine Ink Embossing Powder - Icicle, Oatmeal, Cerulean
Blush collection papers - Enamoured, Calling Cards, Cupid's Folly, Celebration
Chipboard - Flutter Medley, Clip Frames
Stamp - Textured Circles, Romantic Accents


My second share is one of my little girl and her dad. I've gone for a brighter look because these two were having such a delightful time together playing.


Some close-ups:


My title - Daddy's Little Girl. This is quite a big piece and so I didn't follow conventional ways of placing titles (ie. under or next to photo) but choose to give it its own space above the photo.


Some background detail created with the Key to My Heart stamp and embossing powder.


Rose Medley chipboard altered with water colors, mist and embossing powder.


Layering behind the chipboard.


My must-have floral cluster.

And below is how I put this layout together. Sit back and enjoy the video tutorial!


Blue Fern Studios products used:

Imagine Ink embossing powder - Icicle, Pearl, Raspberry, Cotton Candy
Blush collection papers - Calling Cards, Key to My Heart, Devoted, Celebration
Chipboard - Daddy's Little Girl, Rose Medley
Stamp - Textured Circles, Key to My Heart


Monday, February 1, 2016

February Sketch Challenge

Welcome to February, everyone!  Today we have a brand new sketch for you designed by Michele Singh.  This month's sketch has a romantic feel to it, in honor of Valentine's Day.  Of course, you can use our sketch as inspiration for any theme you wish.  The February sketch has some beautiful layering, room enough for two photos, and a large title.  We can't wait to see how you use it!


To get you started, we have some beautiful examples from some of our Creative Team.  You will see the many ways they interpreted the sketch.  First up are the layouts that, like the sketch, use two photos.


Cathi O'Neill kept with the love-theme for her sketch layout this month, using paper from the Blush Collection.


Sandi Clarkson created her sketch layout using the beautiful "Celebration" paper from the Blush collection, for her dreamy layout.


This beautiful brown paper from the Timeless collection really makes the photos stand out in this layout created by Bec Genet.


Elena's Volckova's  layout began with a green background that mimics the background in her photos using paper from the Paisley and Vine collection,  She built layers with scraps from other collections.  Like the 3 shown above, Elena used two photos in her design.


As we mentioned, you don't have to use two photos with this month's sketch.  Let's take a look at some of the other Creative Team examples using just one photo.


 Maiko Kosugi used repeated hearts on her adorable layout using paper from the Blush collection.


 Staying with the love theme of this month's sketch, Nicole Doiron also used the beautiful Blush collection for her sweet layout.


The beautiful and romantic Blush collection is just perfect for February and ties in so well with  the theme of Yuko Tanaka's layout.  And what could be better than the Hugs & Kisses chipboard title.


Continuing with the love theme and use of paper from the Blush collection, here is Renea Harrison's  gorgeous layout. 


The next three examples use paper from the recently released Timeless collection.  First up is this precious layout from Marie-Eve Bernard.  


And Debbie Burns not only used the Timeless collection, she also used the Timeless chipboard title with this vintage photo.


Keren Tamir rotated the sketch and used the neutral Artistique paper from the Timeless collection which coordinates so well with the colors in her photo. 


Now it's your turn to join us.  We would love to see how you used the February Sketch as inspiration for your project.   We will have a prize for one lucky winner (from a random draw), and will feature a few projects from YOU at the end of the month!

We ask that you follow these guidelines:

1.) Feel free to interpret the sketch as you please by means of taking it as-is or 
flipping/turning/mirroring it to suit your needs, but please make sure your layout resembles the sketch.

2). Please note that you can do whatever type of project you please - a layout, card, 
  canvas, altered item- whatever suits your mood and style! 
We would love to see the different ways our sketch can be used.

3.) You must use at least one piece of Blue Fern Studios chipboard OR use Blue Fern Studios paper on your project. Please note that you do not need to use the pieces featured in the sketch
- use whatever suits your fancy! You can find the store nearest you HERE.
 {Do not use any other brand of chipboard on your project, please!}

4.) Upload your project using the Inlinkz tool below by midnight EST on February 29, 2016.

Please link your projects here:


Friday, January 29, 2016

January Video Tutorial by Marilyn Rivera

Hi everyone! I'm so happy to be back on the Blue Fern Studio design team with all those  talented ladies. I love Blue Fern products, I'm a fan!
My name is Marilyn Rivera, I'm from Puerto Rico but I live in North Carolina . I love to create and I used to live surrounded by fabrics, dress forms and threads designing dresses, because  you will see some of my dressmaking techniques in my work.
Scrapbooking become more than a hobby,  
 I've been giving the opportunity to travel and give workshops. I love to share my knowledge and techniques in my classes and in my video tutorials. My style is shabby chic with mixed media with a little of vintage.

You can see my work and videos:
Blog: http://marilynrivera.blogspot.com/

YouTube: Marilyn Rivera/YouTube Channel

Facebook: 
https://www.facebook.com/marilyn.r.dominguez

Pinterest: https://www.pinterest.com/marilynrivera/
"Momentos Especiales"
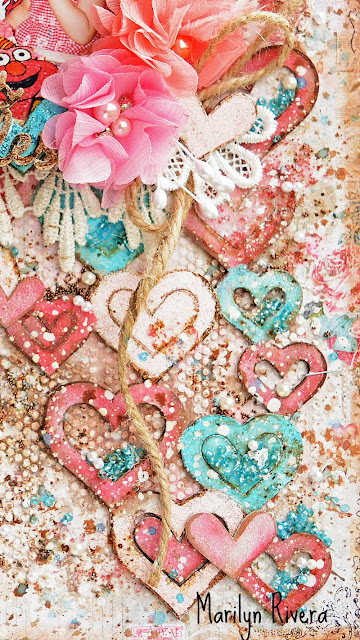
I worked this page with the beautiful Blush collection. My title is the new Spanish chipboard word "Momentos Especiales" that means Special Moments that goes perfect with this lovely memory of my kids, here is my daughter's first birthday.
I selected the Chunky Heart Panel chipboard to create the background and made it different techniques that you will see in the video tutorial.

I painted the chipboard title "Momentos Especiales" with two vintage color tones and embossed with the new oatmeal color.

I traced the hearts chipboard with a marker to enhance it and create dimension.

I embossed some of the hearts with the new embossing powders Blue Sky and Cotton Candy.

Supplies:

Blush colllection- Calling Cards, Reminisce papers
Chipboards: Chunky Heart Panel, Momentos Especiales
Imagine-Embossing powders: Blue Sky, Cotton Candy, Oatmeal
Imagine Ink- Mist- Sky, Cotton Candy
Stamp- Beads and Charm


Here's the video tutorial, I hope you enjoy it!


"KEY TO MY HEART"
I made this card using the Blush collection. I mixed the calling cards and Cupid's Folly papers. The Valentine Hearts chipboard goes perfect in my card.

I cut out the bird and the Key to my heart phrase from the Calling cards papers.

Supplies:
Blush collection: Calling Cards, Cupid's Folly papers
Chipboard: Valentine Hearts
Imagine Ink- Mist- Cotton Candy


Thanks for stopping by...Until next time!
Marilyn Rivera