
I hope everyone is doing something creative this fine Sunday! It is me, Lisa, sharing some Blue Fern Studios product with you today. Something about birdcages makes me sing!! And the beautiful Fancy Birdcage was just the perfect piece for this layout. I absolutely adore the piece that the birdcage appears to be hanging from. A gorgeous iron scrollwork piece that is the "arm". You can use the bird cage alone, or you can add the arm and even change the position of that piece so that it stands upright. I played with the position until I was satisfied with the way it sit on this layout.

Here is a close up of the birdcage. I used a Martha Stewart iridescent paint and stippled it on using my finger. When the paint was dry, I gave it a second coat. The result is a beautiful soft stucco texture. I used a pretty vine trim and wove it around the "arm" of the piece that the bridcage appears to be hanging from.

Model: 074677

For the title, I used one of the "words" from the "Good Vibes Word Set". I stippled on some white gesso, then while the gesso was still wet, sprayed it with the same spray I used to spray the background paper, flowers and gauze.

Model: 07489

My next project is a mini album that I started. I have the cover done, and plan to fill the inside pages with more Blue Fern Studios chip board.

I used 2 butterflies from the beautiful Brigittte Butterfly set. The technique I used on them was a simple heat embossing using Ranger's Tim Holtz Distress powder in Antique Linen. It gave them a beautiful old stone finish.

Model: 074387

For the Vintage Lock, I heat embossed the piece with gold embossing powder. It has a hammered gold metal finish.

For the lock and keys. I used the same heat embossed gold finish and hung the pieces on a jump ring before I tied it to the seam binding ribbon on the spine of my mini.
Model: 074783


This next layout, I decided to leave the beauty of some of the chip board in its bare form with a touch of ink to give it a little dimension.

I split the Blooming Foliage chip board in half and placed a flower in the middle. It makes a beautiful filler for your flower clusters.
Blooming Foliage


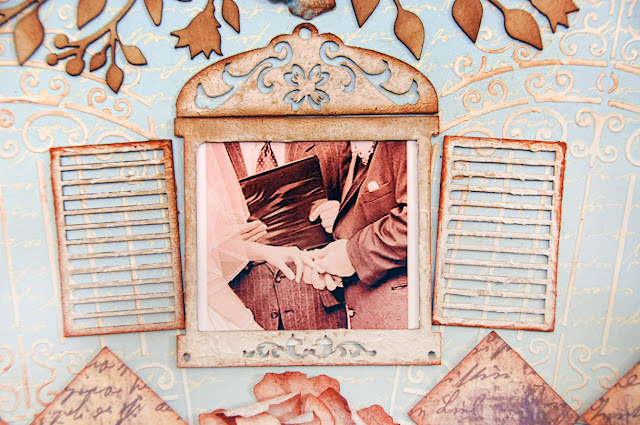
For the Tuscan Window, I used texture paste and stippled it on the pieces using my finger. When it was dry, I inked the edges. It gave it a weathered look.
Tuscan Window

I used the word LOVE from the Good Vibes Word Set. Just a simple brush of ink over it to give it depth was all it needed.
Good Vibes Word Set


I will be back throughout the month with more of my work with Blue Fern Studios chipboard. There are new collections being added all of the time. Thank you for taking a peek today and come back for more inspiration from our fabulous designers.

Here is a close up of the birdcage. I used a Martha Stewart iridescent paint and stippled it on using my finger. When the paint was dry, I gave it a second coat. The result is a beautiful soft stucco texture. I used a pretty vine trim and wove it around the "arm" of the piece that the bridcage appears to be hanging from.

Model: 074677

For the title, I used one of the "words" from the "Good Vibes Word Set". I stippled on some white gesso, then while the gesso was still wet, sprayed it with the same spray I used to spray the background paper, flowers and gauze.

Model: 07489

My next project is a mini album that I started. I have the cover done, and plan to fill the inside pages with more Blue Fern Studios chip board.

I used 2 butterflies from the beautiful Brigittte Butterfly set. The technique I used on them was a simple heat embossing using Ranger's Tim Holtz Distress powder in Antique Linen. It gave them a beautiful old stone finish.

Model: 074387

For the Vintage Lock, I heat embossed the piece with gold embossing powder. It has a hammered gold metal finish.

For the lock and keys. I used the same heat embossed gold finish and hung the pieces on a jump ring before I tied it to the seam binding ribbon on the spine of my mini.
Model: 074783


This next layout, I decided to leave the beauty of some of the chip board in its bare form with a touch of ink to give it a little dimension.

I split the Blooming Foliage chip board in half and placed a flower in the middle. It makes a beautiful filler for your flower clusters.
Blooming Foliage


For the Tuscan Window, I used texture paste and stippled it on the pieces using my finger. When it was dry, I inked the edges. It gave it a weathered look.
Tuscan Window


I used the word LOVE from the Good Vibes Word Set. Just a simple brush of ink over it to give it depth was all it needed.
Good Vibes Word Set


I will be back throughout the month with more of my work with Blue Fern Studios chipboard. There are new collections being added all of the time. Thank you for taking a peek today and come back for more inspiration from our fabulous designers.


")


