Friday, March 11, 2016

March Creations by Nicole Doiron


How happy I am to be here with you again to share some more 
creations using Blue Fern Studios products.

Two of my layouts feature the beautiful new Courtship Lane collection,
starting with this romantic page inspired by the March sketch challenge.


This is the beautiful March sketch.  I'm hoping to see your take on it!


Like all Blue Fern Studios papers, Courtship Lane has elegant floral designs
and is centered on a Home Sweet Home theme.  And when I think of home, I think of love!
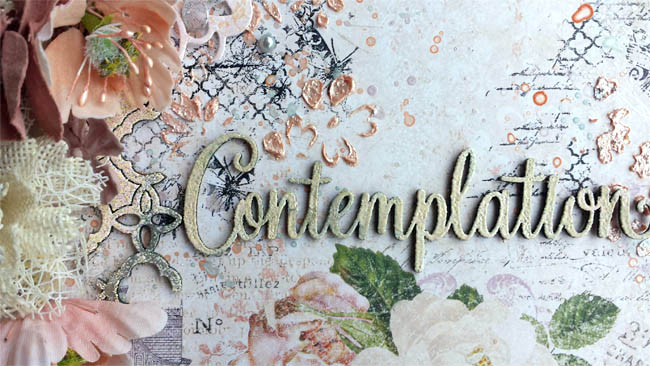
I used the Everlasting Love title which I covered in Imagine Ink Copper 
embossing powder and then dabbed in white paint.


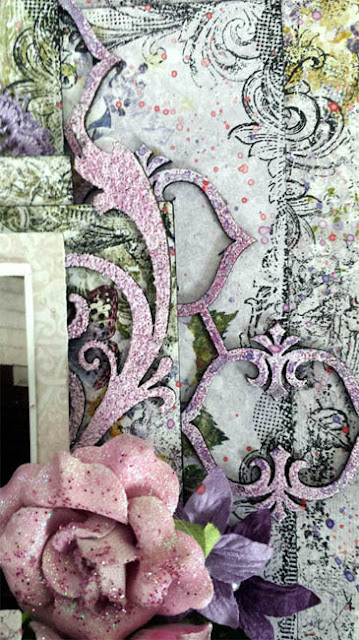
Below you see the fancy Floral Vine which I embossed in Imagine Ink Copper, Sage
and Iris embossing powders.  I love the way the mix of colors turned out.


I did some stenciling on my background and mixed in different purple shades of stains.
I added a small piece of the Ironwork Accents set adorned with a purple gem.


All and all, a very soft color palette with a touch of copper to match the beautiful, 
albeit dead, rusted tree in front of which Yves and I posed in this picture.


Blue Fern Studios Supplies
Paper: Courtship Lane (Royal Street, Parkway, Calling Cards)
Chipboard: Everlasting Love, Floral Vine, Ironwork Accents
Imagine Ink Embossing Powder: Copper, Iris, Sage


My 2nd Courtship Lane inspired layout brings the 'home' theme home, so to speak.
I decided to scrap this old but precious family photo.  I have very few pictures of me alone as a baby
 or with my family, and the ones I do have are of very bad 1970's quality. This one, however, is certainly
a favorite of mine and I found that it was perfect for Courtship Lane.


Slipped behind my photo is the Princess Window which I've treated with 2 shades of Imagine Ink  powders,
Ginger and Nutmeg. I then lightly dabbed on some copper and white acrylic paint.


I did the same to this piece from the Leafy Page Accents set...


and this fancy hinge from the Ironwork Accents.


Other chipboard pieces used are the Reminisce word from Serendipity Words 2 and the Shabby Brick Bits
which I simply covered with Snow embossing powder.


Blue Fern Studios Supplies
Paper: Courtship Lane (West Plaza, Parkway)
Chipboard: Princess Window, Ironwork Accents, Leafy Page Accents, 
Serendipity Words 2, Shabby Brick Bits
Imagine Ink Embossing Powder: Ginger, Nutmeg, Snow


As you may know, I'm from Canada and, in my part of the country especially, we have the longest Winters!  
They always seem to drag on and on and on... So to warm myself up a little, 
I thought of using this adorable picture of my friends' daughters on a beautiful 
Summer day matched with the bright happy papers from the Frolic collection.


The beautiful blue background paper, Petits Moments, covered in different shades of blue mist reminds
me of a bright blue sky.  I decided to combine it cut out circles of the pretty butterflies
from Dans le jardin paper.  I love the combination of blue and yellow.


 I chose Sunshine Kisses as my title, using the Sunshine piece from the Optimist Word Set
that I colored in  Buttercup yellow Imagine Ink embossing powder.


Surrounding the picture is the Floral Medley Frame on which I used a mixture of Seven Seas,
Breeze and Azure embossing powders with added white paint.  You can also see below
the Mixed Media Poppies that I cut into 3 pieces to display across diagonally on my page behind the butterflies.


Lastly, I chose to add this sweet little heart and arrow from the Directions set... perfect to accentuate 
the adorable sisterly love between these two little girls!


Blue Fern Studios Supplies
Paper: Frolic (Dans le jardin, Petits moments, Calling Cards)
Chipboard: Floral Medley Frame, Mixed Media Poppies, Directions, Optimist Word Set
Imagine Ink Embossing Powder: Sevens Seas, Breeze, Azure, Buttercup


Whether or not it's Winter where you are, I hope I've added a little sunshine in your day with my projects!  
I can't wait already until next month's post!
- Nicole

Wednesday, March 9, 2016

Using Blue Fern Studios To Create Masculine, Vintage, & Shabby Chic Styles With Renea Harrison

Today, I have 3 different layouts done in 3 different styles showing you how you can use the Blue Fern Studios products to create something unique and wonderful no matter what style you like to craft in!!

If you haven't had a chance to check out the Blue Fern Studios Sketch Challenge, be sure to do so  and get entered in for your chance at one of their awesome prize packs!!

Here is this month's sketch:


And the following is my take on the sketch using the Blue Fern Serendipity Collection to show you how you can use Blue Fern Studios products to take it to the Masculine, Grungy side of paper crafting:


I started with a layer of Serendipity-Chronicle Paper, and then took a layer of Serendipity-Imagination Paper


did some tearing and then heavily inked the edges. 


Next, came a layer of corrugated board that I misted in different layers, and then added Black Microbeads mixed with glitter glass to the torn edges on, and randomly onto the surface. 


I am one of those people who does not like to waste, and so I took the large pieces that housed the  Blue Fern Circle Links that I used on a layout last month, (yeah the part that most people throw away), and I stamped it with clear embossing ink and stamped it with the grid pattern from the Blue Fern Essential Textures Stamp, coated it with Imagine Ink Ginger Embossing Powder, heat setting it with my heat gun.
I took more of the Serendipity Chronicle Paper, cut and curled the edges, then added my photo, and "hung" it with an Office Metal Piece.


I wanted to add some details, without adding flowers, so I splatter painted the paper and then sprinkled Imagine Ink Ebony Embossing Powder and Silver Microbeads into the paint and heat set it. I set some silver brads in a zig zag pattern and then wrapped them with silver wire.


I created this completely FABulous large piece by taking a Blue Fern Working Parts Chipboard Piece and Grunging it up. I inked the brown part, used Imagine Ink Ebony Embossing Powder on the gear pieces of the design and used Imagine Ink Snow Embossing Powder on the chain and gear teeth part of the design and then just splatter sprinkled the Snow Powder to get a worn look. I then added some bolt heads to give it a really cool industrial look.


I continued the piece, actually making it look like one large piece, using the Blue Fern Studios Cogs and Gears Chipboard. I embossed the cog pieces with the Imagine Ink Snow Embossing Powder , and the Gears with the Imagine Ink Ebony Embossing Powder and attached the pieces to the Working Parts piece with a bolt head, and attaching the cogs with some screw brads. I love how combining those pieces created an amazing focal piece for my layout!!!


For the Title work, I stamped the "Photos" using the Blue Fern Studios Photography Stamp, and embossed the stamping with the Ebony Embossing powder, then tore the piece out of the paper and heavily inked it, attaching it with an office metal clip with the word "capture" on it and adding a metal tag with the word "Collections" on it. 


To bring out the teal color in the paper, I took some Blue Fern Studios Grid Bits Chipboard,  heat embossed it with some Imagine Ink Peacock Embossing Powder, and tucked them into some of the tears and layers of my layout.


Here you can see all those layers of Masculine, Grungy goodness that the Blue Fern Products allowed me to achieve, and absolutely no flowers!!
I love doing masculine work! It completely stretches my imagination and makes me think outside the box! 

Blue Fern Studios Supply List:
Paper:
Serendipity-Imagination
Serendipity-Chronicle

Chipboard:
Cogs & Gears
Working Parts
Grid Pieces
Circle Links (Leftover Pieces)

Stamps:
Essential Textures
Photography

Imagine Ink:
Ebony Embossing Powder
Icicle Embossing Powder
Ginger Embossing Powder
Peacock Embossing Powder


Next up, I have a layout using the Blue Fern Serendipity Paper Line that shows you how you can use the Blue Fern Products to create a  Vintage/Heritage style piece:


I started with a layer of Serendipity Fascination Paper. I liked that it had that notebook edge to it, lending a perfect setting for the look I wanted to achieve. I then cut down a piece of the Serendipity Chronicle Paper, and punched the top and bottom with a lace look punch. I added some vintage look lace to add a touch of softness and femininity.


I then wanted to capture the feeling of time, so I took the 2nd Sized Clock from the Blue Fern Large Roman Clocks Chipboard Set, 


and I heat embossed it with Imagine Ink Oatmeal Embossing Powder. I then stamped it randomly with the pattern stamp from the Blue Fern Bottled Sentiments Stamp Set, used the Imagine Ink Garnet Embossing Powder on the stamping and heat set it.


I created some layers to place my photo on using more of the Serendipity Fascination Paper, and a piece that I cut from the Serendipity Calling Cards Paper that repeated the notebook paper pattern, and then topped it with my photo. 


 I then added a metal office clip topped with a pearl and let it "hold" one of the Calling Card Paper pieces with the "Serendipity" definition.


I created a base for my flower layers using the Blue Fern Whimsy Flourish Chipboard Set that I heat embossed with Imagine Ink Sage Embossing Powder,


 stacking the 2 pieces to make a continuous base to place my flowers and foliage onto.
I then added some of my handcrafted Secret Crush Butterflies on, and they pulled out the pattern in the background paper wonderfully!


At the top of the clock, I added more flowers and foliage. 


Here is a side view to help you see all the Vintage elements and how you can achieve a time worn look using the Blue Fern Products.

Blue Fern Studios Supply List:
Paper:
Serendipity-Chronicle
Serendipity-Fascination
Serendipity-Calling Cards

Chipboard:
Roman Clocks
Whimsy Flourish

Imagine Ink:
Oatmeal Embossing Powder
Sage Embossing Powder
Ginger Embossing Powder
Garnet Embossing Powder

Stamp:
Bottled Sentiments

For my last layout I created a super romantic, Shabby Chic look using the brand new Courtship Lane Line that has just been released:


I started the layout with a layer of the Blue Fern Courtship Lane-Bourbon Avenue. 

For the next 2 layers, I wanted to create torn, book page layers to carry out my Fairytale Book theme from the photo, so I used a piece of the Courtship Lane-Town Gossip Paper, tearing a side piece off, flipping it and using the backside for the under layer and the front side for the top layer.


To get the wrinkled look, I just water distressed the edges and then kept working the paper with my hands to break it down a bit and then pushing it until I got the look I wanted and then drying it with my heat gun to form the look of pages.
I then used a Doily Stencil and texture paste to create the raised pattern on the papers.


I layered my photo on and then topped it with the Circle Flourish Chipboard that I heat embossed with Imagine Ink Snow Embossing Powder and then added faux pearl accent to.
The butterflies are some of my handcrafted Snow White Butterflies and really added to the soft look of my layout.

I love how the Imagine Ink Embossing Powders give the chipboard a wonderful, textured look when heat embossed. It makes creating gorgeous chipboard pieces a snap!


To add some Shabby Chic softness, I layered on some frayed cheesecloth, 


Then added on Mulberry Paper flowers and foliage, and a sweet metal adornment that I coated with Gesso and added a little silver key to.


For my Fairytale title, I used the Fairytale piece from the Blue Fern Story Fairytale Magic Chipboard Set, that I first coated in Gesso then inked with a pink ink, and then created a coating using a mix of glitter glass and Imagine Ink Dusty Rose Glitter. After that dried I inked randomly with a tea dye ink to get an aged look. I then distress crackle painted areas on my layout to add to the aged look of the piece.
I created a book latch using a metal latch coated with Gesso and added it to my "pages"


I then took some Blue Fern Garden Lattice Bits Chipboard that I painted with Gesso and then coated with some more of that glitter glass and Imagine Ink Dusty Rose Glitter mix, and added some more faux pearls and tucked the pieces under the water distressed edges. 


I just love how you can use the Blue Fern Studios products to achieve so many different looks!! The papers are so high quality and hold up to technique abuse and heavier layering, the chipboard allows you to create such amazing focal points and accents, the stamps allow you to create beautiful images or textural accents and the Imagine Ink Embossing Powders and Glitters allow you to create amazing colors and textures easily. I hope you get a chance to try some out for yourself! I promise you will be hooked!! Hugs ~Renea

Blue Fern Studios Supply List:
Paper:
Courtship Lane-Bourbon Avenue
Courtship Lane-Town Gossip

Chipboard:
Circle Flourish Chipboard
Story Fairytale Magic Chipboard (Fairytale Piece)
Garden Lattice Bits

Imagine Ink:
Snow Embossing Powder
Dusty Rose Glitter

Tuesday, March 8, 2016

March Inspiration With Debbie

Hi everyone!  Debbie here with you today to share some layouts created with the new Courtship Lane collection.  I had so much fun creating with the new papers.

-Reminisce-
 My first layout features the Lovers Lane paper.  Love the details and colors.  I used the Calling Cards paper to layer under the photo of my grandparents. I added some masking and paint splatters to the background paper along with misting using the Imagine Ink Cotton Candy Mist and stamping with the Arcadia Textures stamp.


I used three pieces of chipboard here.  The Poppies Collage under my photo and Bits Of Honey on each side of the photo and Chelsea Vines tucked in my flower clusters.  I embossed the Poppies Collage and Bits of Honey with a mixture of Ginger, Oatmeal and Cotton Candy embossing powders and  added some Dusty Rose  and Fools Gold Glitter.  The Chelsea Vines were embossed with Sage and Verdant and sprinkled with some Peridot glitter.

My title Reminisce is from the Serendipity Words 2.  I inked it with brown ink and randomly embossed with Ginger, Oatmeal and Cotton Candy embossing powers.  I love the aged effect.

Blue Fern Studios Supplies
Paper:  Courtship Lane
Lovers Lane, Calling Cards

Chipboard:
Poppies Collage
Bits Of Honey
Serendipity Words 2
Chelsea Vines

Imagine Ink Embossing Powder:
Sage
Verdant
Ginger,
Oatmeal
Cotton Candy

Imagine Ink Mist
Cotton Candy

Glitter:
Dusty Rose
Fools Gold
Peridot

Stamps:
Arcadia Textures

My second layout features the Town Gossip paper.
-Contemplation-
 I added several layers of papers under my photo using Royal Secret, West Plaza and Parkway papers.  Lots of masking, paint splatters and stamping with the Forever and Garden Frolic stamps.


The title Contemplation is from Serendipity Words 1.  I embossed it with some Pearl and Petal embossing powders.  Here you can see some of the stamping along with the Floral Lattice Bits Chipboard piece tucked beneath the flowers, embossed with the Pearl and Petal embossing powders.

Here is another close up of the Floral Lattice Bits chipboard.


Beneath the photo I used a portion of the Garden Celebration chipboard, embossed with Pearl and Petal embossing powders.

Blue Fern Studios Supplies
Paper:  Courtship Lane
Town Gossip, Royal Secret
West Plaza, Parkway

Chipboard:
Serendipity Words 1
Garden Celebration
Floral Lattice Bits

Imagine Ink Embossing Powder:
Pearl
Petal

Stamps:
Forever
Garden Frolic

My final layout was created for the March Sketch Challenge.  
-Our Dream Home-

 I used the Main Street paper for my background and West Plaza Side B, East Plaza, Royal Street and Calling cards to create layering under my picture.  Lots of stamping on my background using the Halftone and Arcadia Textures stamps and some paint splatters.


I used a mixture of the Lilac and Mystic Plum embossing powders and dusty Rose Glitter on the word Happy from the Laughter, Happy, Smile chipboard set.  I lightly added some Dusty Rose Glitter on the flowers.


On each side of my picture I used the Persian Ornament chipboard which I embossed using the Lilac and Mystic Plum embossing powders.  


On the right side I used the Whimsy Flourish chipboard, embossed with the Lilac and Mystic Plum embossing powders. 


Blue Fern Studios Supplies
Paper:  Courtship Lane
Main Street, West Plaza, East Plaza, 
Calling Cards, Royal Street

Chipboard:
Persian Ornament
Whimsy Flourish
Happy from Laughter, Happy Smile

Imagine Ink Embossing Powder:
Lilac
Mystic Plum

Glitter:
Dusty Rose

Stamps:
Arcadia Textures
Halftone

I hope I have inspired you!
Thanks for stopping by!
. . . Debbie