Showing posts with label circle vine. Show all posts

Friday, June 24, 2016

Three Tranquility Layouts with Karine

Hi there, Blue Fern Studios fans,

I hope this post finds you well and that summer is arrived in your part of the world. I'm sharing with you today three layouts I did in the past week or so. I used one of the last collection: Tranquility. I think it's my favorite collection ever!

All You Need Is Love


For this layout, I stepped out of my comfort zone. Orange is a scary color for me, but this Keepsakes paper from the Timeless collection is so beautiful, I couldn't resist.


My main chipboard piece is the Circle Vine. I coloured it with brown ink, and then partially embossed it with Imagine Ink Honey and Chili Powder embossing powders. I just love how it turned out.


As for my background work, I used the Serendipity stamp with brown ink and the Garden Frolic stamp with orange ink. I also used some withe and gold texture paste, to add interest to the background. Brown ink drops complete the work.


My title piece is simply coloured with brown ink.


I must say, my layout is also inspired by the beautiful orange flowers, part of the Tranquil Blooms set. I just can't get enough of those gorgeous flowers. I also used some of the Courtship Blooms.

Blue Fern Studios products used:
Keepsakes paper (Timeless collection)
Serendipity and Garden Frolic stamps
Chipboards: All You Need is Love and Circle Vine 
Imagine Ink Honey and Chili Powder embossing powder
Tranquil Blooms and Courtship Blooms flowers


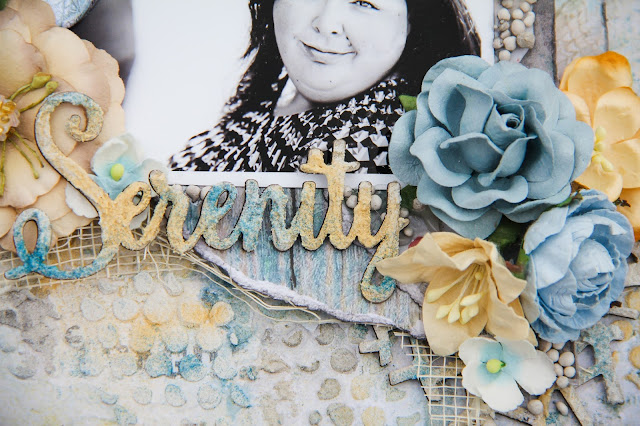
Serenity


My second layout features the Contentment paper from the Tranquility collection. When I got the collection, I wanted to create something special with this paper. It is just gorgeous. I decided on a layout about me, since I rarely use a picture of me.


For the background, I wanted to match what was already in the paper and that reminded me of sand or some rough texture. I used some stone effect medium with a stencil or simply applying it with a palet knife, and while it was still wet, I sprinkled some Imagine Ink Seven Seas and Honey embossing powders and heated it. I LOVE the result.


I did the same thing with my chipboards (the Crackle Bits). Look at this texture!


My title piece comes from the Serenity, Cam, Hushed set.

To mat my photo, I used the Jubilation and the Calling Cards papers, also from the Tranquility collection.


To embellish, I used two large flowers and some pale yellow lilies from the Tranquil Roses and Lilies set.


To add a bit of interest to my background, I partially stamped using the Serendipity Medley and the Making Plans stamps with blue ink, and the Postal Textures stamps with grey ink.


Blue Fern Studios products used:
Contentment, Jubilation and Calling Cards Papers (Tranquility collection)
Serendipity Medley, Postal Textures and Making Plans stamps
Crackle Bits and Serenity, Calm, Hushed chipboards
Tranquil Roses and Lilies
Imagine Ink Seven Seas and Honey embossing Powders 


Perky


My last layout features the Stillness paper from the Tranquility collection. I mated my picture with the Serenity paper, also from the Tranquility collection.


I wanted a masculine feel to this one, so I used the Grid Pieces on which I used clear crackle medium and some brown paint to make the cracks stand out more. I love the result. It matches the grid pattern in the paper. I also used a grid stencil with modeling paste and a grid stamp, along with the Texture 1 and Making Plans stamps sets.


Look at the texture on the chipboards pieces.


My title is part of The Optimist Word set. I left it raw.


To embellish everything, I used the Tranquil Blooms (green) and some Courtship Blooms (kraft and dark brown). Aren't those flowers simply amazing?

Blue Fern Studios products used:
Stillness and Serenity papers (Tranquility collection)
Texture 1 and Making Plans stamps
Grid Pieces and The Optimist Word set chipboards
Tranquil Blooms and Courtship Blooms flowers

I hope you have a great day.
Karine

Wednesday, December 23, 2015

Mixing it Up ~ Sandi's December Projects!

Hello, Blue Fern visitors! 
Sandi here with you today sharing my 3 December projects.
It's so hard to grasp that 2015 is almost over! 

"Memories"

First up is a layout using the Vintage Christmas collection. I used a variety of papers as listed below and then built my background with super heavy gesso, a stencil and Imagine Ink mists in Persimmon, Cotton Candy and Leaf. 


My Clip Frame was treated with Cotton Candy mist and then heat embossed using both Petal and Poinsettia. The Berry Stem on the left was misted with Imagine Ink in Leaf and variegated with a random ink pad. The Blooming Foliage peeking from beneath the photo was treated the same. A few microbeads were added to both for more texture. 


The Garden Lattice Bits were misted with Cotton Candy and then randomly embossed with Petal and Poinsettia.  You can also see I've used a snippet of the Blooming Foliage tucked into my cluster. 


One last close-up

Blue Fern Studios Products Used:
Paper:
Vintage Christmas Deck the Halls
Vintage Christmas Magical
Vintage Christmas Greeting Cards

Chipboard:
Garden Lattice Bits
Clip Frames
Berry Stems
Blooming Foliage

Imagine Ink mist:
Cotton Candy
Persimmon
Leaf

Embossing Powder:
Poinsettia
Petal

***

"Dream"

I love scrapping with purple! And since I haven't had a lot of opportunity to use the DejaVu collection yet, I took this time to do so.
  (Love this early ingenue photo of Lucille Ball, 1930s. Photo credit to Tumblr, original photographer unknown.) 

The spectacular Circle Vine Frame seemed the perfect choice to add a little drama to my layout. It was coated with gesso, then misted with Imagine Ink in Jingle Bells. I did a little random embossing with a clear powder and then added in some purple with one of my gelatos. 


The Framington Medley was treated the same and used as a background layer. To emphasize my photo, I used color around the Circle Vine Frame and mixed in some microbeads as well. 


You can see some of my stamping in the background using the Garden Frolic stamp. 


I used more of the gelato color to create an ombre look on my Dream title. I finished the page with some random paint splattering. 

Paper:
DejaVu Lustre
DejaVu Tresors
DejaVu La Plume

Chipboard:
Framington Medley
Circle Vine Frame
Wish, Wonder, Dream

Stamps:
Garden Frolic

Imagine Mist:
Jingle Bells

***


"Merry"

Here I am again using the Vintage Christmas collection. I've tried to photograph this layout multiple times and cannot seem to capture it's true appearance. IRL, it is so sparkly and pretty! 
The background was treated with gesso and Imagine Ink in Winter Mint. 
This LO is based on the December sketch and is of one of my grandsons with a great-granddad, so sweet. 


The Holiday Frame was misted with our Leaf mist and then blinged up with our Lucky embossing Powder! The shine is gorgeous! I've tucked in some fussy cut flowers. 


The Wood Ornament was treated with Petal and Poinsettia embossing Powders. A bow and flower finish it off! 
I used one of the Halftone Stamps around the outer edge of my layout for depth and interest. 


I added some personal touches with cheesecloth, peals and flair. 

Blue Fern Studios Products used:
Paper:
 Vintage Christmas Wonderland
 Vintage Christmas Greeting Cards
 Vintage Christmas Deck the Halls
 Vintage Christmas Magical

Chipboard:
Wood Ornaments
Holiday Frame

 Embossing Powder:
Petal
Poinsettia 
Lucky

Mist:
Winter Mint
Leaf

Stamps:
Halftone

That wraps it up for December and for 2015! 
I am thrilled to be back with Blue Fern Studios again next year! 
See you then! 

Wednesday, September 2, 2015

September Inspiration with Jelissa

Hello friends and welcome to the month of September!

Things are definitely going at warp-speed for me now that little baby is due any time now. Sometimes I do feel like I'm getting affairs in order, which sounds so morbid!

Anyhow, I'm in today to share my September creations for Blue Fern Studios. I couldn't resist using the sketch that Michelle has created for this month's challenge even though I had a different project planned. So here is her sketch:


And my take on it:


I've never used so much purple before! But the soft palette of the Deja Vu papers made it so easy and pleasing. This is one of my favourite photos of Number 2 and hubby - don't they look so happy with their bright smiles?

Lots of close-ups:


My title, which I have left untouched but just simple priming with gesso. Not forgetting the paper layers I have under my photo.


Part of the Circle Vine chipboard which I used to frame my photo. I had cut out one end so that the whole piece fits and still gives me the flow I wanted for the page. I had also die cut some leaves out for adding into the floral cluster.


Die cut doily from one of the Deja Vu sheets.


Using the collection title from the info strip as a sentiment in my top cluster. I used the Deja Vu stamp set to create a resist for my watercolor background, plus the little piece which I had snipped off the Circle Vine chipboard. I also added some beads and distress glitter for extra texture.

Blue Fern Studios products used:
Papers: Deja Vu collection - Tresors, Atelier, Lustre, Petite Cartes
Deja Vu Stamp set, Widgets
Chipboards: Laughter, Happy, Smile
Circle Vine

My next share is a educator video I've created. I had wanted a relatively simple layout without too much clusters and a comfortable amount of white space. 


Again, using Deja Vu papers. I can't seem to get enough of this gorgeous collection! The drawings on this paper is so subtle but yet they actually help to create a visual flow that framed my main cluster beautifully.

Many, many close-ups again:


The Township Collage chipboard which I had altered in a few different ways.


I've always wanted to use that bird cage stamp!


I like the dangling trinkets in the Deja Vu stamp set a lot because of the intricate details they have, just like BFS's laser-cut chipboards. 


My title piece.


Main cluster with the pretty papers all layered up and I sneaked in bits of lacy flowers.

And here is how I created this page:


Blue Fern Studios products used:
Papers: Deja Vu collection - Friperies, Petite Cartes, Lustre, Atelier
Deja Vu Stamp Set
Chipboards: Township Collage, Frolic in the Sun


Friday, June 19, 2015

Angelica's June Projects

Hello everyone! Angelica here today to share my June projects with you! Since being on the DT I've been using one paper collection each month. Well, time to mix it up. Today, my three layouts are from three different paper lines.

First up is my take on the June Sketch just flipping it. I used two papers Ombre Dreams Collection; Charlotte's Dream and Joyce's Dream.
 
I used the Beaded String Chippy to further embellish my title. I used the word "Smile" for the Laughter, Happy, Smile set.
 
I used the Circle Vine chipboard piece to hold my photos.

For this page I used Boudoir from the Blue Fern Garden collection as my background. I fussed cut the Wisdom paper from the Montage Collection and matted my photo.

I really don't do much to my chipboard pieces. Just some thick gesso and mists.  Here I used the Estate Railing piece.
 One of my favorite chippies are the Roman Clock Sets. Here I used the Large Set..

 Last but not least, I used the Love Story Collection. My daughter loves Alice in Wonderland so I made this for her. This line was perfect! I used the True Harmony, Twenty One, and Amazing Heart papers.
 I used the Queen of Hearts piece for my title and Heart Crowns as embellishments.
 The Card Suit Melody chippy is so unique! Love it!
 
Well, I hope that you've enjoyed my projects for June! I will be back in August for I'm breaking for July!