Showing posts with label Vintage Locks. Show all posts

Saturday, April 13, 2013

Making Chipboard the Project Focus~!

Hello everyone and welcome back to the Blue Fern Studios blog! Erin Blegen here with you today to show you how to take your favorite chipboard pieces and make them the shining star on your projects. I've got three different examples for you, featuring three different types of projects- all of varying sizes- so you can see how easily you can incorporate our amazing products into whatever you love doing best!

"The Wait is Long"
First up we have an 8"x10" canvas. My inspiration for this piece was the Grand Balloon. And paired with this sweet photo of my son as he patiently awaited a deer to his "stand", I found my match! It was perfect for putting together this whimsical scene and truly does take center stage on my canvas.

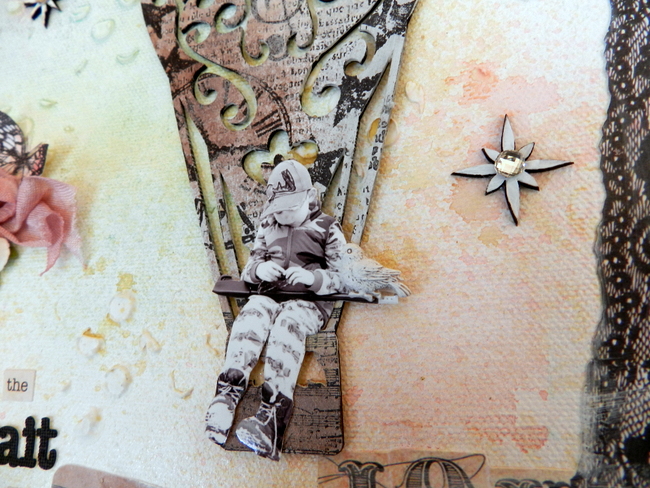
For the stars, I used the centers of the Ornate Medallions.

Blue Fern Studios Products Used:

Grand Balloon 075100

Vintage Locks 074783

Ornate Medallions (centers) 074462

"Pixie Tag"
 Next we have a smaller piece, a tag. And taking center stage we have one of the Regal Ornaments and Vintage Keys, inked and layered to create a wonderful centerpiece for this feminine project.

I just love the dimension! And so simple to create coordinating pieces with a coverage of chalk inks.

Blue Fern Studios Products Used:

Regal Ornaments 074479

Vintage Keys 075032

"Forever" Card
Finally, I have a "dressed up" card for you! I knew that the Charlotte's Dress Set would be perfect for a wedding card, though I hadn't exactly intended for it to be a Bohemian-style wedding- but that is just the way it goes sometimes, isn't it? :)

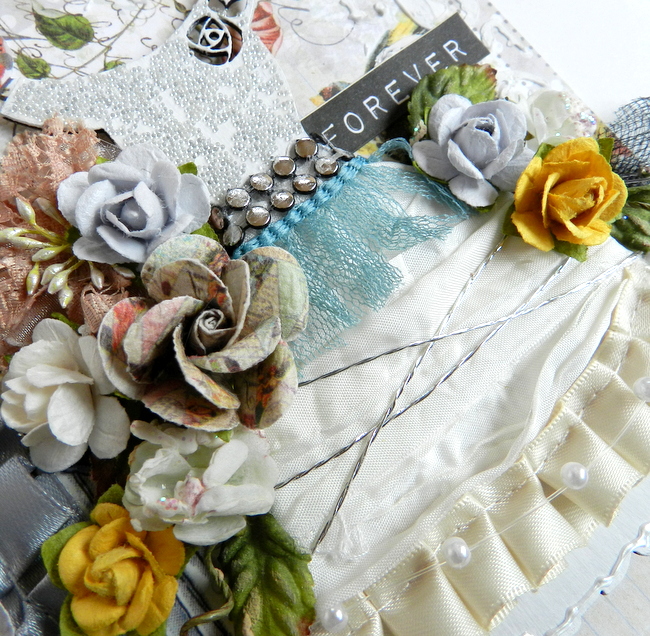
I used plenty of fabric, trims, wire, pearls, liquid pearls, and microbeads to bring this dress to life. What would you do with yours??

Blue Fern Studios Products Used:

Charlotte's Dress Set 075056

Thank-you for the visit today! Enjoy the rest of your weekend :)

Sunday, March 17, 2013

{3} Layouts with Patter

Hi everyone. It's Patter Cross here, and I am glad to be back. Today I am sharing three 8x8 layouts with you. I hope you will enjoy them and find some fun ideas to use. Now let's look at these smaller layouts.

"Keep Faith"
We are finally members of a church in our new town. I am so excited, and of course scrapping a picture of our new church was very important to me. So, here it is (below). For this layout I used the Tuscan Window chipboard as a topper to my photo. I then added the Garden Window shutters to the sides of my photo. I liked mixing the two chipboard sets.

I wanted to leave my chipboard raw as I liked the raw color on the layout. To dress them up, I just stamped on them using brown ink.

Blue Fern Studios Product Used:
Tuscan Window 074752
Garden Window 074691

"Beautiful Iris"
In our new house in October, the irises began to bloom. Kind of late I believe but we moved them from the front yard to the side so I think they were in a bit of shock. But once they came up, wow! I used the Blooming Foliage chipboard on this page.

To create the fun texture on Blooming Foliage, I mixed a bit of glass bead gel with green acrylic paint. I then spread it on the chipboard. While it was still wet, I then misted it with a mix of gesso and water. It has a really fun texture when you touch it but it's hard to tell in the photos.


Blue Fern Studios Product Used:
Blooming Foliage 074851


"Love Always"
And for my last layout, I thought I would share my husband's executive work photo. I don't have a lot of scrapped photos of him so this one is special. I used the Vintage Locks and the word 'love' from the Valentine Word Set here.

I wanted my chipboard to look like leather since this was a masculine layout. To achieve that, I just covered the chipboard in distress ink. It worked very well for the look I wanted.


Blue Fern Studios Product Used:
Valentine Word Set 074646

Vintage Locks 074783

Thanks for joining me today. Blessings,

Wednesday, March 13, 2013

Achieving Different Looks w/Erin Blegen

Hey everyone :)~ Erin Blegen here with you today to share with you three different projects, all using the same paper collection but achieving different looks using Blue Fern Studios chipboard! We've got a lot to get through, so let's get started :)...

"Lilah"
This project was created on an 8"x10" canvas. I love this beautifully soft photo of my niece Lilah, so I wanted to create a romantic piece with lots of stamping and bursts of color. Let's take a closer look at the Blue Fern Studios chipboard used here:

I've used pink crackle paint on the Princess Window piece before smattering with microbeads. Then I topped it off with a piece cut from the Symphony Border, misted it, and stamped to correlate with my bakcground.

I LOVE keys. I've painted this one from the Vintage Keys set with gesso, applied a very light pink mist to it, and then stamped over top. Then I brushed on some Stickles, added the heart gem and some tulle at the top.

This Vintage Locks piece was also lightly misted and then stamped.

Blue Fern Studios Products Used:

Princess Window 074578

Vintage Locks 074783

Vintage Keys 075032


"Our Bond"
My second project is a layout, featuring how easy it is to use chipboard in its raw fashion, which I love to do! 

The Calligraphic Border provides dimension, texture, and detail to the layering beneath my photos. I felt that by leaving it raw, it really stood out like I wanted it to :).


Blue Fern Studios Products Used:

Calligraphic Border 074363

Vintage Keys 075032

"Hello" {Tag}
My final project today is this tag. I love the smaller chipboard pieces for projects like these! So much fun to put together :)

I've combined a dress form from the Miss Taylor Set, as well as the larger butterfly out of the Brigitte Butterfly set to dress up this tag. I used a combination of Glimmer Mist and embossing powder to set the base of my dress form. I then added the tulle skirt and some seed beads for the bodice. Finally, the little heart accent was put in place.

For the butterfly, I used some light misting and embossing powder as well, before adding my stamping. Finally I trimmed up the tops of the wings with some microbeads.

Blue Fern Studios Chipbpoard Used:

Miss Taylor Set 074721

Brigitte Butterfly Set 074387

Thanks so very much for stopping by the blog today! I hope you enjoyed my projects- and that you're inspired to go out and get some BFS chipboard for yourself!

Take care and see you again soon :),

xErin

Sunday, March 3, 2013

Happy Blue Fern Studios Sunday!!

I hope everyone is doing something creative this fine Sunday! It is me, Lisa, sharing some Blue Fern Studios product with you today. Something about birdcages makes me sing!! And the beautiful Fancy Birdcage was just the perfect piece for this layout. I absolutely adore the piece that the birdcage appears to be hanging from. A gorgeous iron scrollwork piece that is the "arm". You can use the bird cage alone, or you can add the arm  and even change the position of that piece so that it stands upright. I played with the position until I was satisfied with the way it sit on this layout.


Here is a close up of the birdcage. I used a Martha Stewart iridescent paint and stippled it on using my finger. When the paint was dry, I gave it a second coat. The result is a beautiful soft stucco texture. I used a pretty vine trim and wove it around the "arm" of the piece that the bridcage appears to be hanging from.


                                                                                           Model: 074677

For the title, I used one of the "words" from the "Good Vibes Word Set". I stippled on some white gesso, then while the gesso was still wet, sprayed it with the same spray I used to spray the background paper, flowers and gauze.

                                                                                                 Model: 07489

My next project is a mini album that I started. I have the cover done, and plan to fill the inside pages with more Blue Fern Studios chip board.

I used 2 butterflies from the beautiful Brigittte Butterfly set. The technique I used on them was a simple heat embossing using  Ranger's Tim Holtz Distress powder in Antique Linen. It gave them a beautiful old stone finish.

                                                                                                 Model: 074387                   

For the Vintage Lock, I heat embossed the piece with gold embossing powder. It has a hammered gold metal finish.

For the lock and keys. I used the same heat embossed gold finish and hung the pieces on a jump ring before I tied it to the seam binding ribbon on the spine of my mini.

                                                                                               Model: 074783


This next layout, I decided to leave the beauty of some of  the chip board in its bare form with a  touch of ink to give it a little dimension.


I split the Blooming Foliage chip board in half and placed a flower in the middle. It makes a beautiful filler for your flower clusters.
                                                                    Blooming Foliage


For the Tuscan Window, I used texture paste and stippled it on the pieces using my finger. When it was dry, I inked the edges. It gave it a weathered look.
                                                                     Tuscan Window


I used the word LOVE from the Good Vibes Word Set. Just a simple brush of ink over it to give it depth was all it needed.
                                                                 Good Vibes Word Set


I will be back throughout  the month with more of my work with Blue Fern Studios chipboard. There are new collections being added all of the time. Thank you for taking a peek today and come back for more inspiration from our fabulous designers.