Showing posts with label Organic Vine Corner - Large. Show all posts

Wednesday, June 5, 2013

Two Layouts by Kelly Foster

Hi everyone - Kelly here! So glad you have stopped by..I have two layouts to share, and I'll just get right to it!

A Beautiful Day

I created this layout, taking photos from one of the first days of spring we had here, and wanted to create an earthy but springy-vibrant page. I used one of the Organic Vine Corners, and I cut it in two, to place opposite one another in my clusters. I love how the one below the photos sort of mimic's my daughter's hair blowing in the wind! I dabbed various inks onto the chipboard using a sponge, and then added a touch of a textured medium to give it more dimension.


Below you can see the other half, which was treated the same way.


Below I have used one of the gorgeous Regal Ornaments, to which I applied the same techniques above, then tucked under my flower cluster.


Organic Vine Corner
Organic Vine Corner - Large

Regal Ornaments
Regal Ornaments - Click Image to Close

Cherished

On this layout, I have used just one piece of chipboard, but it is what I think of as a "statement piece" in that it is just SO beautiful and really added something awesome to my page. The Bordeaux Layered Frame is two pieces, so it can have a really dimensional look. 


The technique on this frame, well it was all a big experiment, and this is the result of layers and layers of "trying this and that." I simply painted the back panel of it white with gesso so that the ornate part would really stand out. I then did some embossing, painting with multiple colors of spray mist, dabbing with gesso where things got too dark, then repeat, until I got what I was going for! I also wrapped a bit of jewelry wire around the left side of the frame.


I love that even though my background and embellishments are quite "busy," this beautiful frame piece really draws the eye to the photo.


Bordeaux Layered Frame


Thanks a bunch for stopping in today!! Have a wonderful day!

Monday, May 27, 2013

Marcasite Technique and some Tags too!

 Yea!! It’s the 27th day of the month!  And, you know why I like that day of the month so much?  It’s because it’s my assigned day  to share with our inspiring and supportive Followers what I have been working on for BFS.  I am Joyce, and I hope I can inspire you to try out this Marcasite technique to use on some of your BFS chipboard pieces.  It is really quite effective on chipboard and renders a jewel like quality.  The technique is easy to apply, and I’ve created two different pieces to share with you using the same technique.
 
Bargain Bin Journal featuring the Organic Vine Corner chipboard.

 
Close up of Marcasite Technique


 Here’s how I obtained the look of Marcasite on the chipboard above.

1)      Apply an acrylic gold metallic paint, or an metallic ink from a stamp pad, to your chipboard and let it dry.

2)      Visualize where you want to apply your Marcasite application to rest and apply either (a) a liquid pearl product, or (b) an application of glitter in small dots, or (c) add self-adhesive pearls or rhinestones on your pattern, and allow any wet product to dry thoroughly before continuing on to the next step.  I alternated an application of a liquid pearl product and a glitter dot on my first example.

3)      Use a small paint brush and dip it in a dark grey, black or vertigris colored mist and apply the mist with your paint brush all around your pearls/rhinestones/glitter dot design and set to dry.  Wipe up any excess mist that may get on to other areas of the chipboard that are not in alignment with your Marcasite design.  You may need to apply another coat for more drama because the acrylic metallic paint may produce a resistance.  If this happens, then try a watered down black acrylic paint on your paint brush instead of the colored mist.

4)      Once the mist or paint has dried, use a moistened  Q-tip to clean off the mist or paint on the pearls/rhinestones so that the radiance of the pearl/rhinestones show through.

5)      Then using your fingers, apply an ivory/gold metallic paste or paint around the edges of the Marcasite technique to bring back the radiance of the original gold metallic paint application.  This last application really shows up well in the door knocker chipboard tag featured below because there was more surface space available on that particular chipboard design.
The rest of the Organic Vine Corner  chipboard was spritz with other colors and metallic paint was applied as well.


An image transfer technique was used on the bargain bin journal cover and it produced a lovely worn and vintage fabric appeal.  It actually feels like fabric to.  The technique works well when using brightly colored pattern paper.  I’ve use the same technique on some of BFS gears and widget chipboard and it rendered really nice results.  You’ll see an additional example of the technique used on the chipboard on one of the tags below.  The Image Transfer technique will be posted on my personal blog this week.


Marcasite Technique

Embossing Technique

Image Transfer applied on first Widget
 
Here are pictures of the products I have used in this months project:

Organic Vine Corner

Ironwork Accents

Widgets


I hope you give the marcasite technique a try too!


Thursday, May 9, 2013

Black and White

Hi!
I am here to share two new layouts with you. I have used some yummy Blue Fern Studios chipboards. Both layouts are based on black and white with a colour accent. I have altered the chipboards for both layouts in the same way, except for the black swirls.

For my first layout I have used the Organic Vine Corner and the Damask Flourish. I have divided both of them into two pieces. I have also used a heart from the Heart Set. The Damask Flourish pieces are just painted in black acrylic painting. The other pieces are first painted in white, then stamped on with black ink and then covered in glossy accent.


Blue Fern Studios products used:

Damask Flourish

Organic Vine Corner

Heart Set

Secondly, I have made this layout using the Blooming Foliage divided into two pieces and one of the Gabrielle Butterflies. All of the Blue Fern Studios chipboards are first painted in white, then stamped on with black ink and then covered in glossy accent.


Blue Fern Studios products used:

Blooming Foliage

Gabrielle Butterfly Set

Hugs,
Camilla

Wednesday, April 17, 2013

Loads of Color with Patter Cross

Happy Wednesday! It's Patter Cross here, and today I am sharing two layouts with you. The fun part is that they are 8 1/2 x 11, and I have not scrapped that size in probably 10 years or more! Let's look at them in detail.

"You Today"
This precious little one zones out when she is ready for a nap. So, here you see that adorable expression on her face as she waits for her bottle. I chose to use the Blue Fern Studios Brigitte Butterfly Set. I put down a light layer of gesso on the chipboard then painted it with Adirondack pool paint dabber. While the paint was still wet, I spritzed it with Heidi Swapp mint green color shine. In person it has a bit of a marbled look but I wasn't able to capture it on camera.
Pin It


Brigitte Butterfly Set, 074387

"Cute Stuff"
My next layout is done in the colors of the baby's room. I love the bright colors so I went bright with this layout. It was a bit hard to photograph because of the white background. The close-up photos show the colors best.

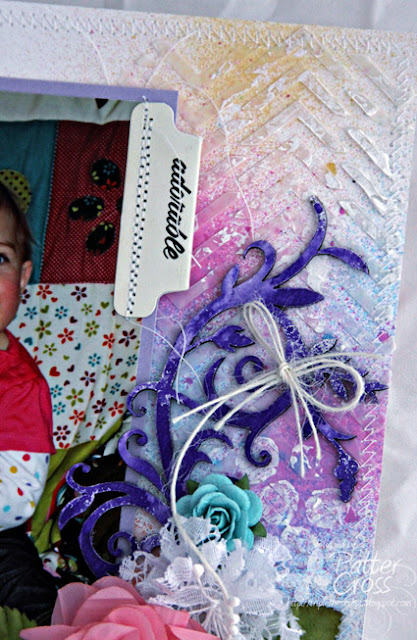
The Blue Fern Studios chipboard I used was the Good Vibes set for the title "Cute Stuff," and the Organic Vine Corner which I cut in half to use on both sides of the picture.
Pin It
For the Organic Vine Corner, I painted it with gesso and then spritzed with SEI Tumble Dye desert purple mist. I was able to get it darker in some areas so it gave it a very fun look.


The title I painted with gesso and Adirondack raspberry paint dabber. I needed it to be bright.

Good Vibes, 074899

Organic Vine Corner, 074622

Now remember, you still have time to enter the Blue Fern Studios April Sketch Challenge. I hope you will join in as there is a wonderful Blue Fern Studios prize pack up for grabs! :) Thanks for stopping by!

Saturday, March 23, 2013

Irene's Projects

Hi everyone! Today I would like to share with you all my March projects using some gorgeous Blue Fern Studios chipboard pieces. I've created a layout, a tag and a card for this month.

First up, is a layout using a seasonal wildflowers piece and an organic vine piece. I've also used a Blooming Beauty word chipboard piece as the title for this layout.


Here are some close-ups on the chipboard pieces.


I've painted the chipboard pieces with some glitter paints.

Here are the chipboard pieces used:

Seasonal Wildflowers

Organic Vine

Blooming Beauty


My second project is a tag. I've used a Tuscan window piece on it.

 Here is a close-up on it. I've used some texture paste to cover it and later misted it with some paints.


Chipboard piece used:

Tuscan Window


My third project is a card using an organic vine corner piece.

Here is a close-up. I've misted the corner piece with some gold paint.


Chipboard piece used:

Organic Vine Corner

Hope you all like today's projects!