Showing posts with label Little Birds. Show all posts

Wednesday, August 20, 2014

Two Layouts and a Card with Rae

Hello, everyone! It's Rae with you today to share some projects I've made this month.

"Wonder" Card


For this card, I used a couple of sheets of paper of the Blue Fern Garden line, Parlour and Timeless. I used a light brown distress ink to give it the aged look.

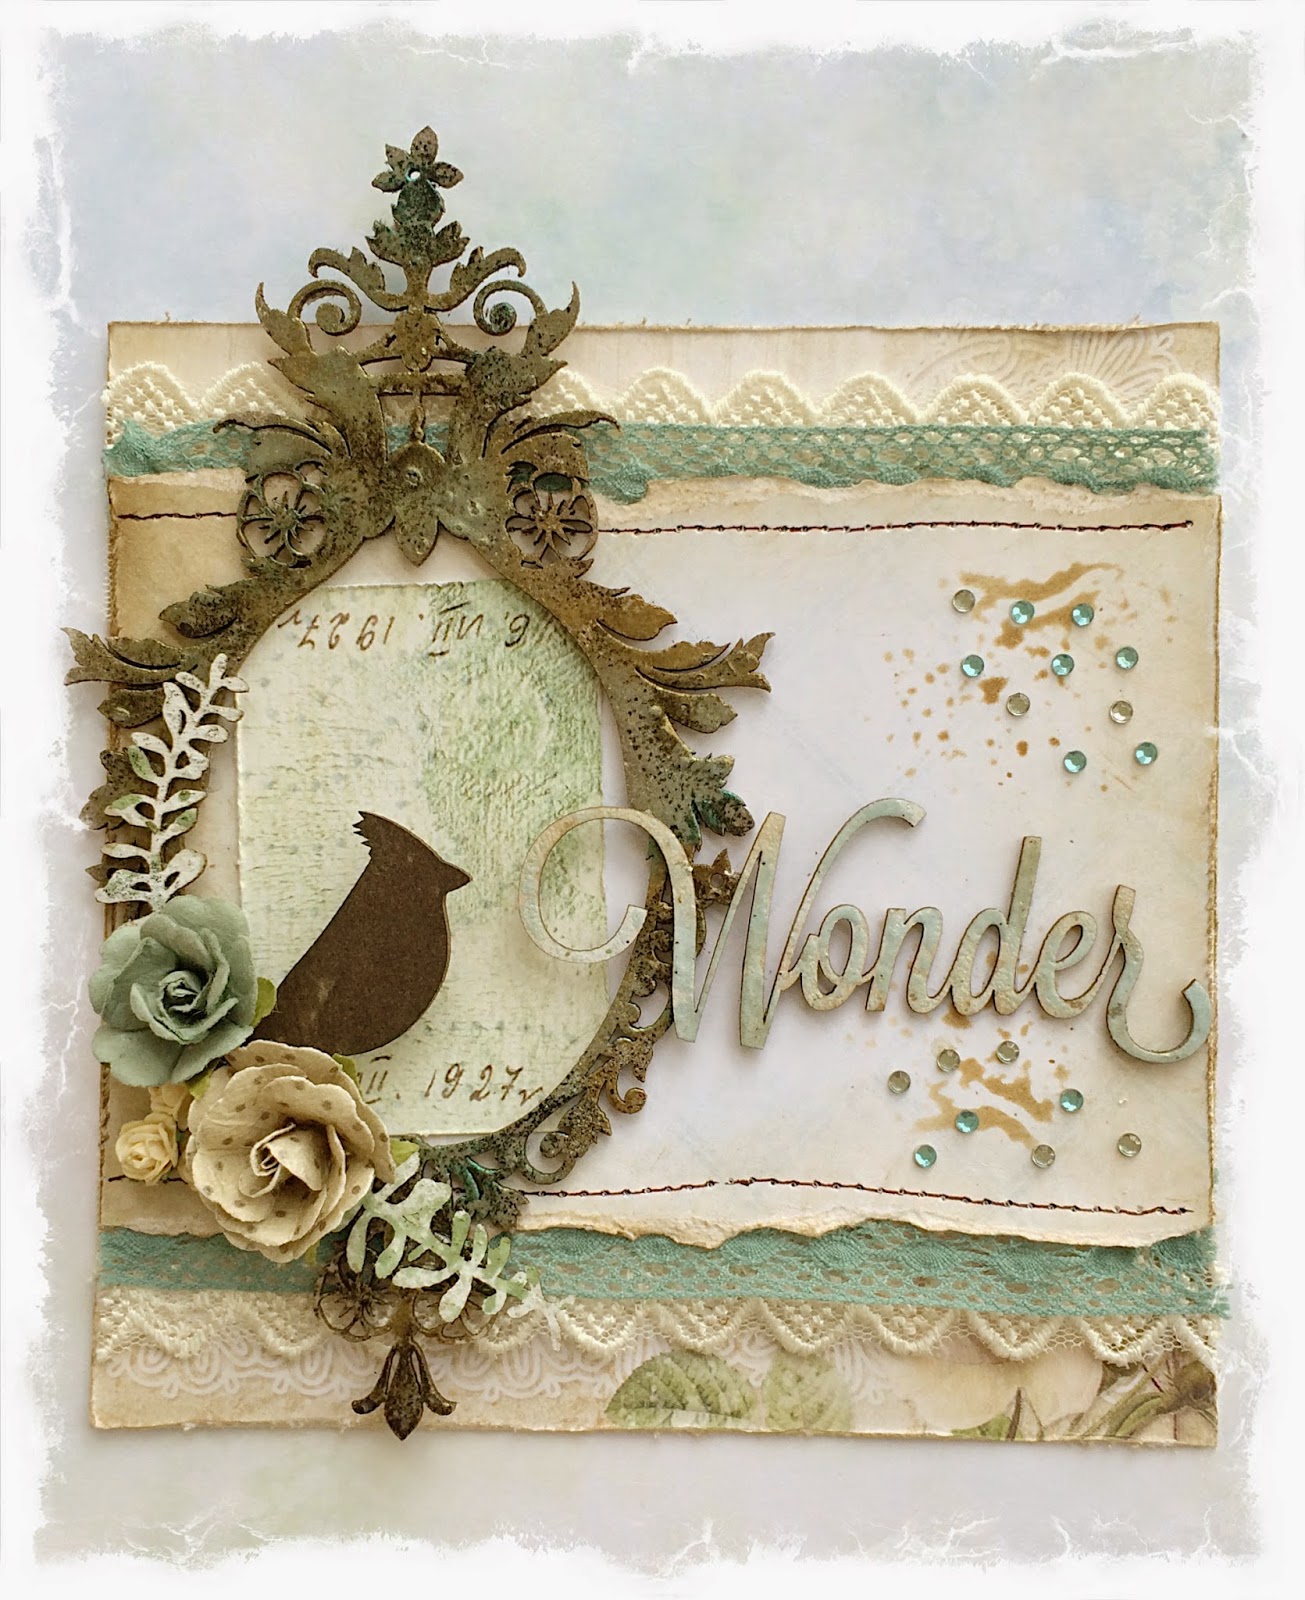
In this closeup, you can see the four pieces of chipboard I used, each treated in a different way.
 The bird is from the "Little Birds" set is simply colored with brown archival ink. The title, "Wonder" from "Winter Titles" set was primed with white paint, then I randomly placed light blue embossing powder so some of the white would show through, then I lightly covered the whole piece with a light brown distress ink. The foliage peeking out under the flowers are remnants I had form some "Layering Stems" that painted white and lightly misted with an olive green mist.

For the "Majestic Frame," I covered the whole piece with an embossing medium and sprinkled brown, gold, and blue embossing powders. I repeated the process three times to get nice coverage.

"Cherish" Layout


For this layout, I used papers from the Ombre Dreams collection, along with some green cardstock.

I used the "Blue Fern Frame" for the focus of my design. I treated this piece by spraying it with a brown mist, letting it dry, then tracing the details with dimensional paint to create a look somewhat reminiscent of a gilded metal look. I finished the look by spraying the whole piece again with the brown spray to get into the little crevices of the dimensional paint.


I used green dimensional paint and poured purple and coral embossing powders over the entire "Cherish" piece while the paint was still wet. Then, I used a heat tool, and overdid it so the paint would bubble up for this dimensional distressed look.


"Key to my Heart" Layout

I used papers from both the Blue Fern Garden and Ombre Dreams collections, picking out light blue and light brown tones, along with some cardstock.


In this closeup, you can see the paper that I stamped with a script stamp to alter the look of it.


I treated all of the pieces with gesso.  On the "Ket to my Heart" title and key, I used two shades of brown distress ink.

On the "Large Roman Clock Set" I used various distress and chalk inks.

For the "Wild Flourish Bundle" I sprayed it with an ivy mist to create drops, then used more light brown distress ink.

I hope you enjoyed seeing my projects today. Thanks for stopping by!


Rae

Friday, July 18, 2014

Round & Round Circular Designs- by Keren Tamir


Keren here and its my turn today on the Blue Fern Studios blog. I have an all around theme this month which is "Circles". I have used different circular designs this month to create each of my layouts. I hope they inspire you to create with circles and love them just as much as I do!!!

First up is:

"Good Vibes"

I used the Ombré Dreams- Leslie's Dream paper as a background for this layout.


I just love using circular designs on my layouts and I tried to incorporate different circle motifs in each of these layouts. I also used stencils and stamps to create different textured circles in the background.


I framed this cute photo of my daughter picking strawberries in the field with the treasured floral chipboard frame. I primed it with gesso and then colored it with markers.


Then I added circles from the Circle Group set which were coloured in yellow marker. finally I added the Good Vibes title on the side because she's truly just so happy here!!


<<<<<<<<<<<<<<>>>>>>>>>>>>>>

"Joy"


For this layout I used the Techno rings to frame the photo of my daughter painting and one of the words from the Ombré Dreams- Dream Cards paper.  First I primed them with gesso, Then I painted them with gelatos and added some stickles glitter. I also stamped them with a circular stitched stamp (which is the same stamp used on the background). Finally I created white lines on them with a white acrylic marker.


I used the Ombré Dreams- Joyce's dream and matched all the embellishments and inks to it.


my daughter had so much fun using the dropper to create splatters on the page. It gave me so much joy watching her and so I used the Joy title from the Good Vibes chipboard word set.


<<<<<<<<<<<<<<<<<>>>>>>>>>>>>>>>>

"Natural"

I used the Ombré Dreams- Susan's Dream as the background for this layout and added some layers with the Dream Cards paper.


Finally I want to show you the layout I created for the July sketch challenge. I also happened to use a circular motif so I thought I'd share the design.


The small circle flourish chipboard frame was perfect to frame this natural looking photo of my daughter.


I also used the bohemian flowers, little birds and a frame trinket to to add to the natural look. Finally I added the natural title from the All Natural word set.


Thank you so much for visiting the Blue Fern Studios blog today. You can still enter the July sketch Challenge Here

Have a wonderful day!!

Keren

Sunday, May 18, 2014

Home decor using Chipboard- by Keren Tamir


Keren here today for you again on the Blue Fern Studios blog.

One of the things I love about chipboard is how versatile it is. You can create so many different projects and ideas. You can alter it and incorporate it to so many types of designs.

I really love experimenting with new ideas on how to incorporate chipboard into off the page projects and home decor and that's what I've done below in both my projects.

A Perfect Moment
- Shadow Box Frame -


Recently I created two identical canvases using these images of my children picking seashells from the sand. I gave away both canvases as mother's day gifts so I decided to create a new project with the same photos to hang up on my wall. 


The Seaside Treasures and the Seaside Seashells were the perfect chipboard pieces to use for this sandy beach scenery. I used all the different types of seashells and the corals from the sets.


Each shell was covered with two different shades of crackle paint. This allowed the shells to look more realistic. I used some real shells and sand that I collected during my trip, too.


The Coral shaped chipboard from the Seaside treasures set was covered in Shimmerz Texturez to create coral that is similar in texture and colour to the real one.


I used two little chipboard birds that are perched on each side of the shadow box. I inked them in brown fluid chalk ink.


Finally I used two clouds from the cloudy skies set and thickly covered them in white Dazzlerz to make them look like clouds. I edged them in brown ink to create a shadow.

The chipboard title was inked with two shades of fluid chalk ink, 


<<<<<<<<<<<<<<<<>>>>>>>>>>>>>>>>

Enjoy the Journey
- Door Hanger -

The second home decor piece I created was a Door Hanger for my scrap room. 
The project started as a tag but then I realized how cool it would be if I could use it as a door hanger for my door. That's why I attached two pieces of twine to the back.


I used two papers out of the Blue Fern Garden collection: Love Letters and Timeless.


The Grand Balloon was used as the main focus of this project. I primed it with gesso and then painted it with Shimmerz paint. Then I stamped it in black using a script stamp. Finally I inked it in two different colours of fluid chalk edgers: blue jeans and summer field.


I applied the same treatment to the title enjoy the journey. However once I had inked it, I rubbed some of the ink off to give it a worn out look.


So next time you give tags to people for a celebration or simply for any occasion, you could add a piece of string or twine in the back. That way people could display your beautiful tag by hanging it on a door or on the wall instead of it just going in a drawer.

How is that for a practical use?

Hope you enjoyed my home decor creations today.

Have a wonderful day!!!

Keren

Saturday, May 17, 2014

The Colors of Blues and Browns by Joyce

Greetings everyone, this month I found inspiration in the colors of the blues and browns found in the Blue Fern Garden papers.

The Love Letters Paper was used on this layout:

Most of the flowers in the layout were made with a die cut and the Parlour paper,  the bike surrounded by the flowers near the photo is the Penny Farthing cycle chipboard.
 
Here's a little mixed media tag using the Signature paper as the base, with lost of stamping and gesso on top of the reverse side of the paper which was then torn into strips. The little fussy cutting ribbon came from the Calling Cards paper. The Apothecary jar was treated with some white paint, fiber paper, and blue mist applied with a fine paint brush, then it was placed on top of one of the many Ever After Frames.


And, finally here's a greeting card using one of the Calling Cards, applied on top of the back side of the Parlour paper.  The little humming bird was treated with white paint, script stamp, and some blue mist.

 
Thank you for stopping by and allowing me to share my design team creations with you.  I'll be seeing you again on June 17th with some creations from the new Blue Fern Studios Ombre Dreams paper collection. 

Monday, May 12, 2014

A card and something altered from Maja

Hi all Blue Fern Lovers. I´m here today to share some small projects I made using  papers from the "Blue Fern Garden" line  and of course some of BFS lovely chipboard. First up is a card.


Blue Fern Products used:
Papers: Love Letters, Timeless and Calling Cards.
Chipboard: Grande Cages


My next projects turned out to be some kind of a frame. I have used a small wooden "box" or what you should call it. I ordered some resin embellisment and got them in this box. I started with painting the box with white paint and then used some of BFS papers, BFS chipboards and flowers to decorate it.


The beaded sting that I have used around my photo here is painted with crackle texture paste.


I have chalked the chipboard pieces. On the word "Love" I also used some Glossy Accent.

Blue Fern Products used:
Papers: Parlour
Chipboard: Petite Boutique Frames, Little Bird Set, 2Hearts Set, Beaded Srtings and Veranda Cage Set.


Thanks for stopping by =)

Friday, April 18, 2014

So Much Gratitude and Thanks- by Keren Tamir


Hello Blue Fern Studio Friends
This post is very meaningful to me as its all about Gratitude and Thanks.
There are so many things I'm thankful for that If I list them here I won't have enough space to display my creations this month.

All three of my projects this month were created as a gift for three different people whom I love very much and are very special to me.
I'm Thankful and Grateful that I have them in my life!!!

The first project is a layout created for the parents of this precious baby who has been such a miracle of life.

"Sweet Dreams"


When I asked the parents to give me the color scheme of this baby's nursery they described these colours above which are exactly the colours of some of the papers from the Blue Fern Garden collection. I was then so happy to fussy cut, frames, bows and other images from those papers.


I framed the photo in one of the Ever After frames. I simply primed it with Gesso and then painted it using Shimmerz sky blue paint.


I  treated the Frilly Heart behind the photo with the same gesso and paint to match the Blue Fern Garden Papers.


Finally the title was inked in blue fluid chalk ink.


<<<<<<<<<<<<<<<>>>>>>>>>>>>>>

The next two projects are very near and dear to my heart. I created them for two very special people in my life. Both these people asked me to create Gratitude Journals for them and I thought it would be great to include some Blue Fern Studio Chipboard on the front cover.


"The Book of Gratitude"


I bought 2 hard cover journals at the dollar store. Then, using some of the Blue Fern Garden papers I covered both front and back. To blend the paper seam to the cover's background I used light moulding paste and a brick stencil.


I used the tree from the Descanso Garden Set, a little bird and one of the Veranda cages. I have a tutorial below describing how I created the tree. The bird was painted in silks glaze paint and the bird cage in brown fluid chalk ink.


Here is the tutorial on how I created the texture on this tree:


<<<<<<<<<<<<<<>>>>>>>>>>>>

"The Book of Gratitude"


This is the second book of gratitude I created. Its a little different than the other one but still unique on its own. 


I used a different set of Blue Fern Garden papers to cover this journal. Then, I also covered the seams with some stencilled moulding paste. This time I used a different stencil to mimic the pattern on the Blue Fern Garden paper.


I used two different shades of Silks glaze paint to cover all the different flowers on the cover as well as the mini butterfly.
The Lattice fence was roughly covered with gesso leaving parts unpainted.


I try to find things to be thankful and grateful each and every day.
I hope you sit back today and find something to be thankful for.

Thanks so much for visiting the Blue Fern Studios Blog

Have a wonderful day!!!

Keren