Showing posts with label Late Winter Lilies. Show all posts

Tuesday, February 14, 2017

February Projects by Babi

Hi Everyone,

Today it's my turn to share with you my new projects with the upcoming collection Chesterville.  It's such a beatiful grunge style collection and  it will be available soon for you to work with it.

I used the Chesterville - Bretton and Whitford papers to create my first project, called "Smile Today".


I applied some texture paste with stencil, watercolor and paint to create a more girly background.

Then, I covered  the Manchester Frame Chipboard with Antique Gold and Fern embossing powder and acrylic paint.


I finished  the layout with some gorgeous paper flowers - Spring  and Late Winter Lilies.  


Supplies using Blue Fern Studios:
Papers: Chesterville - Bretton  and Whitford 
Chipboard: Manchester Frame
Embossing Powder: Fern and Antique Gold
Flowers: Spring and Late Winter Lilies

--------------

My next projet is a  mini album  that I made with several papers from  Chesterville collection. You can check the names in the supplies list.

For the Cover I used the Chesterville GeorgeChester and Holmes  papers.


I used the Texture Wildflowers for the coverthen I embossed it  with  Antique Gold (a must have :)) and Fern Embossing Powder.

I stamped on a vellum paper a few images of the  Widget Stamp and added  Snow Embossing Powder to it.


To finish, I added some embellishments, gesso and watercolor to create more dimension.


Now I would like to share my video tutorial that shows  how I decorated the cover for my mini album. You can see the whole project at the end of the video.


Supplies using Blue Fern Studios:
Papers: Chesterville (Barton, Bretton, Buckley, Chester, Geroge, Hargrave, Holmes, Keswick, Preston).
Chipboard: Texture Wildflowers, Romantic Page Dangles, Shabby Bricks Bits and Checker Bits and Gears
Embossing Powder: Antique Gold, Fern and Snow
Stamp: Widget
**Hope you enjoy it**
Thank you so much for stopping by today!
Babi

Thursday, February 2, 2017

February projects by Tartine Peluche

Hi Everyone!

Today, it's my turn on the Blue Fern Studios blog and I'm so excited to share with you my new projects. A new collection will be soon announced and I had the pleasure to work it to show it to you.
One of my favorites at this time, I tell you, you must have it!

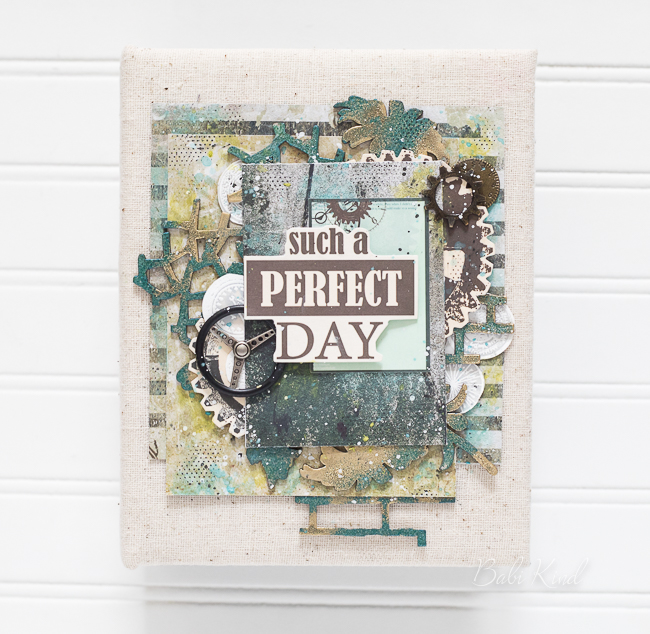
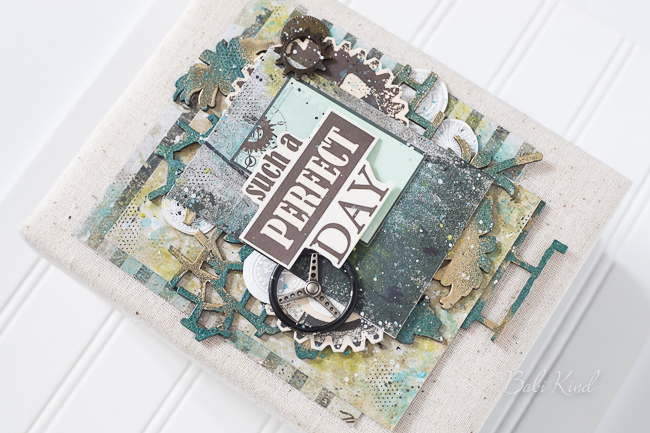
For beginning, here is my first layout : Believe.
I used a paper from the collection Timeless, another of my favorites.
I worked a lot on my background and used very few embellishments.
The chipboard being the main element of my page.


I choose the chipboard " Bordeaux Layered Frame " and I worked with texture paste.
Then I played the inks to give it a patina effect.

On the background I used the stamps Grungy Grid and Scratched with a solvent brown ink and a lot of work with texture paste, beads and others small embellishments gave the final touch of my layout.

I used several small flowers, including the white ones of the collection Heartland Roses and Blooms.
Then I emboss and cut a butterfly from a stamp, with Ginger embossing powder.


One of the details of my chipboard that I prefer is the lace that I glued to the back. It gives a totally shabby effect that I love.

Blue Fern Studios products I've used:

Paper:
Timeless - Couture
Chipboard:
- Bordeaux Layered Frame
Imagine in Embossing Powder:
- Ginger
Stamps:
- Grungy Grid
- Scratched
Flowers:
- Heartland Rose and Blooms

===============


My second layout and the last one are made with the new collection coming out soon: Chesterville

For the first of two: Que sera sera.
I used two papers: Chester and Holmes.
I simply put a brush stroke of black gesso in the top left corner to the bottom of the page. Then I added a piece of Holmes paper and I embossed it with stamp Scratched and Black Sand embossing powder. As the paper has a checkered background I used a stencil with the same pattern. I did the same thing in the other two corners.

Some close-ups:

For the main chipboard Treasured Floral Frame I applied white gesso and Black Sand embossing powder, then, with a brush, I painted some places with purple wax.

I covered the chipboard with white gesso and I embossed it
with Black Sand embossing powder then I applied a purple wax.

All small flowers were painted in purple and embossed
with the stamp Scratched and Black Sand embossing powder.


I used the purple flowers of the collection Courtship Roses.


Blue Fern Studios products I've used:
Paper:
Chester and Holmes from Chesterville collection
Chipboards:
- one from the new collection, Chesterville
- Treasured Floral Frame
Embossing powder:
Black Sand
Stamps:
Scratched
Flowers:
Courtship Roses

===============

My last layout for this month: Smile all day long.

For this one I had created also with papers from Chesterville collection.
Background was realised with texture paste and stamps Crackles Textures, Coarse Fabrics and Serendipity Medley, some times used with brown solvent ink and other times with Ginger embossing powder. All the rest was worked with inks and embellishments of different sizes.

I used two chipboards for this project. One from the new collection,Chesterville, that I just embossed with Black Sand embossing powder and the other one, Organic Vine,
that I painted in green ink by playing the shades of color.
The wonderful green flower of Late Winter Lilies was perfect, I also added white roses fromes Heartland Roses and Blooms. 


Blue Fern Studios products I've used
Paper:
Chesterville - George
Chipboards:
Chesterville coordinated chipboard
Organic Vine
Imagine Ink Embossing Powder:
Black Sand
Ginger
Stamps:
Crackles Textures
Coarse Fabrics
Serendipity Medley
Flowers:
Heartland Roses and Blooms
Late Winter Lilies

===============

I'm totally in love with the new collection Chesterville, watch the blog in order not to miss its release very soon. I'm sure that you will be charmed.

So, there it is! Hope you liked it.

All the photo are borrowed on Pinterest.

See you soon!
Tartine Peluche
xxx

Thursday, January 12, 2017

January Inspirations plus a VIDEO tutorial by Catherine Giguère

Hello Blue Fern Studios fans! I am thrilled to write my first blog post as Blue Fern Studios Design Team member! It's a dream come true for me!

Let me first introduce me. I am 39 years old and I live in Quebec City, Canada. I'm a 4th grade teacher and a mother of two children of 6 and 4 years old that are the main stars of my layouts. I do scrapbooking for 11 years now and this is my passion. I love doing romantic layouts full of flowers. I also love mixed media.


You can find me on:

Instagram: https://www.instagram.com/cat_gig/
Facebook: http://www.facebook.com/catherine.giguère.98
YouTube: https://www.youtube.com/channel/UCWRWvTLyPhi9IOYtwvyXEQA
Pinterest: https://fr.pinterest.com/catemet/
sb.com: https://www.scrapbook.com/myplace/index.php?mod=galleries&login=1
Blog: http://www.lescrapdecat.blogspot.com

___________________________________________________


Here's my first projects as Blue Fern Studios Design Team member.

'Follow Your Heart'


For this first layout, I made a step-by-step video tutorial that you can watch below. I used the paper Heartland XOXO to start this project. First, I made a textured background with a stencil and modeling paste. I used yellow and caramel inks to add colors. I also add details with the 'Making Plans' and 'Vintage Phrase' stamps.


Then, I embossed my chipboards 'Crackle Bits' with BFS Imagine Ink Embossing Powder 'In the Navy'. I used 4 pieces of this chipboard under my picture. I cut one piece to make the design I wanted. I used 3 others papers of the Heartland collection to put under my picture. 


I embossed my title 'Follow Your Heart' with BFS Imagine Ink Embossing Powder 'Honey'.


Then, I glued many Blue Fern Studios blue, yellow, white and turquoise flowers.


Here's the link to see the video tutorial: 


Blue Fern Studios products used:

Papers
 Heartland  XOXO
Heartland Kiss Kiss
Heartland Bicycle for Two
Heartland Love Song Serenade

Chipboards
Crackle Bits
Follow your Heart

Stamps
Vintage Phrase
Making Plans

Embossing Powder
BFS  Imagine Ink 'Honey'
BFS Imagine Ink 'In the Navy'

Flowers
Attic Charm Daisies
Attic Charm Glitter Roses
Dark Tropic Lilies
Harvest Lilies


'Magnifique'


I did my second layout on the gorgeous paper 'Wonderland' of the collection Vintage Christmas. I first did a subtile tone on tone background with modeling paste, stencil and brown inks. Then, I stamped with brown ink some words with the 'Vintage Phrase' stamp set. 


I embossed the 'Floral Lattice Bits' chipboards with BFS Imagine Ink Embossing Powder 'Garnet' to add a little bit of colour. I used pieces of Vintage Christmas 'Greeting Cards' paper and Vintage Christmas 2 'Holiday Cards' to put under my picture. 


I embossed the chipboard 'Circle Vine' with BFS Imagine Ink Embossing Powder 'Ginger' and my title 'Magnifique' from the French Adjectives 1 chipboard set with BFS Imagine Ink Embossing Powder 'Garnet'.


Then, I add many Blue Fern Studios flowers.

Blue Fern Studios products used:

Papers
Vintage Christmas Wonderland
Vintage Christmas Greeting Cards
Vintage Christmas 2 Holiday Cards

Chipboards
French Adjectives 1 (Magnifique)
Floral Lattice Bits
Circle Vine

Stamps
Vintage Phrase

Embossing Powder
BFS Imagine Ink 'Ginger'
BFS Imagine Ink 'Garnet'

Flowers
Attic Charm Glitter Roses
Late Winter Lilies
Soft Blossoms

I hope you have found some inspiration! I wish you a nice crafty day!

Catherine Giguère


Saturday, November 12, 2016

Ode to Vintage Christmas 2 … and Babies ~ Sandi's November Inspiration

Hello, hello! 
Sandi Clarkson here with you today sharing my November inspiration for Blue Fern Studios. 

Last weekend my Design Team package arrived with all the gorgeous Vintage Christmas goodies .. paper, chipboard, flowers and more! Vintage Christmas 2 is such a beautiful complement to Vintage Christmas 1. I wasn't really quite ready to scrap Christmas yet but these papers made the prospect irresistible. I just had to dig in! 
 

I decided to create a canvas this time around. I love creating a unique background with my wet mediums, paper and embellishments! So, I gessoed, stenciled, stamped, misted, splattered and even used my gelatoes to build up the background. Then I set about fussy cutting some images from the Vintage Christmas 2 papers … Tree Trim and Let it Snow. I tore some strips of those same papers to layer under my photo. 


Aren't those floral images just gorgeous?!! Michelle Singh designed this collection and did such a beautiful job! After using a medium to adhered the paper to the canvas, I did some random stamping with the Scratched stamp. Love all the texture stamps so much! (Photo is the hubby and I, done for the our church directory. Kind of a quick one but not too bad.) 


Next, I got busy on choosing a chipboard and altering it. In the end, I only used just the Berry Frame which was altered with Ruby and Magenta Embossing Powder. Then dabbed with white gesso, as was everything else for continuing the shabby feel. Note the Christmas Blooms that coordinate with these papers! Couldn't be a better match! 


For my title, I've used a Holiday card that says "All I want for Christmas is you." I don't take for granted that I still have him this year after his battle with cancer last Fall and Winter. 


Blue Fern Studios Products Used:
Paper: Vintage Christmas 2 Tree Trim, Let it Snow, Holiday Cards
Chipboard: Berry Frame
Embossing Powder: Ruby, Magenta
Flowers: Christmas Blooms
Mist: Winter Mint, Persimmon
Stamps: Scratched

***

"Each Day" 

When I created this sweet layout, I still had my Memoires paper collection out on my desk and   couldn't wait to use them again along with some new supplies from Blue Fern Studios! These little grandsons have become a favorite subject to scrap this year! Aren't they precious?! 


The title piece is quite large and very dramatic, especially in red! I've embossed it with Golden Bricks Embossing Powder and then stamped it with black ink and the crackle texture stamp. It also got a few dabs of white gesso and ink. 


My other chipboard piece is also on the large side. I've tucked it under my photo layers after embossing it with Army Dust Glitter. Then I did some paper tearing and had fun creating my background. This time I reached for my new Crackle Texture stamp! My blooms are a combination of collections: Memoires Blooms, Late Winter Lilies and some tiny Courtship Blooms. Last but not least, my darling photo of Silas and Samuel. Awww! 


Blue Fern Studios Products Used:
 Paper: Memoires Songbird's Drama, Tale of Treasure, Autumn Biography
 Chipboard: Each Day, Swirled Floral Corners Large
 Embossing Powder: Golden Bricks
Glitter: Army Dust
Flowers: Memoires Blooms, Late Winter Lilies, Courtship Blooms
 Stamps: Crackle Texture


Next month, I'll be back with a couple of Social Media posts in lieu of design work. So, let me take this opportunity to publicly thank Valerie and Leslie for allowing me to be a part of this wonderful Design Team the past 18 months or so. It has been such an honor to create for Blue Fern Studios (as in dream come true) and hopefully to inspire you! Don't forget that I'm watching for you on Social Media, so be sure to tag Blue Fern Studios!

Sandi

SaveSave

Tuesday, November 8, 2016

Memoires with Jelissa

Hello friends! 

Today is my turn on the Blue Fern blog and I'm excited to be showing you a couple of projects I've created with the beautiful new collection by Michele!

This collection had me digging up old photos from the attic. My first layout is one of my folks when they were on their honeymoon.


Keeping the background really toned down because of the details in the paper that I wanted to show.

Close-ups:


Mesh bits chipboard which I had altered with Clover and Grassy Knoll embossing powders.I also fussy cut an element from Calling Cards which made a lovely addition to this floral cluster.


Another cluster with the other half of the Mesh Bits chipboard, layered over another fussy cut from Calling Cards and a bit of the Cuckoo Clock chipboard.


The Cuckoo Clock chipboard which I painted with copper metallic paint and added a couple of shiny bits on.


My title piece which I altered with Copper, 14 Karat and Antique Gold EP.

Blue Fern Studios products used:
paper: Memoires - Chronicles, Nature's Novel, Songbird Drama, Calling Cards
chipboard: Cuckoo Clock, Mesh Bits, Everlasting Love
embossing powder: 14 Karat, Antique Gold, Copper, Clover, Grassy Knoll
stamp: crackled textures

My second project is a video tutorial which I had created with also papers from the Memoires collection. This features a photo of my dad and me on a holiday trip.


A fair bit more details in the background as the paper was suitable for some playing around with. I also deliberately chose the Daisy Collage chipboard to match the paper because of the brick motif.


The clock piece from Cuckoo Clock chipboard, of which the main clock was used in the first layout. I also used Late Winter Lilies throughout the layout because they added so much softness to the page.


Sparkly antique feel created for the Ever After Frame.


Daisy Collage tucked between the paper layers.


More of the Daiy Collage.

You can view the creative process in this video:


Blue Fern Studios products used:

paper: Memoires - Tale of Treasures, Nature's Novel, Autumn Biography
chipboard: Cuckoo Clock, Daisy Collage, Ever After Frame set
EP: Copper
Glitter: Dijon, Autumn, Burnt Copper, Fool's Gold
flowers: Late Winter Lilies