Showing posts with label Jeweled Trinkets. Show all posts

Saturday, June 14, 2014

3 cards by Evgenia Petzer

Hello dear friends! Its Evgenia Petzer with you today with my 3 soft, feminine cards for your inspiration. Ombre dreams collection is absolutely divine and all my cards are from it:)


Blue Fern Studios chipboards used:
Grande Cages, Jeweled trinkets


 Blue Fern Studios chipboards used: Symphony Border, Royal Page Baubles


Blue Fern Studios chipboards used: Floral Hearts, Swirly Doodle
covered with crylic paint, sprinkled randomly with fine dry glitter and above the glossy accent.


Have a happy, scrappy weekend:)

Friday, May 9, 2014

A Little Title Love

Hi everyone!  It's Valerie here today with a couple of layouts for May.  Do you sometimes struggle with titles?  I do, so I pulled out a couple of Blue Fern chipboard titles, and got started on my layouts. 

For this layout, I chose the Cute Stuff title from the Good Vibes set, and my very favorite sheet from the Blue Fern Garden Collection - In Bloom.  I also took advantage of some strips in my scrap pile to create some dimension in the background.


Here is a close-up look at the sweet title.  I primed it first with gesso, inked it with a light brown ink, and when dry, I used a make-up sponge (an awesome scrap room supply) to apply some Inka Gold.


I also used the smallest circle from the Graduated Circles set of 5 to frame the left side of the photograph.  
After priming the chipboard, I applied some pink ink, then heat-embossed it 
using a frosted embossing powder to add some sparkle.


The Berry Stems and Jeweled Trinkets were painted white and used as accents in the floral cluster.


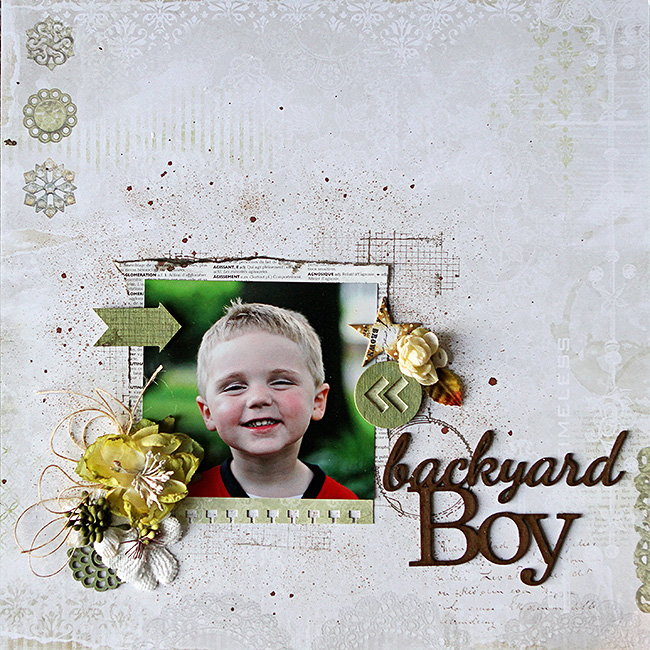
For my second layout, I chose the Backyard Boy title, and knew just which photo I wanted to use. 
 I'm sure many of you have photos that would fit perfectly with this title.  This title was super easy to alter.   
I applied some VersaMark ink and clear embossing powder, 
then heat embossed it.  The result was this beautiful chocolate brown. 
For the background I have used the back side of the Timeless paper from the
  Blue Fern Garden Collection.  


If you like arrows, you will love the Directions set.  It includes numerous arrows that can be used in so many ways.  I covered this arrow with Distress Ink, then stamped it with a texture stamp.


You can see another of the arrows from the Directions set in this close up, as well as the gloss that the embossing powder left on the title.


And here is a little flower from the Bohemian Flowers that I tucked in behind a flower. 
 It's a great assortment of 12 flowers. 


That's all from me today.   It was awesome to begin my layouts with a title and not have to worry about it at the end.  Give it a try!

Wednesday, March 26, 2014

2 layouts Blue Fern Garden by Yuko


Hello! it's Yuko.

2 layouts are useing Blue Fern Garden Paper
and beautiful chipboards.


【sweet】
It is a photograph of when I went to Strawberry Picking with my daughter( 2-year-old) .
I like the look Zany her!:)


The chipboard of the heart(Heart Set) attached the texture with modeling paste, 
after ink colored. 

 The very lovely heart was made (my favorite♥). 


"Sweet" word of the title( Valentine's words) after having painted the gesso,

Was loaded partially gesso and colored with brown ink.


<Blue Fern studios products>
Blue Fern Garden : In Bloom
Jeweled Trinkets
Heart Set  
 Veranda Cage Set   
Turkish Bits
Valentine's Word Set


【place】
This photos taken with trip the other day.
Morning, in the hotel lobby. 
The morning sun shone in and it was a very wonderful place.


 The background used modeling paste.
And I was colored with ink stamp.


glitteringly -- imagining the shining morning sun,

I was attached spangle


This uses the part of the Fancy Birdcage chip board.

It was colored with ink stamp after having painted  gesso.


<Blue Fern studios  products>
Blue Fern Garden  :Timeless
                                   Signature
Fancy Birdcage
Shabby Brick Bits
Magical Monarchs
Good Vibes


Please visit my blog !
Thanks for looking♥


Yuko


Tuesday, March 25, 2014

Spring wedding with Jelissa

Hello everyone! We're almost at the end of March, can you believe it?!

Today I have two projects I created for Blue Fern Studios based on two of the most wonderful things ever - Spring and weddings! The first is a layout using their beautiful paper collection "Blue Fern Garden". I cannot get enough of this paper line - the colors are soft and shabby and just perfect for my mixed media projects. 

"The Big Day"


The photo I used was from my own wedding 6 years ago, how time have passed! Love how the pinks and greens come together in this paper collection which gives a feel of Spring.  I primed the papers with clear gesso so that I can still achieve the water color effects without masking the beautiful designs on the papers.

Some close-ups:


I've used the Rose Bouquet chippie, what a beautiful piece!  I used one half of the chipboard for this corner cluster. I covered it with gesso and painted it over with some watercolors and randomly sprinkled clear embossing powder and heat set them. The result is a very uneven texture with small drops of embossed surface looking like dew. Lastly I patted some coloured texture paste over the leaves and flowers. In this cluster, I have also tucked the key piece from Romantic Page Dangles under my photo and I only did simple heat embossing.


For the title, I used "The Big Day" from the "Wedding Words" set and layered green water colors in three different shades for a marbled effect. 

Blue Fern products used:
Blue Fern Garden - "Boudoir"
Blue Fern Garden - "Picnic"
Rose Bouquet
Wedding Words set
Romantic Page Dangles


My second project is a canvas which I made for a very special couple on their wedding day.

"Wedding Canvas"


One of my favourite background elements are the panel chipboards as they add dimension and design. Here, I've used cut outs from the Marrakesh Panel and painted them with green watercolors.


I've rotated a piece of the Ever After frame set and painted it with at least four different shades of green for a marbled look and finished off with some script stamping. 


In this cluster, I used two pieces from the Jeweled Trinkets set. I snipped of the chains on either end of one of the pieces and used it as a centre for one of the flowers. On the ends of each motif, I added a dab of dimensional paint and topped the centre with a gem. I've also used the in-between hexagon bits from Bits of Honey to accent the background.

Blue Fern products used:
Marrakesh Panel
Ever After Frame set
Jeweled Trinkets
Bits of Honey

Thanks for joining me today and have fun creating!

Jelissa

Monday, January 27, 2014

Some "Blue Fern Garden" Collection Inspiration w/Erin Blegen

Good morning!

Erin Blegen here to share with you my projects for January, including a couple of layouts using the NEW Blue Fern Garden Collection~!!

You will absolutely LOVE these papers :). They are incredibly detailed with crystal clear images printed on a nice heavyweight paper. I was impressed...and I'm confident that you will be too :)

"Magical"
First up, I have a girly girl layout to really show off the truly feminine side of this collection. Lots of pinks with just a hint of blues, paired with a few of my most favorite of the new chipboard designs...

This piece is one of the "Jeweled Page Baubles". I've dressed it up with glitter and various colors of microbeads.

The "Jeweled Trinkets" like this one are just as beautiful :)

I tore a section of the "Number Grid- Small" to create a textured photo mat. I used a sandy colored chalk ink and just a hint of mist/embossing powder to give it a little bit of color.

Blue Fern Studios Products Used:

Blue Fern Garden Collection Papers
Number Grid- Small
Jeweled Trinkets
Jeweled Page Baubles

Next up I have another layout for you using the Blue Fern Garden Collection:

"Live Your Story"
I've taken the opportunity to show the masculine side of this collection with this layout. There are plenty of blues, greens, and browns in these papers which I've put to use here :)

I've added stamping and watercolors to bring the "Beaded Strings" piece to life.

Adding a darker pigment to the outside of the circles while dabbing away the middles helps add some dimension.

Blue Fern Studios Products Used:

Blue Fern Garden Collection Papers
Beaded Strings

Finally, I have a sweet and simple card to share:

"Dream"
I've used one of the sweet little "Petite Windows" pieces to give view to the pretty fairy beyond.

I first dabbed the edges of the window with a pale blue chalk ink and then used Glossy Accents and some white glittery embossing powder to create a frosted look over the rest of the window.

Blue Fern Studios Products Used:

Petite Windows

I'm so glad you stopped in today :)
I hope you've enjoyed this first look at the Blue Fern Garden Collection in action!

And in case you haven't yet, I invite you to join us for our monthly sketch challenge. There are still a few days remaining and we'd LOVE to have you join us :)

Take care!