Showing posts with label Grungy Grid. Show all posts

Wednesday, November 23, 2016

Vintage Christmas by Pascale

Hello Sweeties,

Today I'm up on Blue Fern Studio with three new projects featuring the Vintage Christmas 1 & 2 collections. The first project is a mini album entirely realized with the first Vintage Christmas collection. The size of the mini album is 13 x18 cm (5" 1/4 x 7"1/4).


 I embossed the pages with different stamps as well as the edges. 


I die-cut a few doilies to add inside. I added the page titles too.


I added the first design to the cover with the Brocade Texture stamp and the Ginger powder. Then I continue with the Christmas Collage stamp set and a permanent ink.


I embossed the Dangled Flake with two layers of Black Sand embossing powder and the Winter Flakes with two layers of Ginger While the embossing powder was still hot, I stamped the Winter Flakes to add some texture.


Blue Fern Studios products:

Papers - Vintage Christmas (Wonderland, Greeting Cards, Magical, Deck the Halls,
Auld Lang Syne, Noel)
Chipboards - Dangled Flake, Winter Flakes
Stamps - Christmas Collage, Brocade Texture, Postal Texture, Texture Circle, Grungy Grid
Embossing Powder - Antique Gold, Ginger, Black Sand, Silver Bells

------------------------------------

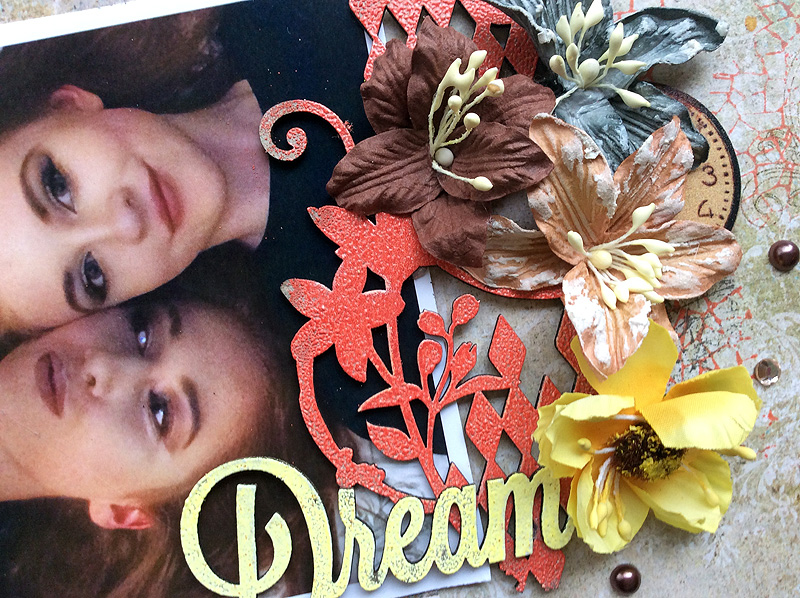
My second project is a layout featuring the new Vintage Christmas collection. I chose an old photo of my daughter.


I cut a large strip in the Twas the Night paper and glued it on the Joly paper. Then I primed the background with clear gesso.


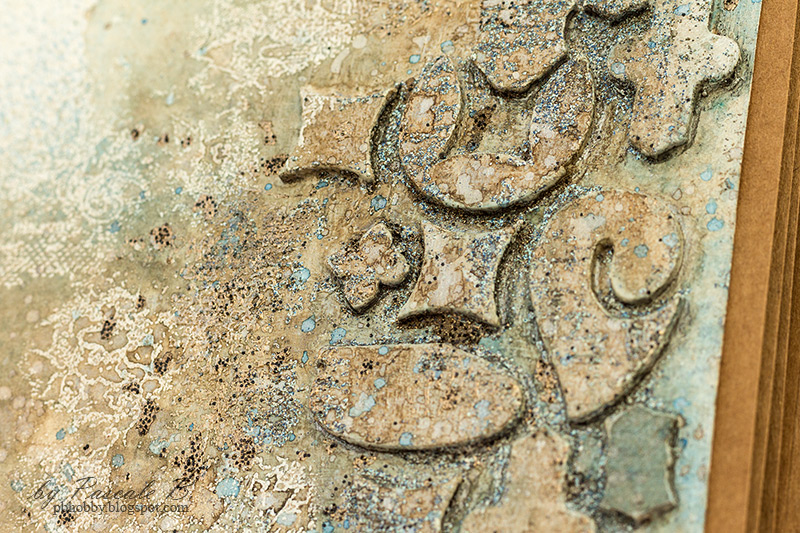
I added a thin layer of white gesso where I want to put my embellishments and photo. When dry, I added a design with 3D Gloss Gel and a stencil. While the gel was still wet I sprinkled some Pyrite glitter.


While the background was drying, I painted the chipboard with a metallic paint and the Soft Blossoms in red. 


I splattered some red and copper paint; Then I added a new design to the background with the Christmas Collage stamp embossed with the Ginger powder. I colored the area with different colors of watercolor.


I glued all the embellishments with a 3D gel (flowers, chipboard, lace...), and to finish, I added some star brads embossed with the Ginger powder. 


Blue Fern Studios products:

Papers - Vintage Christmas 2 (Jolly, Twas the Night, Holidays Treats)
Vintage Christmas 1 (Wonderland, Greeting Cards)
Chipboard - Tree Treats
Flowers - Christmas Blooms, Soft Blossoms
Stamp - Christmas Collage
Embossing Powder - Ginger
Glitter - Pyrite

------------------------------------

Here is my third November's project: a set of card.


I chose the Jolly paper as the base of both cards. I stamped them with one of the stamps from the Christmas Collage set. Then I embossed the image with a sticky powder in order to add Carribean glitters.


Then I embossed also the edges of both cards with the 14 Karats powder to add some extra shine.


I embossed some Winter Flakes with the Honey powder, other with the Ginger and the Antique Gold powders. 


I embossed some die-cut leaves with the 14 Karats powder too. While the embossing powder was still hot I sprinkled them with  the Carribean glitter and heat set them. 


Blue Fern Studios products:

Paper - Vintage Christmas 2 (Jolly)
Chipboards - Winter Flakes
Flowers - Christmas Blooms, Soft Blossoms
Stamp - Christmas Collage
Embossing Powders - 14 Karats, Antique Gold, Ginger, Honey
Glitter - Caribbean


Monday, November 7, 2016

My November's layouts with the Mémoires Collection by Marie-Eve Bernard

Hello,

My turn to share with you some layout with the Memoires collection.  What a beautiful collection to play with!  One of my absolute favorite!  

Angel:

My first layout is the one I have made for the November challenge.  You have to use a chipboard title from Blue Fern Studios.  So much beautiful chipboards to choose from! This layout featured my little boy, my little angel, Léo.


For my layout, I choose the Tale of treasures paper from the Memoires collection.  With the neutral tones of this paper, the possibilities are endless.


On my background, I use the grungy grid stamp set.  Love the texture it brings.  I use the Crackled Bits chipboard set too.  I alter those chipboard with the Imagine Ink Sand and sea Embossing powder.  I


I use the word Angel from the Baby Words chipboard set. First, I ink it in black. I found it to dark on  my layout. So, I add some white marker and some turquoise ink. I was much more happy with the result.  I add some flowers:  Harvest Lilies  and the  Dark tropic Lilies.

Special, adorable, Perfect

For this second layout, I also used the Memoires collection.  The paper I used is Calling Cards.


On this layout I mixed two different set of title sets: Perfect, adorable, special and good vibes.  I just inked them with black ink.  I also used two sets of chipboards :  Techno rings and Industrial gears.  altered them with Imagine Ink Embossing powders in Copper, Chili Powder, Breeze and Seven Seas.  


On my background, I use the Scratched stamp set with  black ink and the Grungy Grid Stamp set with turquoise ink.


Finally, I had some beautiful Blue Fern Studios Flowers: Late Winter Lilies and Memoires Blooms.

Sourire

The Mémoires collection is just perfect for fall layout.   It was the perfect paper to compliment the picture of Mathilde in the pumpkins field.


I use the  Chronicles paper, the remember when paper from the Memoirs collection.  Also had the adobe paper from the timeless collection.


I also use Blue fern flowers:  Late winter lilies, tranquil blooms and  Memoires blooms. 


I love the pretty pumpkins chipboard on that layout.  First, i add a coat of gesso and the chipboard and glue them on the Couture paper from the Timeless collection (I have previously put clear gesso on it).  Once they are dry, I cut them and add color the pumpkins with watercolours.

 
For my title, I use the sourire chipboard.  I put a coat bof gesso and add watercolours. I did the same process with the Organic vine.


hope you enjoy those layouts and that they insured you to play with the wonderful Mémoires Collection,

Marie-Eve

Sunday, November 6, 2016

Memoires Inspiration with Cathi

Hello again scrappy friends, Cathi here!! I can't believe how fast this year has flown by, how is it November already??  This month I have some project to share from the gorgeous new Memoires collection.  My first project I feature another photo found on my iPad courtesy of my eldest selfie taking daughter! As they have gotten older, I find I am much worse about capturing them in photos and it is something I need to improve, thank goodness for one daughter who loves to take photos of herself which I promptly coopt for my layouts and Project Life!!


For my first layout I chose the Remember When paper as my base. I used some layers underneath my photos from the Calling Cards paper and the Tales of Treasure paper.


Here in this close up you can see the beautiful Memoires Blooms and Lilies cluster on Jasmine Collage and the Dream chipboard.  For the Jasmine Collage I used the Melon Imagine Ink Embossing Powder and for the Dream chipboard I used the Buttercup Imagine Ink Embossing Powder.


On this photo you see another Memoires Bloom I used as well as some background stamping using the  Scratched and Crackle Textures stamps.


To frame my layout I finished it off with the gorgeous Manor Hinges chipboard embossed in the 14 Karat Imagine Ink Embossing Powder.

Blue Fern Studios Supplies:

Paper:
Blue Fern Studios Memoires Collection~Remember When
Blue Fern Studios Memoires Collection~Calling Cards
Blue Fern Studios Memoires Collection~Tales of Treasure

Chipboard:
Jasmine Collage
Manor Hinges
Wish Wonder Dream

Imagine Ink Embossing Powder:
Melon
Buttercup
14 Karat

Stamps:
Scratched
Crackle Textures

Flowers:
Memoire Blooms
Lilies


For my second layout I chose a gorgeous turn of the century photo of a Parisian model. I thought it went perfectly with the beautiful Photographic Record paper. Clustered underneath my photos I again had the beautiful Calling Cards cutouts and the Tales of Treasures paper. My title in the bottom corner is inoubliable chipboard from the French Words set, the French word "Unforgettable" which was embossed in the 14 Karat Imagine Ink Embossing Powder.


Here in this photo you can see the beautiful Spring in Paris chipboard which I have also embossed in the 14 Karat Imagine Ink Embossing Powder.  The embossing powder did not cover the chipboard perfectly and instead of trying for perfect coverage I left it a bit distressed and added some Black Soot Distress Ink.  Here you can also see the fleur de lis shaped hinge from the Manor Hinges set, perfect for this layout!! I added some metallic pearls to finish off the chipboard along with the 14 Karat Imagine Ink Embossing Powder.  I added a few Lilies to the layout for some gorgeous detail.


I used several sets of stamps to build up my background: Grungy Grid, Texture 1 and Coarse Fabrics. I also added some brown and blue splashes from mists in my stash.


Here you can see more background stamping, splashing and a bit of texture tucked in with the Mesh Bits pieces embossed in Frozen Imagine Ink Embossing Powder.

Blue Fern Studios Supplies:

Paper:
Blue Fern Studios Memoires Collection~Photographic Record
Blue Fern Studios Memoires Collection~Calling Cards
Blue Fern Studios Memoires Collection~Tales of Treasure

Chipboard:
Spring in Paris
French Words
Manor Hinges
Mesh Bits

Imagine Ink Embossing Powder:
14 Karat
Frozen

Stamps:
Texture 1
Coarse Fabrics
Grungy Grid

Flowers:
Memoires Blooms
Lilies


For my next project I made a set of cards.  This collection had an awesome sheet perfect for cardmakers: Grand Sequel.  The back side of this paper had a collage of four of the sheets from the collection in 6x6 size!!


I just love this idea!! I was able to use the smaller sizes of these designs for gorgeous card backgrounds.


For my first card I fussy cut the typewriter from the Chronicles paper.  I added a Memoires Bloom and Attic Charm Daisy to the card and tucked in some Bits of Honey pieces embossed in 14 Karat Imagine Ink Embossing Powder.  The golden typewriter font letters saying hello and the stitching finished off this card.


I always love to make cards using vintage images I find.  I added some twine and a doily under this image and some beautiful Blue Fern Lilies to this card. I added the gorgeous flower from the Layering Stems chipboard set and embossed it in Raspberry Imagine Ink Embossing Powder. Again I finished off the card with stitching and it was done!


For my final card I found this adorable vintage girl image. I tucked in some paper and this fussy cut bird/watch image from the Calling Cards paper.  The leaves are from the Layering Stems set and are embossed in Sage Imagine Ink Embossing Powder to match the green in the girls dress and hair ribbon.  A little bit of stitching around the card finishes off this set.

Blue Fern Studios Supplies:

Paper:
Blue Fern Studios Autumn Anthology Collection~Grand Sequel
Blue Fern Studios Seaside Cottage Collection~Calling Cards

Chipboard:
Layering Stems
Bits of Honey

Imagine Ink Embossing Powder:
14 Karat
Raspberry
Sage

Flowers:
Memoires Blooms
Attic Charm Daisies
Lilies

Thank you so much for stopping by to have a look at my projects. Aren't the new Memoires papers and new flowers just amazing?  Looking forward to seeing you next month with the gorgeous Vintage Christmas collections for my final month here with Blue Fern Studios!

Sunday, October 23, 2016

Memoires inspiration by Pascale

Hello Sweeties,

Today I'm up on Blue Fern Studios with three new projects featuring the new collection designed By Michelle " Memoires ".  For the first one, I chose a photo I've taken during a trip in Montrésor (Loire Valley, France), one of the most beautiful villages in France. The bridge came from the Eiffel workshop.


I started to cut the "Remember When" paper in two which I glued it on a cardboard. Then I primed the new background.


I  embossed the Organic Vine with the Black Sand embossing powder. I painted the Classic Ornament with black gesso, then I covered it with Graphite Paste.


I embossed the title Peaceful with the Sand and Sea embossing powder. I embossed it a second time with the Pearl embossing powder and I started again with the Sand and Sea.


I cut a few Post Cards from the Photographic Record paper to add under the photo. I glued all the embellishments.


To finish the layout, I added some texture to the background with the Scratched stamp and the Sand and Sea embossing powder.

Blue Fern Studios products:

Papers - Memoires (Remember When, Photographic Record)
Chipboards - Organic Vine; Classic Ornaments; Peaceful, Stillness & Contentment
Stamp - Scratched
Imagine Ink - Embossing Powders (Black Sand, Sand and Sea, Pearl)

------------------------------------

Here is my second project : an art journal page. After my New York Journal and my Family Journal, I decided to start a new Journal with all the castles I visited in the Loire Valley. Here is the first page with the castle of Chaumont-sur-Loire (Loire Valley, France)


I glued the left-overs from the different chipboards (Turkish Panel, Dot Grid Panel, Quilted Panel, Flutter Medley, Floral Lattice Bits...) to add texture to the page. I primed them with white gesso.


I added more texture with different stamps and embossing powders : the Journey stamp with the Black Sand powder, ...


... the Arcadia Texture with the Pearl and the Grungy Grid with the Sand and Sea. Then I sprayed different inks. The embossing powders have a resist effect.


I splattered some ink and sprinkled some Black Sand embossing powder while it was still wet and heat set it. 


I cut some Post Cards from the Calling Cards and the Photographic Record to add under the photo.


Blue Fern Studios products:

Papers - Memoires (Calling Cards, Photographic Record)
Stamps - Grungy Grid, Journey, Arcadia Texture
Imagine Ink - Embossing Powders (Black Sand, Sand and Sea, Pearl)

------------------------------------

Here is my third October's project for Blue Fern Studios. I work again with the Memoires collection. I chose a photo of Rock of Cashel I've taken during my trip in Irlande.


I primed the Tales of Treasures paper with clear gesso. Then I stamped with different stamps. First Ione was the stamp collage from the Journey set with black ink. I stamped again with one of the Ornamental Edges set and the Grungy Grid and embossed the prints with the Antique Gold powder. I stamped one last time with the second stamp from the Ornamental Edges set and used the Sand and Sea  powder to emboss the prints.


I added a design with a stencil and two differents medium: 3D gloss gel and clear crackle paste. I let dry naturally before adding some colors.


I painted the chipboard with a gold paint. I cut a few Post Cards from the Photographic Record paper to add under the photo. 


I die-cut some leaves in a watercolor paper.  I colored them with the same inks I used to color the background and  I sprinkled the rose leaves with the Antique Gold embossing powder while they were still wet to add some texture.


I colored the flowers with the same inks I used to color the background and the leaves. When They were dry I added a little touch of gold paint.


Blue Fern Studios products:

Papers - Memoires (Tales of Treasures, Photographic Record)
Chipboard - Trailing Scrolls
Stamps - Journey, Ornamental Edges, Grungy Grid
Imagine Ink - Embossing Powders (Sand and Sea, Ancient Gold)