Showing posts with label Flutter Page Dangle. Show all posts

Saturday, March 28, 2015

March projects from Bente.

Hello all you friends of Blue Fern Studios.!
We have already reached the end of March and it's my turn to share a few of my projects 
showcasing some BFS awesomeness :-)

I have used lots of chipboards to make three very different pages and also used 
three different paper collections.
Hope you like it!!

My first one is with a photo of my dear sister snuggling one of our small nephews.
I used one of my absolute favourite sheets from the Sanctuary collection.


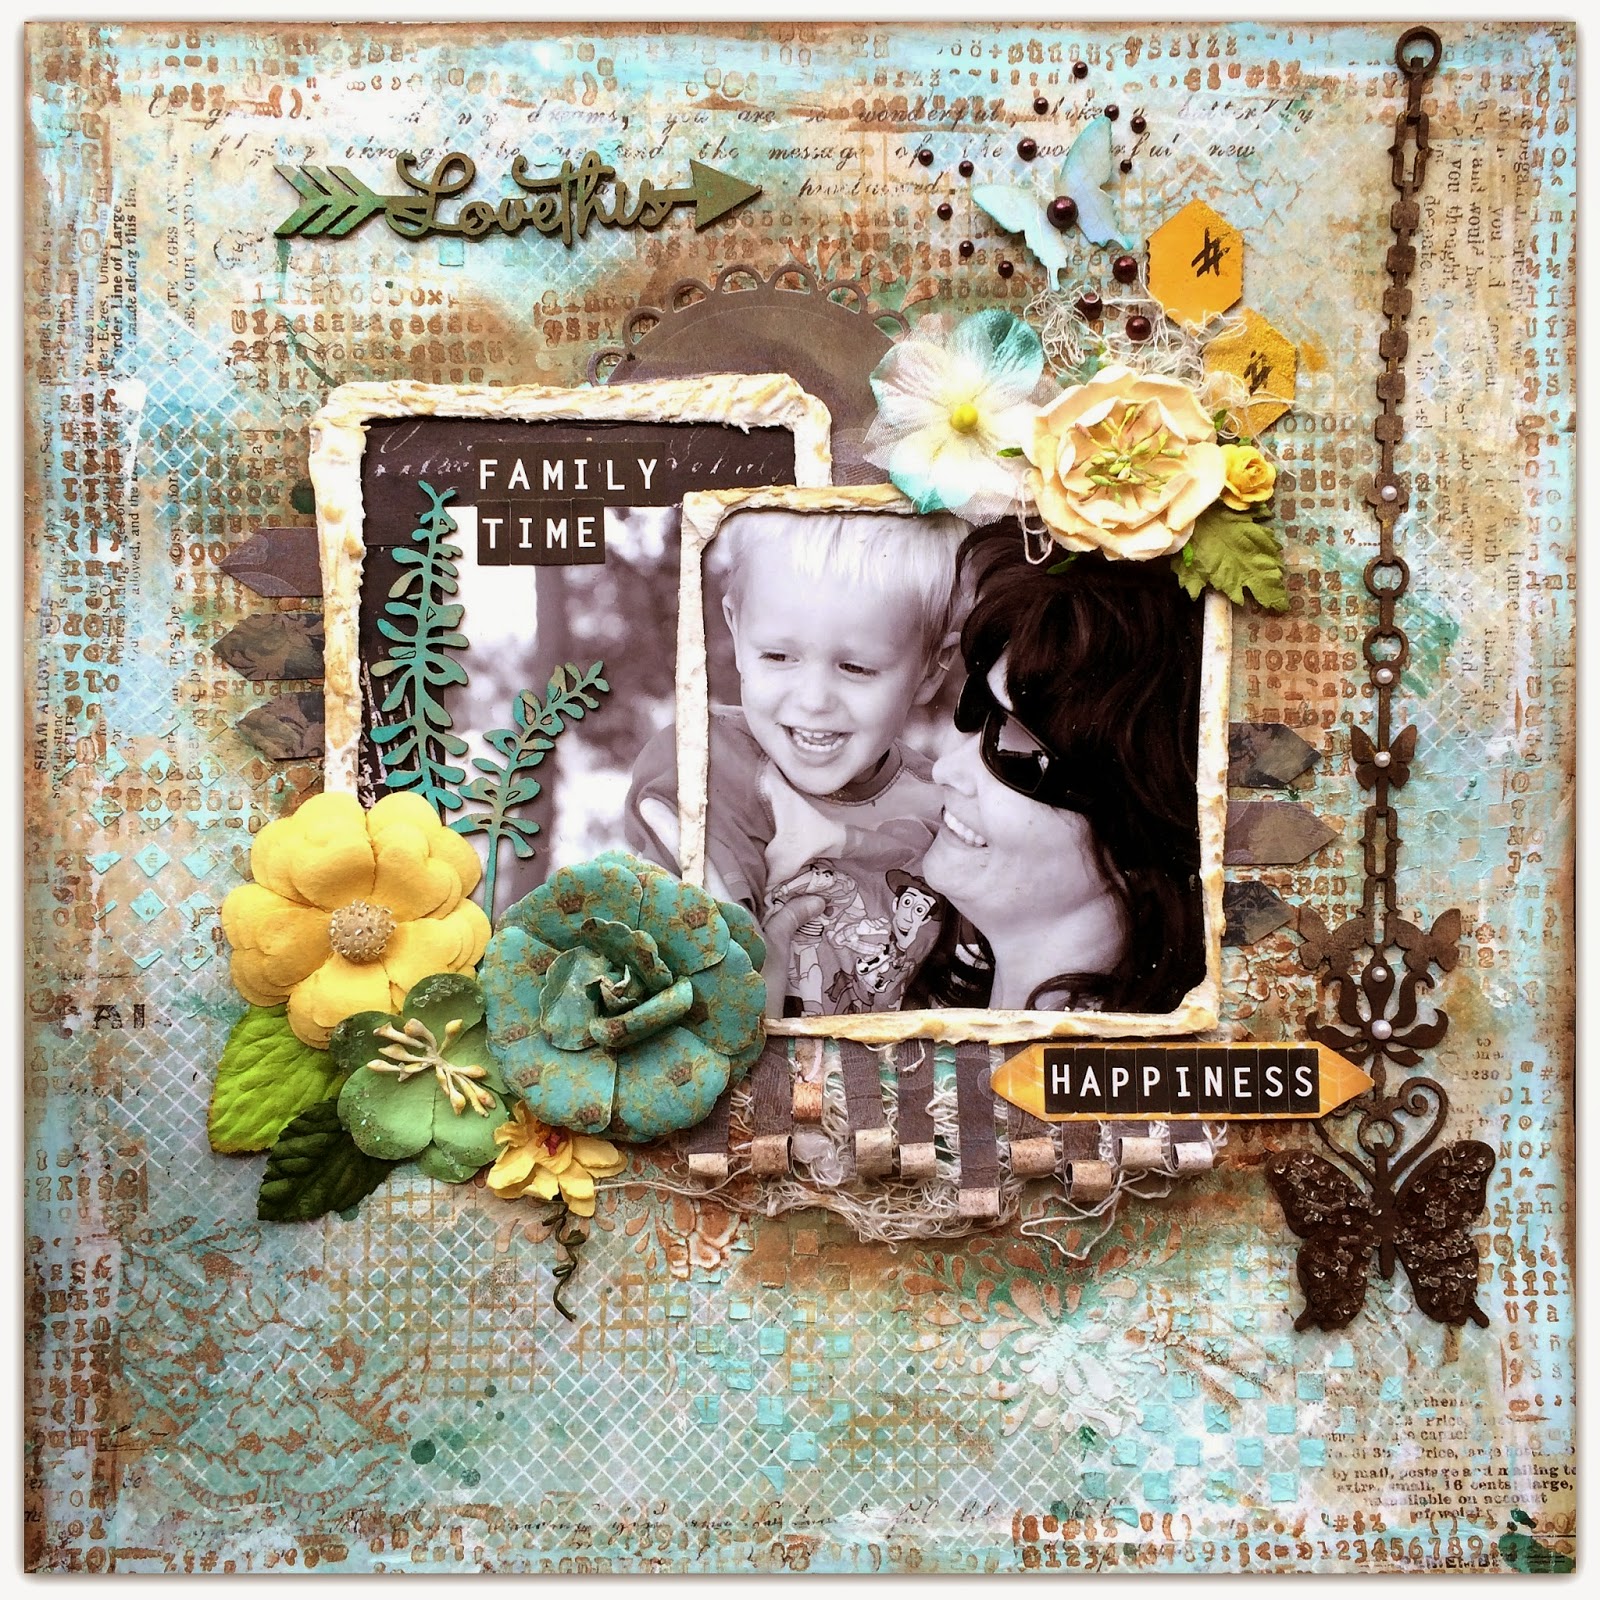
Below is a close up of the painted 'Flutter page dangle' with some added glass beads for texture.


And here you see some leftover bits from thelarge  chicken wire panel as a  goldpainted accent.


Lots of stamping, painting and misting on the background here and a fun paper rolling technique.


(I used the Flutter Page Dangle, Arrow Words, Graduated Squares, Layering Stems, 
Sanctuary collection) 

My second page uses the recently released Love Story collection together with a varied selection of Blue Fern Studios chipboards.


  I painted my chipboards using a red colour. Once dry it turned out much darker than I had expected so I used some gesso to tone it down a few notches. Aftercreating a photo mat with some layers of different pp's I used one of the stamps around the edge of the top layer. Then lastly I glued down the painted frame on top.


I cut out the word 'Sweet' from one of the patterned papers.


(For this page I used: Floral Medley Frame, Fancy Birdcage, Love Story paper collection, and the Love Story Stamps Forever set) 


And finally a page using one of the stunningly beautiful papers from the Ombre Dreams collection.
Each and every one of those patterned papers inspire me immensly!


This paper has a blue and purple background that is very helpful if you want to do some mixed media work on top. The work is half done for you so to speak:-) I used some of the new stamps from the Love Story collection here as well. I used them around the edges and in the center. Stamps are
perfect for creating a beautiful setting for your photo.


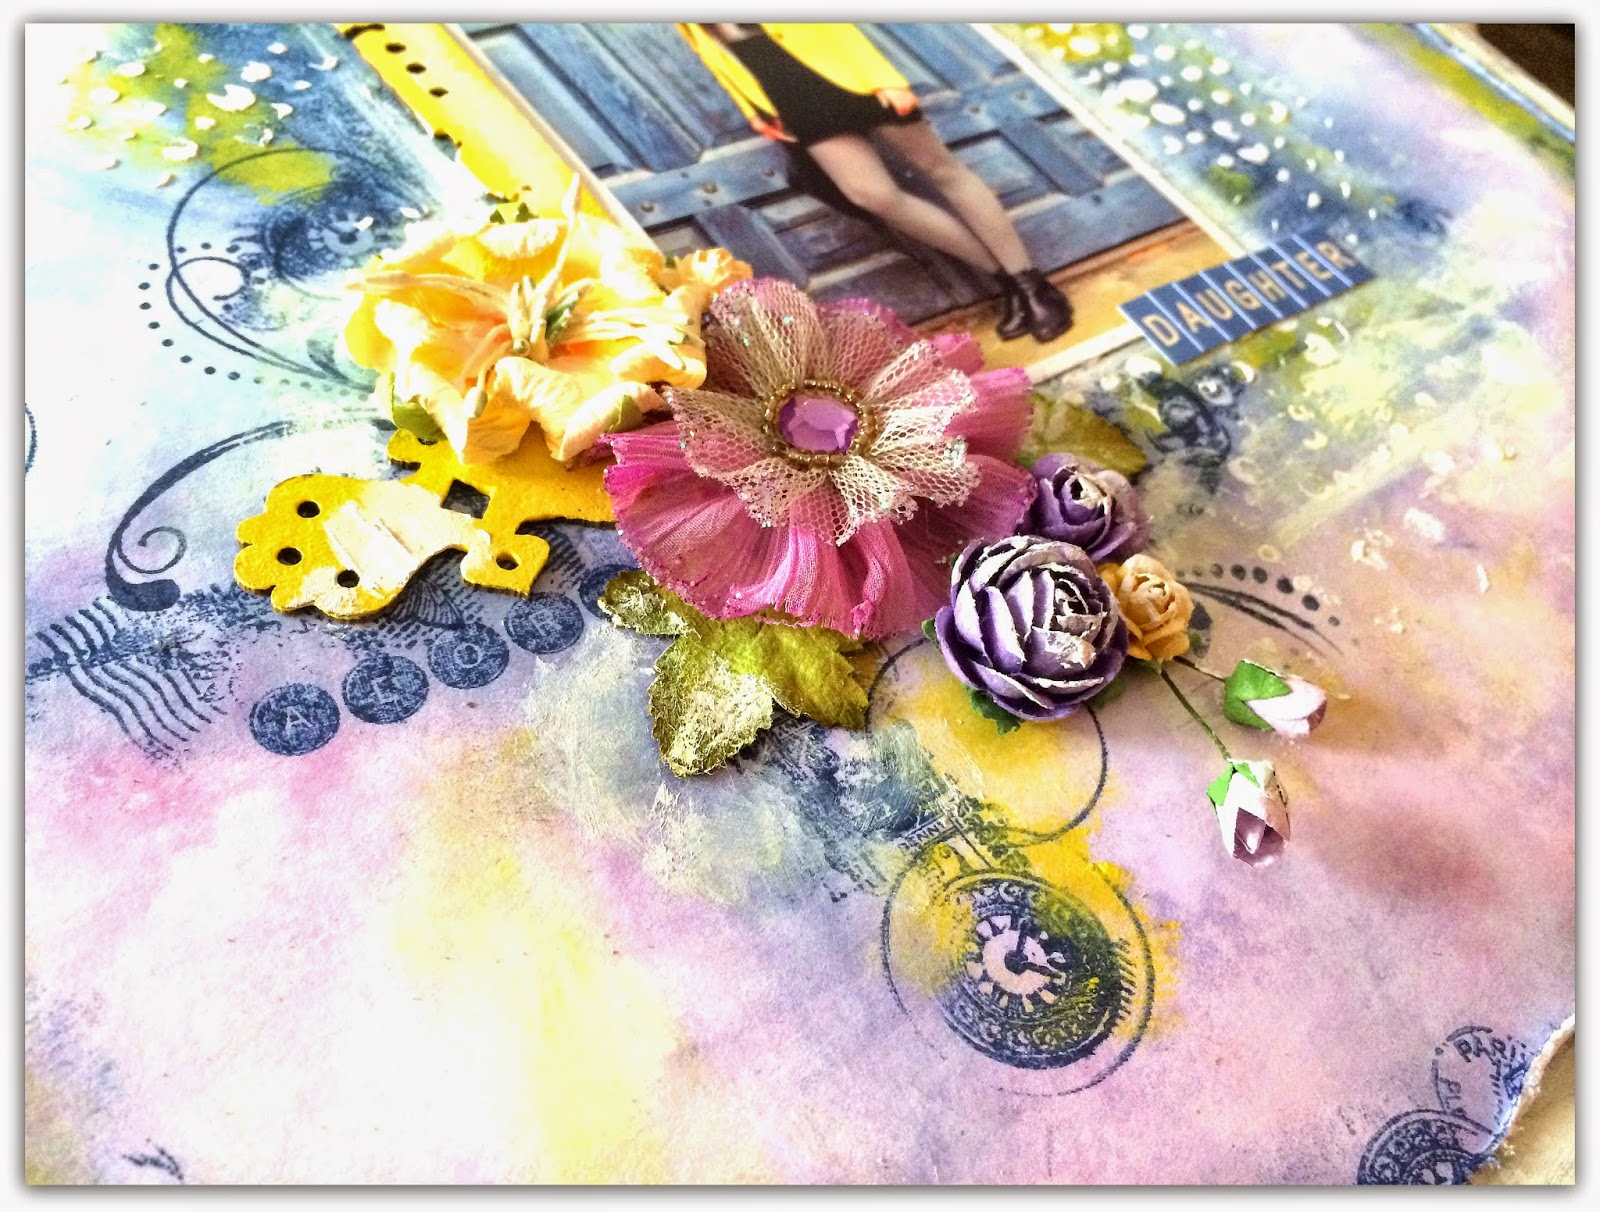
I painted the chipboard pieces yellow here to match my DD's jacket. 
I used the top of a glue stick to stamp the round shapes and filled them in rather haphazardly with some more of the yellow acrylic paint.


Below you get a closer look at how I used the stamps.


 (For this page I used: Love Story Stamps set one, Love Story Stamps set two, Manor Hinges,  
Ombre Dreams paper collection, Arrow words set)

Thanks for looking !


Monday, August 18, 2014

Mixed Media Layout Inspiration by Keren Tamir


Keren here and its my turn again on the Blue Fern Studios blog. I have 3 Mixed Media Layouts for you today.

Hope they inspire you!!


"You Are My Happiness"

This is the first layout I created using the Ombré Dreams Ginger's Dream Paper as a background.


I used the Wild Flourish Frame to frame my photo. I altered it by adding texture over it using textured paste and a patterned Stencil. Then I sprayed it with two different Color Bloom Sprays: Sorbet, Vintage Coal and Lime Wedge


I added the same texture and colours to the background and then stamped some branches and birds using black archival ink.


Finally I added some matching flowers, a title using the word Happiness from the Good Vibes set  and Voila!! 


<<<<<<<<<<<>>>>>>>>>>>


"You are perfect just as you are"

This is my second creation this month for Blue Fern Studios

I created a mixed media layout using the Ombre Dreams Chalotte's Dream paper as the background.


I wanted to hide the purple side of the paper as much as I could because I wanted to create a masculine layout. First I primed the purple side of the paper with clear gesso. Then, I created lots of texture in the background using a Stone Wall  stencil and some Textured paste. Finally, I sprayed it with two  Color Bloom Sprays: Cobalt and Precious Stone. I let the spray drip down the page to cover as much of the purple as possible.


I cut the Ups and Down panel Blue Fern Studio Chipboard. I cut it unevenly to create movement on the page. Then I embossed it with white and black embossing powder. Finally I inked the edges with black coal fluid chalk ink.


I built some layers over the chipboard panel and added some matching flowers and embellishments around the photo.


Finally I added a title in the corner using the Perfect chipboard word from the Chunky Word Set. I also embossed it with black embossing powder.
I also added some journaling along the side of the page using both sticker words and my own writing.


<<<<<<<<<<<<>>>>>>>>>

"I Love You"

This was my layout created for the new sketch challenge this month. The August's sketch was amazing as always.
We hope you get to play with us!!!


I love it when my kids pose together for me and on that rare occasion I snap the camera to get this cute picture of them. I used it as the centre of my layout.


I used the Blue Fern Studios Ombre Dreams Collection, Flutterbird chipboard dangles, a small camera from the picture perfect chipboard set and the word Love from the good vibes chipboard set.


Well that's all for today!!
Hope you enjoyed my creations

Have a wonderful day!!

Keren


Saturday, April 26, 2014

2 layouts and card by Yuko

Hello!Everyone.Yuko here!
The season of a beautiful cherry tree passed Japan.
Many beautiful flowers bloom now.Going out is a season becoming happy from now on!

Today,I introduce 2 layouts and a card.


【Tresure the MOMENT】
The photograph of the dress which took in commemoration of
 2-year-old birthday of my daughter
I wanted to do it this way since I saw a chair of this paper!
A daughter sat down on a chair in just right ! !!


After the cardboard of the title applying gesso,
 and having colored it in ink, I painted with a glossy accent.

 This paper of  Blue Fern Studios  is  very beautiful !

 It was good to my image.


【TIMELESS Beauty】
This is my most favorite photo  in this SAKURA(cherry tree)season 
.I feel the growth that it has seen a daughter running 
in the spirit of the beautiful cherry trees.


I was cut out from the paper delicate pattern.


Used  distress enbossing powder ( Renger)for this chip board.(Memory Frames)


【BEAUTY】
I used the frame of handmade for this card.
The texture is attached with modeling paste. 


Please visit my blog to see  more details.
Thank you for looking!


Yuko


<Blue Fern studios Products>

habby Brick Bits
Vintage keys
 Treasure the Moment
Flutter Page Dangle
Petite Windows
Memory Frames

Blue Fer Garden  Timeless /parlour /calling cards /singnature


Thursday, April 17, 2014

Inspiration from Colors in the Blue Fern Garden Paper Collection by Joyce


The colors of pinks, roses and greens from the Blue Fern Garden (“BFG”) paper collection inspired me to create this collection of a layout, a 6 x 6 card, and an artist trading card collection.  A lot of fussy cutting took place to capture all those glorious colors, prints and patterns and assemble them onto the collection.

Layout:

 
I used the pretty rose pattern from the BFG Signature paper to create the basis of the composition of the layout.  No, your monitor is not blurry, that photo of the kids is blurry, a defect from the camera or the photographer in those days.  Sadly, the shoes are more in focus, and unfortunately, a lot of these old pics I inherited are blurry.   But on to the best part… those chipboard dangles! This one is the Flutter Page Dangle.  I cut off the butterfly portion of the dangle and placed it on the other side of the layout on top of the rose pattern paper.  It looks more like a “flutter fly” than a “butterfly” because I applied mists of water to separate the cardboard to make the wings look like they are in motion. I love the dangle chipboard pieces because they are so versatile and you can cut them up too.

Treatment of the Dangle: The dangle was created by first applying white dauber, light green mist, and a darker mist.  To add depth, you sporadically cover the chipboard with the two mists (allow to dry between applications) and carefully allow some overlapping but not too much or you’ll only create one color. After the applications of mists dry, add some detail with a black marker, or water color pencil around various areas.  Try to create larger sweeps of the application of the marker, or watercolor pencil, in some areas and go over them with a white gel pen to add little dots to create further detail.  A simple treatment with lovely results.


Artist Trading Card Collection:

It was time for another artist trading card collection,  and I quickly set about creating this collection with my left over scraps of the “Signature” page to BFG paper collection.  I thought the rose pattern on the paper would add a lovely base layer on the cards.  More,  BFG papers were used to create the torn textured layers on top of the base paper.  I strategically placed the torn textured papers so they would not cover up the rose pattern on the base layer.  The BFG papers are really sturdy and can stand mixed media applications very well.  The little flowers are the result of using a flower punch over the rose pattern areas on the BFG Signature paper, and the centers were filled with beads, and a specially formulated glitter mixture from my forensic scrapping buddy which consists of red glitter and various sized micro beads. The glitter mixture looks like candy and is so pretty on chipboard too.


On the cards, you’ll find the window frames from the “petite window” chipboard collection. 
Treatment of the Petite Windows:  Each petite window was treated with a coat of white dauber, one light sporadic application of a light green colored chalk ink, one light sporadic application of a medium green colored chalk ink, and a light spray of a darker green glimmer mist in which I let the liquid of the mist run in various places making sure not to let it cover the entire frame. Applying the inks and mist sporadically over the frames creates interest and depth.     Some gold pen, black and white markers were used to highlight certain areas on the frame too.
 
6x6 Card:


This is the second of my “Women of Substance” card series. I used the BFS April sketch for the basis of the card. The card series is dedicated to the women before me from my maternal line of the family. I’m introducing these women to my 20 year old niece and future generations. Each of the 6 x 6 cards will have a picture of the woman, and inside the card, I will write a biography for the women I knew. And, for those few photos I  have of women from the 1800’s, I’ll incorporate some historical facts to enlighten my niece of what life must have been like living during that period so that she will know what it was like living before the Smartphone and her Twitter account. J  Each card will be mailed to my niece in intervals, and I hope she thinks of them as gifts when she receives them in her mailbox. Hmm…I foresee in he near future, a decorate box using BFS chipboard to store these cards.
Here’s Ginger from the 1950’s, I’m certain her hairstyle gave that a way.  All the papers on this card are from the Blue Fern Garden paper collection, including the fussy cutting papers.  Some of the papers were stamped, gesso’d, torn, and stamped some more to add texture and interest
to the front of the card.  I have used the “Ever After” frame, and Turkish bits chipboard pieces from “BFS”. The size of the chipboard frame is just perfect for the 6 x 6 card.  The frame was treated very similarly to the Petite Windows except a stencil and molding pasted was used to create the raised circles.  The card was pasted on another piece of Blue Fern Studio’s paper.  I don’t normally leave a piece of chipboard undressed, but the Turkish bits added some balance in the composition lighted painted with a white dauber, and a pretty bead.
Thank you for stopping by, and I hope I have inspired you to do something similar for those women who came before you and to share some of your family history with your future family.  And, of course, add some beauty by using some BFS chipboard to your creations.