Showing posts with label Floral Lattice Bits. Show all posts

Thursday, February 23, 2017

February projects by Vera Shelemekh

Hello Blue Fern Studios fans.
Vera is here to share some projects with the very new and amazing Chesterville collection and also one layout with Heartland as I fell in love with the wonderfull blooming papers.

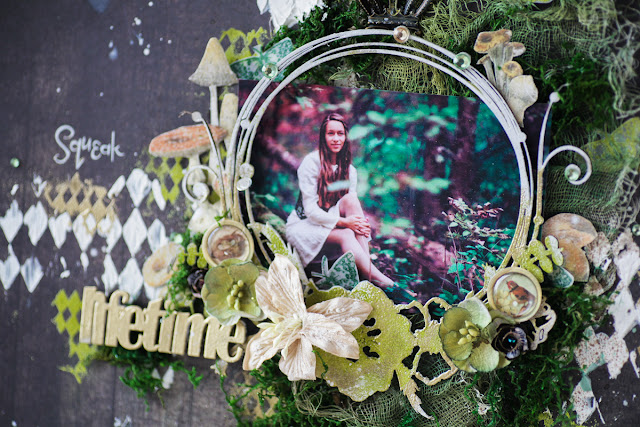
Let's start with Chesterville.  Hargrave became the background for my first project. The layout has been created for a good friend of mine.  I framed the photo into large Circle flourish chipboard covered with lime and antique gold embossing powder.
I also added some stamping with Texture 1 set.

Chesterville looks wonderful with cut elements from other collections, for exaple with mushrooms cut from Autumn antology.


I also decorated the layout with the Lifetime header covered with antique gold embossing powder and a Spring lily.

Blue Fern Studios products used:
Papers:
Chesterville - Hargrave
Autumn antology - Calling cards
Chipboards:
Large Circle flourish
Chunky Words
Embossing powders:
Lime
Antique gold
Stamps:
Texture 1 set
 
Flowers:
Spring lilies
------------------------------ 

My second project proves that Chesterville collection may be used even for wedding purposes. I have created two wedding cards. Chesterville - Bretton became the background.

The die cut frame and leaves are made of Buckley sheet.
I decorated the cards with Little birds chipboards, Bits of honey and Winter lilies. Chipboards are covered with Icicle embossing powder.


Papers:
Chesterville -Bretton
Chesterville -Buckley
Chipboards:
Bits of honey
Little birds Set
Embossing powders:
Icicle
 
Flowers:
Late Winter lilies 
------------------------------   
And for the dessert today is the bright pink wedding layout with Heartland collection. Kiss Kiss background and a lot of fussy cutting from Red Rose Ball and Love Song serenade.

You can see numerous layers here. I achieved that with the help of chipboards: floral lattice bits covered with Icicle embossing powder, Spirit of Heartland painted with acrylic paint and the bird covered with Fools gold glitter.


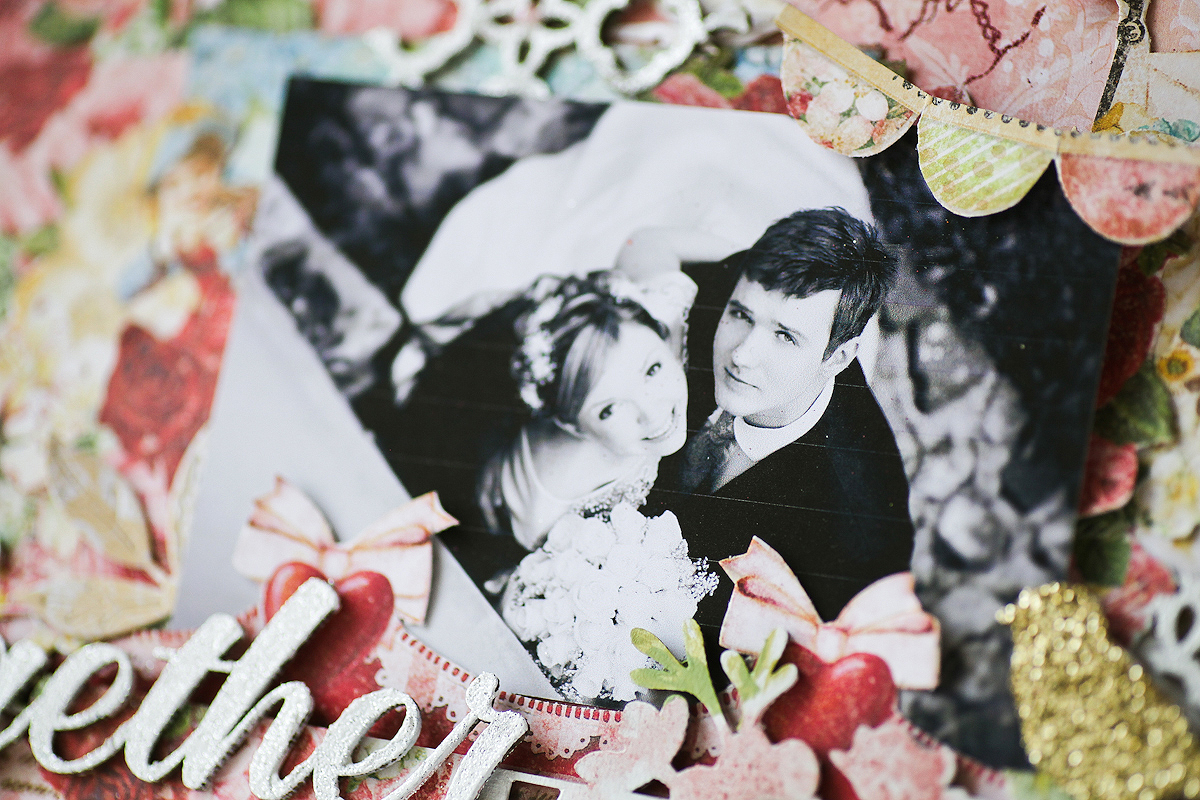
There is some texture stamping with  Iris embossing powder. And the Header cut from Together is the best place to be. It seemed too long to me so I decided to leave the rest for another layout))

 
Papers:
Heartland - Kiss Kiss
Heartland - Red Rose ball
Heartland - Love Song serenade
 
Chipboards:
Floral lattice bits
The spirit of Heartland
Together is the best place to be

Embossing powders:
Icicle
Iris
 
Glitter:
 Fool's gold

Thank you for stopping by and see you in Match *)

Thursday, January 12, 2017

January Inspirations plus a VIDEO tutorial by Catherine Giguère

Hello Blue Fern Studios fans! I am thrilled to write my first blog post as Blue Fern Studios Design Team member! It's a dream come true for me!

Let me first introduce me. I am 39 years old and I live in Quebec City, Canada. I'm a 4th grade teacher and a mother of two children of 6 and 4 years old that are the main stars of my layouts. I do scrapbooking for 11 years now and this is my passion. I love doing romantic layouts full of flowers. I also love mixed media.


You can find me on:

Instagram: https://www.instagram.com/cat_gig/
Facebook: http://www.facebook.com/catherine.giguère.98
YouTube: https://www.youtube.com/channel/UCWRWvTLyPhi9IOYtwvyXEQA
Pinterest: https://fr.pinterest.com/catemet/
sb.com: https://www.scrapbook.com/myplace/index.php?mod=galleries&login=1
Blog: http://www.lescrapdecat.blogspot.com

___________________________________________________


Here's my first projects as Blue Fern Studios Design Team member.

'Follow Your Heart'


For this first layout, I made a step-by-step video tutorial that you can watch below. I used the paper Heartland XOXO to start this project. First, I made a textured background with a stencil and modeling paste. I used yellow and caramel inks to add colors. I also add details with the 'Making Plans' and 'Vintage Phrase' stamps.


Then, I embossed my chipboards 'Crackle Bits' with BFS Imagine Ink Embossing Powder 'In the Navy'. I used 4 pieces of this chipboard under my picture. I cut one piece to make the design I wanted. I used 3 others papers of the Heartland collection to put under my picture. 


I embossed my title 'Follow Your Heart' with BFS Imagine Ink Embossing Powder 'Honey'.


Then, I glued many Blue Fern Studios blue, yellow, white and turquoise flowers.


Here's the link to see the video tutorial: 


Blue Fern Studios products used:

Papers
 Heartland  XOXO
Heartland Kiss Kiss
Heartland Bicycle for Two
Heartland Love Song Serenade

Chipboards
Crackle Bits
Follow your Heart

Stamps
Vintage Phrase
Making Plans

Embossing Powder
BFS  Imagine Ink 'Honey'
BFS Imagine Ink 'In the Navy'

Flowers
Attic Charm Daisies
Attic Charm Glitter Roses
Dark Tropic Lilies
Harvest Lilies


'Magnifique'


I did my second layout on the gorgeous paper 'Wonderland' of the collection Vintage Christmas. I first did a subtile tone on tone background with modeling paste, stencil and brown inks. Then, I stamped with brown ink some words with the 'Vintage Phrase' stamp set. 


I embossed the 'Floral Lattice Bits' chipboards with BFS Imagine Ink Embossing Powder 'Garnet' to add a little bit of colour. I used pieces of Vintage Christmas 'Greeting Cards' paper and Vintage Christmas 2 'Holiday Cards' to put under my picture. 


I embossed the chipboard 'Circle Vine' with BFS Imagine Ink Embossing Powder 'Ginger' and my title 'Magnifique' from the French Adjectives 1 chipboard set with BFS Imagine Ink Embossing Powder 'Garnet'.


Then, I add many Blue Fern Studios flowers.

Blue Fern Studios products used:

Papers
Vintage Christmas Wonderland
Vintage Christmas Greeting Cards
Vintage Christmas 2 Holiday Cards

Chipboards
French Adjectives 1 (Magnifique)
Floral Lattice Bits
Circle Vine

Stamps
Vintage Phrase

Embossing Powder
BFS Imagine Ink 'Ginger'
BFS Imagine Ink 'Garnet'

Flowers
Attic Charm Glitter Roses
Late Winter Lilies
Soft Blossoms

I hope you have found some inspiration! I wish you a nice crafty day!

Catherine Giguère


Tuesday, January 10, 2017

January Projects by Babi


Hi Everyone!

I'm so excited to share with you my first projects for Blue Fern Studios.
It's such an honor to be a part of this talented team.

First, let me introduce myself.

My name is Barbara, but everyone calls me Babi. I am a Brazilian currently living in New Jersey, USA.  In my country I used to be a Librarian,  but now I spend most of my time taking care of my daughter, blogging, teaching and running a small scrapbook business.


I love creating girly projects and I can't resist beautiful flowers. I started this scrapbook journey as a cardmaker but know I'm all over the place, always learning and trying new things.


You can find me on:


-------------------

In my first layout I used the back of the XOXO paper from the Heartland collection .
I started by applying some clear gesso all over the page. I like to protect and seal the paper before adding some color and texture.
Next, I used a stencil and black ink to create the background.


I applied some texture paste on a "handwritten" stencil and covered the paste with Pearl Embossing Powder and heated it after it dried. You can't tell so much just by looking at the picture, but it gives a very delicate texture.

I also covered the Floral Lattice Bits chipboard with Antique Gold Embossing Powder.


For the layers I used the following papers:  Bicycle for TwoSweet of You and a piece of book paper.

I fussy cut some beautiful flowers using Bicycle for Two paper  and  arranged with some paper flowers - Spring Lilies to create a full bouquet.


To finish the background I added a love title, a little bit of spray ink, sprinkle white and black gesso for more contrast.


Supplies using Blue Fern Studios:

Papers: HeartlandCollection -(XoxoBicycle for Two and  Sweet of You)
Chipboard: Floral Lattice Bits
Embossing Powder: Pearl and Atique Gold
Flowers: Spring Lilies

--------------


The Heartland collection was also used in my second layout. I love how versatile this collection is. You can go from bold to colorful very easily and keep a natural style.

I used two Kiss Kiss sheets, one of them slightly smaller to add some dimension.


For the background I applied some texture paste using a heart stencil. Then on top of that I added It's a Girl and Pearl embossing Powder.

For the layers I used Love Blooms and Bicycle for Two papers.

Again, I did some fussy cutting using on the Sweet On You paper.  Sorry, I can't resist these beautiful flowers. LOL.


I used the chipboards Heartland XOXO that I embossed with Snow Embossing Powder. It gives a nice white look that contrast with the colorful papers.


And here you can see more details of the flower arrangement.


Supplies using Blue Fern Studios:

Papers: Heartland Collection  (Kiss KissBicycle for Two, Love Blooms and Sweet On You).
Chipboard: Xoxo
Embossing Powder: Pearl,  It's a Girl and Snow


---------------


My last layout is all about winter.
In keeping with the Christmas spirit, I decided to use these beautiful papers from Vintage Christmas collection for a Winter layout.

I used the Auld Lang Syne paper for the base and added some strips of the Wonderland paper on the sides.


For the Layers I went with Auld Lang  (Vintage Christmas 1) and Twas the Night (Vintage Christmas 2).
Some texture with gesso, stencil, ink and stamps.


Then cut a couple of frames with white cardstock and applied some 3D gel followed by Vintage Gold and Pyrite Glitter. It's sparkly and gives some contrast to the page.


Moving on I embossed the chipboards Shabby Flakes with Snow Embossing Powder and Winter Titles with Antique Gold.


Supplies using Blue Fern Studios:

Papers: Vintage Christmas ( Auld Lang Syne and  Wonderland)
Vintage Chtismtas 2  (Twas the Night)
Chipboard: Shabby Flakes and Winter Title
Embossing Powder: Antique Gold, Snow
Glitter: Vintage Gold and Pyrite.


**Hope you enjoy it**
Thank you so much for stopping by today!
Babi


Friday, September 23, 2016

September inspiration by Pascale

Hello Sweeties,

Today I'm up on Blue Fern Studios blog with three new projects. The first one featured the Tranquility collection: it was perfect for this photo of Marilyn Monroe.


I started to cover the Hushed paper with a thin coat of clear gesso; Then I added a design with a stencil and two pastes: black heavy gesso and platinum crackle paste.


When dry, I added more texture with the Arcadia Texture stamp and the Magenta embossing powder.


I just painted the Chelsea Vines with black gesso.


I embossed the Corner Flourishes with Pearl embossing powder.


Then I glued all the embellishments (flowers, chipboard and lace) with a 3D gel. 


Blue Fern Studios products:

Papers - Tranquility (Hushed, Calling Cards) ;
Chipboards - Chelsea Vines, Corner Flourishes ;
Stamp - Arcadia Texture ;
Imagine Ink - Embossing Powders (Pearl, Magenta) ;
Flowers - Courtship Roses, Tranquil Lillies and Roses, Seaside Lillies.

------------------------------------

The second layout feature the Timeless collection which is perfect for this photo I've taken in the park of the castle of Chaumont-sur-Loire (Loire Valley, France). It's a sculpture from Giuseppe Penone: “Trattenere 8 anni di crescita (Continuerà a crescere tranne che in quel punto), 2004-2012”.)


As usual, I primed the Abode paper I chose as background with clear gesso. Then I added a design with a stencil and platinum crackle paste. I sprinkled Foll's Gold and Pyrite glitters while the paste was still wet.


I splattered watered gesso and let dry. Then I continued some splattering with gold and rust mica powders mixed with water and gel medium as well as gold paint.


In the meantime, I painted the Roman Clock with a gold acrylic paint. When dry, I added a coat of clear crackle paste and let dry naturally. I added some rust mica powder to darken the crackle as well as some pale silver mica powder to lighten the clock face.


First I embossed the Stillness title with the mushroom embossing powder. While the powder was still hot I sprinkled some pearl embossing powder as well.


I primed the Arching Leaves with white gesso, then I painted it with a rust mica powder. Then I added a coated of clear crackle paste.


When all the embellishments were glued, I added some micro beads.

Blue Fern Studios products:

Papers: Timeless (Abode, Main Street)
Chipboards - Roman Clock Set - Small ; Arching Leaves ; Peaceful, Stillness, Contentment
Imagine Ink - Embossing Powders (Musrooms, Pearl) ;
Imagine Ink - Glitters (Foll's Gold, Pyrite).

------------------------------------

I chose to work with the Tranquility collection again for my third layout.


I primed the background with clear gesso. Then I added a design with a stencil and clear crackle paste: I covered randomly the stencil with two chalk inks before applying the crackle paste through it.


While the crackle paste was still wet I sprinkled some Pyrite and Blue Ice glitters.


I sprayed all the chipboards with two inks: a brown and a teal and dried them. Then I added the same chalk inks I used previously with the stencil, sprayed some water.


I kept the Floral Garden Bits like this and I covered the Layering Stems with Glossy Accent.


I die-cut some leaves in the Jubilation paper and I colored the flowers lightly with a beige watercolor.


Blue Fern Studios products:

Papers - Tranquility (Blissful, Jubilation) ;
Chipboards - Floral Lattice Bits, Layering Stems ;
Imagine Inks - Glitters (Pyrite, Blue Ice).