

Hello, Blue Fern Studios fans! My name is Sandi Clarkson and I am new to the Blue Fern Design Team ... although very familiar with the product. Having worked with the Blue Fern Studios owner, staff and many of my fellow team members, I almost feel like I've come back home! It doesn't hurt that I live in the same state where Blue Fern is manufactured to strengthen that sense of belonging! (Texas, USA)
I'm married with three grown, married daughters and a growing number of grandkids! I still work 3 days a week and so I truly enjoy getting "lost" in creating! I like trying new techniques but am usually happiest when the results still fit my "pretty" criteria. My scrap room is my happy place. I kind of love that my desks have paint, gesso and runaway micro beads all over them. I'm mostly a layout girl but love, love, love doing the occasional canvas.
Now, on to my first three Blue Fern projects!

"Authentic Treasure"
I have the distinct pleasure of being one of the first DT members to receive the new Paisley & Vine paper collection! This collection was introduced here on the Blog on June 10th. I wish my photos could truly capture how lovely this range is, with lots of great warm colors and fun patterns. Although it is a bit of a departure from the classic Blue Fern style, it is earthy and rich and will be a great addition. My mind is racing with the possibilities!
I decided to go "shabby" with my photos and chipboard choices but chose some bold paper patterns, Splendor and Bohemian, and layered them against a lovely turquoise background, Pathway. I love this color combo!

I also fussy cut some title notes from the Playing Cards sheet and distress them a bit with my distress tool and some white paint. You can see bits of my chipboard pieces that are a little higher on the page.

My photos were framed with the Royal Heart Frame which was gesso-ed and inked, as was my Dashwood Bouquet piece. I embossed the tips of my Dashwood Bouquet for a bit of glimmer. Photo credits go to Raphael Tuck and Sons but are from a copyright free database.
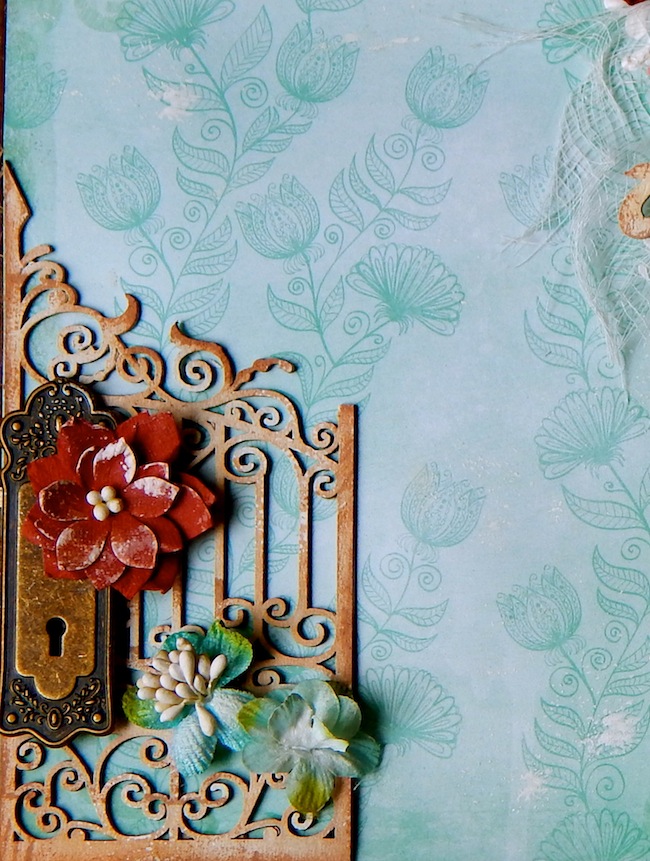
The Royal Gate chipboard pieces was used to balance my layout and was treated similarly to the Royal Heart Frame. A few embellishments and it was done!
Blue Fern Studios products used:
Paper:
Paisley & Vine Pathway
Paisley & Vine Splendor
Paisley & Vine Bohemian
Paisley & Vine Playing Cards
Chipboard:
Royal Heart Frame
Royal Gate
Dashwood Bouquet
***

"Good Vibes"
Once in a while I really love to let loose and go a little Boho/Steampunk as I call it. I had not had a chance yet to use side B of the Love Story Amazing Hearts paper. The colors and collage appearance are so totally "me!" I've also been dying to get my hands on those BFS Goggles! The Steampunk photo from Tumblr just brought it all together.
Here are some close-ups:

After gesso-ing the goggles, I applied chalk ink and paints in different colors, adding a little metallic Patina from a tube. I've used Embossing powder on the inner rim and then painted the magnifiers black so that they would stand out. I've paired them with the Notebook edges which were treated with chalk inks and some random paint. Love Story Calling Cards made for a perfect photo mat. There is also some Journey stamping to the left with the Journey stamp.

Here you can see the Graduated Circles which I've used to frame the photo. They were treated the same as the Notebook edges. My Good Vibes title is from the Good Vibes word set. You can also see a bit of the Journey stamping here on the right which helps create depth.

The Cogs and Gears were treated the same. Love the Industrial look they bring.

Of course, I finished off with florals, metal and Flair.
Blue Fern Studios products used:
Paper:
Love Story Amazing Hearts paper
Love Story Calling Cards paper
Chipboard:
Goggles
Cogs and Gears
Graduated Circles
Notebook Edges
Good vibes word set
Stamps:
Journey Stamp
***

"Delightful"
I don't know about you but I've been on a purple kick lately along with a vintage photo binge! And so, the colors of the Deja Vu collection really called out to me. Here I've paired the collection with some sweet vintage photos, chipboard and purple and cream florals.

The new Quatrefoil Frame made a fantastic photo mat here. It was simply gesso-ed with white.

The Flutter Medley is also a newish piece and made for a great border at the bottom of my photos. I've used chalk ink to give it a tiny bit of color. The Delightful title is from the Optimist Word Set and was painted white, then off-set to provide balance.

I'm in love with the new Peek-a-boos and used one at the top of my project. This photo also nicely demonstrates the use of the Halftone Stamp.

Lots of fun dimension and texture!
Blue Fern Studios products used:
Paper:
Déjà Vu Un Voyage a Paris paper
Déjà Vu La Plume paper
Déjà Vu Tresors paper
Chipboard:
Quatrefoil Frame
Peek-a-Boos
Flutter Medley
The Optimist Word Set
Stamps:
Halftone Stamp
Okay, that's it from me this month!
I look forward to being with you in July.
Be sure to visit the "Where to Buy Blue Fern Studios" page for information on finding vendors.
Be sure to visit the "Where to Buy Blue Fern Studios" page for information on finding vendors.
Sandi


