Showing posts with label Bordeaux Layered Frame. Show all posts

Saturday, December 20, 2014

Sanctuary Projects with Rae

Hello all. It's Rae, sharing my last projects for BFS! It's been an exciting year for me, and I feel so honored to to have been a part of this team! I made all of these projects with the Sanctuary paper collection.


"Remember" Layout


This is my layout that I made for the December Sketch Challenge. You still have time to play along!

I am absolutely obsessed with cemetery statues. I took these pics a few months ago at a huge cemetery here in Denver, and I knew they would be perfect for the Sanctuary papers!

Here's a closeup of two pieces of chipboard that I layered (the ornate frame and a piece of the small Roman clock set). On the ornate frame, I used embossing powders and chalk ink to get that effect. I pressed my black archival ink pad on the clock piece, and used some gold paint.

Untitled Layout

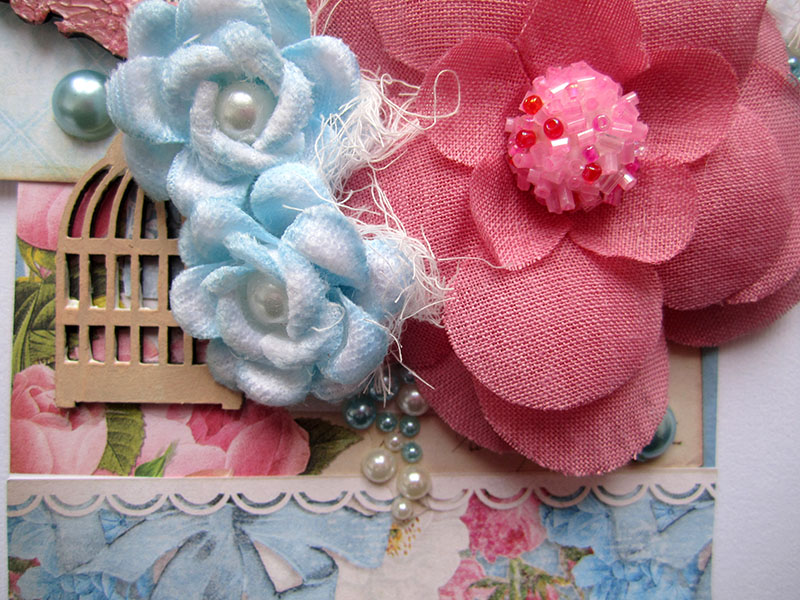
I love all the rich colors in Sanctuary collection and how they are paired with such soft complimentary colors, so I wanted to play with all of them for this layout.


Here's a close up of the small spring iris piece. I treated it with a heavy layer of gesso, then randomly sprinkled clear embossing powder over it, and dried it with a heat gun. Once dry, I used some acrylic glaze paints and water to get this effect.

You can also see the Boston lattice- nothing fancy there- just a coat of gesso!

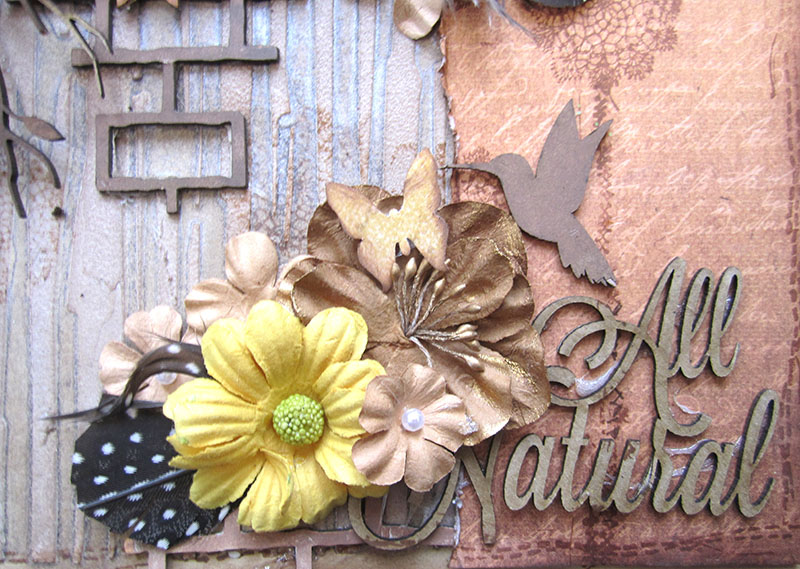
I used some of the Bohemian flowers from that set under the flower cluster, along with a key from the vintage key set. I used a platinum embossing powder and once it was hot, I pour small amounts of black embossing powder over it, so it only slightly melded on to the platinum.

I used the same technique on the manor hinges.


"Smile" Card

For this card, I used the Bordeaux Layered Frame. I traced the bottom piece on to the Conservatory paper, then adhered it to the chipboard, and filed the edges for a clean look.


 In this close up, you can see the top layer of the frame- I used several colors of embossing powders, layering them to achieve this effect.

I did the same thing with the "Smile" title. 


I hope you enjoyed taking a peek at my projects today, and this past year!

Congrats to the new Blue Fern Studios design team- it's going to be an amazing year!


Rae

Thursday, February 20, 2014

Blue Fern Garden Layouts and a Card with Rae

Hello everyone! It's Rae, and today I'm going to share some projects I've made using the fabulous Blue Fern Garden paper line, and some of the amazing BFS chipboard.

I am so in love with Blue Fern Garden papers! The style is so elegant, yet so versatile.

Dream Card

 For the base of my card, I used the the Blue Fern Garden "In Bloom" paper, distressed and inked. I also used the top corner of the "Parlour" paper to capture the beautiful image of a doily, butterfly, and dream dictionary snippet. I wanted to bring out the blues and and creams of that part of the paper, so I used those colors on the "Bordeaux Layered Frame."


I used a heavy layer of gesso on the bottom layer of the frame, and I sprayed it with Tattered Angels Glimmer Mist in Patina while it was still wet. I let it dry slightly, then added Silks Acrylic Glaze in Emperor's Gold in heavy random strokes.

The top layer of the frame is randomly colored with two brown tones of distress inks and then lightly grazed with a dark brown archival ink.


For this "Small Spring Iris" piece, I primed it with gesso, then used different green and gold mists for the stems. For the flower tops, I layered green, blue, and purple embossing powders.

I Love You More Layout


This is my layout based on the February sketch. I used "Timeless" and "Parlour," papers from the Blue Fern Garden line for the background and "Boudoir" to mat the photo.


In this closeup, you see two pieces of chipboard. The leaves are are a piece from the "Natural Sprigs Set" that I painted green and sprinkled with fine glitter while wet. I also used fine glitter on the "I Love You More" piece after I painted black and sprayed with some iridescent mist. I dusted off some of the glitter when it was dry for the random look. 

I cut a small piece of the "Chicken Wire Panel" and used a metallic distress stain as a base. Then, I brushed it with an archival ink pad for the worn look. The birds are just inked with black archival ink.


I coated the "Garden Window" with Martha Stewart Crackle Specialty Finish with a thick coat using a palette knife for an uneven "stucco" finish. And like the other pieces, I lightly brushed it with black ink.

There's still plenty of time to join us for the February sketch challenge


Magical Layout


I used the following papers from the Blue Fern Garden line: "Love Letters," "Boudoir," "In Bloom" and "Signature."


On the "Blooming Foliage" piece, I primed with gesso, used a metallic green mist, then used some green pigment ink over it, then used a brown chalk ink in random spots. 


On the "Romantic Page Dangles," I painted them with green paint, then randomly used a metallic distress stain. While the paints were still wet, I sprinkled a brown embossing powder to create this weathered look.


In this picture you can see the "Country Picket Fence" that I treated with gesso and crackle paint and brown chalk ink. The "Magical" title piece is from the "Winter Titles" set. I used three different colors of embossing powder to achieve this look. 


Thanks for stopping by the blog today! 


Rae

Tuesday, February 18, 2014

Special Moments- By Keren Tamir


 Keren here and its my turn again to showcase my work on the Blue Fern Studios blog.
 I'm thrilled to feature the new Blue Fern Garden Collection today for you.


Capture the Moment


I really loved combining these two colours: green and pink. Its from the Picnic paper of the new Blue Fern Garden collection. 


I painted the beaded circles in matching colours using Shimmerz paints. Of course I first primed the chipboard with Gesso.


Products
Blue Fern Studios:
Blue Fern Garden- Picnic
Blue Fern Garden- Calling Cards
Capture the Moment title
Beaded Strings

<<<<<<<<>>>>>>>>

Natural Beauty Tag


I created a tag with some of the leftover bits from the Calling Cards paper from the Blue Fern Garden collection. I even added a piece of Blue Fern Studios chipboard packaging.


I altered one of the Ever After Frames by covering it in crackle paste. Once dried (which dried clear) I painted it with Pink Shimmerz paint. The bird and the cage were primed with gesso and then inked with a chalk edger.


Blue Fern Studios Products:
Pacakging
Blue Fern Garden Calling Cards
Veranda cage set
Little Birds
Ever After Frame set

<<<<<<>>>>>>>

Finally I want to show you, in some more detail, my Layout for the monthly sketch challenge on the Blue Fern Blog.
I didn't use the Blue Fern Garden collection for it because my package came well after the sketch was revealed. 
I used very earthy colours for this layout and combined it with many different Blue Fern Studios chipboard pieces.


All Natural

The February sketch is very versatile.
I've rotated it 90 degrees to fit my design.


This is a picture of my daughter watching the ducks by the pond. I really wanted to give this layout an earthy natural feel. I used flowers, feathers and nature themed chipboard to create this look.


The Blue Fern Chipboards I used are: All Natural set, Little Birds set, Bordeaux layered frame, Shabby brick bits and Twiggy branch.


I altered the frame by painting it with butterscotch coloured acrylic paint and then stamping it with brown archival ink. The bricks, bird and branch I simply inked in brown fluid chalk and the title I left raw.


Blue Fern Studios Products
Bordeaux layerez frame
All Natural set
Little Birds
Captured Words
Shabby Brick bits
Twiggy Branch

Thank you so much for visiting the Blue Fern Studios blog today!!
I hope you get a chance to come and play with us with the the February sketch.
Have a wonderful day!!

Keren

Monday, September 30, 2013

Valerie Wraps Up September

Hi blog readers.  It's Valerie Serfozo today and I'm here to wrap up the month of September, which has been filled with all things wonderful from 7 Dots Studio.  We have been so excited to share September with them.  Our design team has created some awesome projects combining Blue Fern Studios chipboard and paper from 7 Dots Studio.

And in case you've missed it, the 7 Dots design team has been creating with Blue Fern Studios chipboard this month.  We hope you'll stop by their blog to see how they have used our chipboard. 

Now I'd like to share a couple of layouts that I created this month.  The first one is loving titled "Queen Bee", which fits my niece Makenzie perfectly!  Even at a young age, she likes to be in charge of things.  I have used the Messy Head and The Queen of Hearts collections from 7 Dots, along with several pieces of Blue Fern chipboard.


In this close-up you can see the detail on this piece from the graduated circles.  I have really piled on gesso, paint, distress stain, and embossing powder to give it this corroded metal look.  I can tell you that Blue Fern chipboard holds up extremely well to anything you throw on it.


Here again I used some embossing powder on the gold pieces, and added some sparkle to the title.  


I love the new "Fancy Weeds" and chose to use them to add some green to my flower cluster. 


Blue Fern Products Used:

Graduated Circles (the set contains 5 circles graduating in size from 3" to 11")


The Latest Buzz


Vintage Keys


Pretty Weeds


For my second layout this month, I selected another background paper from the Messy Head collection from 7 Dots Studio.  I love the ombre effect of this paper.  My nephew just turned 2 years old, and I was reminded of the newborn photos I took of him.  There is almost nothing sweeter than a sleeping baby.


I really like to use Blue Fern chipboard in my flower clusters.  On this case, I took apart the Organic Vine Corner and tucked it in several places.  To achieve the variegated coloring, I used two colors of big brush markers and tapped it with a baby wipe while they were still wet.  I like the uneven look of it. 


I used one of the Gabrielle Butterflies in the corner of my layout.  After applying gesso and letting it dry completely, I swiped a gelato over the chipboard and blended lightly with a baby wipe, since I didn't want complete coverage. 

And for this beautiful Bordeaux Frame, I just used some Distress Ink and Inka Gold.  I enjoy adding several types of products to the chipboard until I get the look I want. 


Blue Fern Products Used:

Organic Vine Corner


Gabrielle Butterfly Set


Bordeaux Layered Frame (I only used one piece of this set)


Thanks for visiting today.  Erin will be back tomorrow with our October Sketch Challenge.

Wednesday, June 5, 2013

Two Layouts by Kelly Foster

Hi everyone - Kelly here! So glad you have stopped by..I have two layouts to share, and I'll just get right to it!

A Beautiful Day

I created this layout, taking photos from one of the first days of spring we had here, and wanted to create an earthy but springy-vibrant page. I used one of the Organic Vine Corners, and I cut it in two, to place opposite one another in my clusters. I love how the one below the photos sort of mimic's my daughter's hair blowing in the wind! I dabbed various inks onto the chipboard using a sponge, and then added a touch of a textured medium to give it more dimension.


Below you can see the other half, which was treated the same way.


Below I have used one of the gorgeous Regal Ornaments, to which I applied the same techniques above, then tucked under my flower cluster.


Organic Vine Corner
Organic Vine Corner - Large

Regal Ornaments
Regal Ornaments - Click Image to Close

Cherished

On this layout, I have used just one piece of chipboard, but it is what I think of as a "statement piece" in that it is just SO beautiful and really added something awesome to my page. The Bordeaux Layered Frame is two pieces, so it can have a really dimensional look. 


The technique on this frame, well it was all a big experiment, and this is the result of layers and layers of "trying this and that." I simply painted the back panel of it white with gesso so that the ornate part would really stand out. I then did some embossing, painting with multiple colors of spray mist, dabbing with gesso where things got too dark, then repeat, until I got what I was going for! I also wrapped a bit of jewelry wire around the left side of the frame.


I love that even though my background and embellishments are quite "busy," this beautiful frame piece really draws the eye to the photo.


Bordeaux Layered Frame


Thanks a bunch for stopping in today!! Have a wonderful day!