Showing posts with label Blooming Flourish. Show all posts

Tuesday, October 28, 2014

2 layouts by Leila Cardoso

Hello everybody

Here I'm to show you 2 more layouts that I made using the wonderful BFS papers and chipboards.

The first one is my fav for this month, "Perfect Memories"

In the paper I used distress ink, gesso with stencil and gelatos, and in the chipboards I used chalk.


BFS supplies:
- Paper Fairyland (Montage collection)
- Garden gate
- Chunky words
- Little birds set


The second is a cute layout called "Sweet"

The doilie frame I painted with gesso, chalk and gelatos. I also cut the blooming flourish chipboard and painted with chalk.


BFS supplies:
- Paper Invitation (Montage collection)
- Paper Bouquet (Montage collection)
- Lace rounds
- Blooming flourish

So, I hope you like it! Thanks for stopping by!

xx

Leila

Tuesday, July 29, 2014

Pink and More Pink with Patter

Okay, so pink is my favorite color. For today's inspiration, I decided to go with a pink theme. Let's look at what I've created.

Pink
I love this quote"You can never have too much pink." So, I decided to use that on my art journal page for today. I first started with a lot of Blue Fern Garden paper scraps. I, of course, chose mostly the pink scraps. I then layered them on the page with other scraps of paper. Here is a photo of what the page looked like when I started and layered on the Blue Fern Garden scraps. Sorry for the dark photo.

And here is how the art journaling page turned out:

I used Blooming Flourish chipboard pieces and painted them with different colors of acrylic paint. I also added the chipboard to the page before adding paint splatters so that the chipboard pieces would also got some white and black splatters on them.


Blue Fern Studios products used:
Blue Fern Garden papers
Blooming Flourish chipboard

Hello
For this card, I decided to stick with the pink theme. I used the Blue Fern Garden Calling Cards paper. I started by using my Gelli Plate with acrylic paint to add some more color. Then I embossed the same piece of paper after it had dried. After that, I began layering the paper and embellishments to finish the card.

The chipboard piece I used is called Jeweled Trinkets. I covered it in pink acrylic paint. Then I added a layer of texture paint to the bow portion of the chipboard to set it off a bit.
Blue Fern Studios products used:
Blue Fern Garden papers
Jeweled Trinkets chipboard

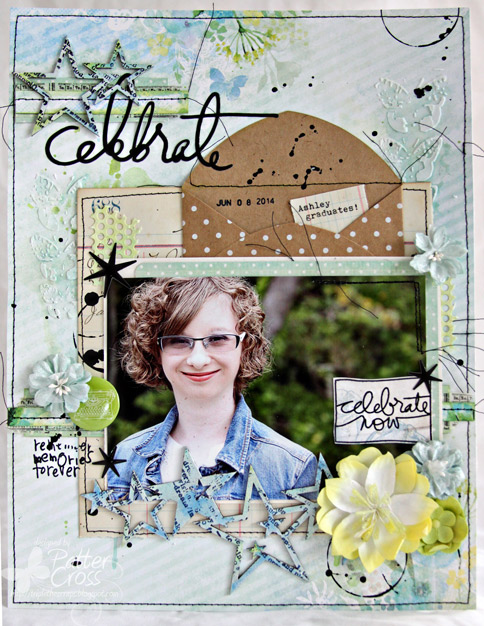
Celebrate
And I know this isn't pink but I wanted to share in detail the 8 1/2 x 11 layout I created for the July Sketch Challenge. This was one of my daughter's on her graduation day, and as you can imagine, she was excited. I used sketch as well as the new Blue Fern Studios paper line called Ombre Dreams.

The chipboard stars are new from Blue Fern  Studios, and they are called "Seeing Stars." I painted the stars with gesso and let them dry. Once dry, I painted with three LuminArte paint colorscool water, navajo pearl, and lime squeeze. I then let that dry, and lastly I stamped on top of the stars.

Blue Fern Studios products used:
Ombre Dreams Susan's Dream
Seeing Stars chipboard

And remember, there is still time to enter the July Sketch Challenge from Blue Fern Studios. Click here to see all of the challenge details as well as the wonderful prize package.

Thanks for stopping by. I hope you have been inspired to try some Blue Fern Studios products along with the color pink today. :)

Sunday, July 20, 2014

July Projects with Rae

Hello! Rae with you today to share my latest projects made with an array of Blue Fern papers and chippies.


Sparkle Card

First up, I have this card I made with the Ombre Dreams paper.


I used two pieces of chipboard on this card, and here's a close up that shows the details. The "Sparkle" piece is from the "Winter Titles" set. I used some metallic stain by sponging it on the raw piece for a toned down metal look. Sponging it on also gives some bubbles on the piece that adds a slight touch of dimension.

For the "Treasured Floral Frame," I primed it with gesso, then used some shimmery watercolors in two different colors in random spots, leaving some of the gesso exposed.

Timeless Beauty Altered Mailbox

I altered this paper mache mailbox with papers from the Blue Fern Garden line. 


This is the back view, showcasing my favorite piece of paper from the line. :)


In this close up, you can see how I line the inside of the mailbox, and stuffed it full of various flowers.

I used the "Blooming Flourishes." Two pieces come in the set.

Here's a closeup to see the details of the flourishes. I ran them through my die cut machine with a script embossing folder, then primed them with gesso, and while still wet, added some dry green milk paint. It left a grainy and chalky surface, which I love. After it was dry, I used green and brown distress inks to change the color in a way that complimented the papers better.


Beautiful Layout

I really loaded up on the chipboard in this layout!


For the "Beautiful" title piece, I ran a chalk ink pad over it, being sure to get an uneven coat. 


For both the "Fancy Bird Cage" and the "Shabby Brick Bits," I used the same technique, which is simple: I grazed each of the pieces with brown archival ink, being sure to leave a lot exposed, then using distress ink with a blending tool to get that definition that you can see on the bird cage.
 And, here's a closeup that shows the finish on the "Roman Clock Set" (Large). I used white chalk ink and then misted it with light brown, dark brown, and gold inks.

For the "Corner Flourish," I primed it with gesso, then painted it with three coats of three different green paints.


Thanks for checking out my projects today!


Rae

Monday, April 28, 2014

Leila's April projects

Hello Ladies

I'm here again to show you more two layouts 12x12'  (they are my passion).

The first one is to travel album of my cousin, on her journey across Europe met some gorgeous places, including Volendam in Amsterdam...


I painted all chippies with acrilic paint and gelatos, them spilled ink on them...

Blue Fern supplies:
- Shabby brick bits
- Directions


The second is one beach page with my children...


Blue Fern supplies:
- Memory frames
- Blooming flourish (2)
- Bohemian flowers
- Doodle flowers

Thanks so much to stopping by!

xoxo

Leila

Tuesday, April 22, 2014

1960 by Lisa Griffith

Hello there! 
It's my turn to share my projects that I made this month. For both my layout and my card
I used the same techniques on my chipboard pieces , and I really love how they turned out.

The first project is a layout featuring a photograph of my Grandma....

'1960'


Here I have used a gorgeous Blue Fern Studios chipboard called 'Blooming Flourish.' I will try to show a close up below so you can see how a few simple techniques can alter your chipboard to make them look so beautiful. First I covered the chipboard with Viva Croco Crackling paint in white and set it with a heat gun to get an amazing weathered and cracked look. Then I covered the chipboard with a deep purple ink and let that dry. Last step is I applied embossing gel around the edges of the chipboard and then embossed them using silver embossing powder.  Really love the final result, it made the pieces look really aged and added so much character to my projects. 
I hope you'll try it!

Here are a few close ups...


I also made a card using an absolutely stunning Blue Fern Studios piece called 
'Damask Motif' that I treated the same way as I mentioned above, 
and really let this piece be the star. 


I started with the Blue Fern Studios paper called 'Parlour' as my base and then applied 
gesso, purple mist and some stamping underneath the altered chipboard.

Here is a close up..


I hope I have inspired you a little to alter your chipboard, 
and have fun playing with some textures! 

Until next time,
Lisa 


Tuesday, September 3, 2013

Blue Fern Studios + 7 Dots Studio = Love

Hi Blue Fern Studio Fans!! It's Lisa here, with a new set of layouts for your viewing pleasure. I hope to inspire you this week with my work.  What a delightful surprise when we found out that we were doing an awesome swap with 7 Dots Studio. It was like a match made in heaven!! But then again, Blue Fern Studios chip board will go with any paper or medium!! This first layout was done with the 7 Dots Studios collection Messy Head. I simply adore the wood grained pattern paper. I topped it with the print pattern paper and edge punched it. The paper and Twiggy Branch inspired me to use this photo of Flamingo's I took at Sunken Gardens a few years ago. They truly are "delightful" creatures.


I decided to leave the branch in a more natural color considering the wood grained paper went with it so well. I did rub a little Rock candy Stickles on it to give it a little sparkle. Then I just added some tiny flowers that I die cut.


  I love the word sets. I base coated the word and after it was dry, I dabbed on 2 different color glazes.


I used a white acrylic gesso to coat the Doily Bunting and the butterflies, and while the paint was thick and still wet, I sprinkled some Micro Beads in 2 different colors onto it and pressed them into the wet  paint.


A detailed look of the microbead/gesso technique. 


Twiggy Branch


Doily Bunting
The Optimist Word set
                              
                                                                   Brigitte Butterfly Set

For this next layout I used Messy Head once again. I cant tell you how beautiful the 7 Dots paper is!!


On the flourish I used some crackle paint. Whe the paint was dry and crackled, I rubbed some soft chalk ink over it so that it seeped into the cracks. Then I just dry rubbed the ink off of the paint leaving it on very lightly in some spots. .


I did the same treatment to the Circle Motifs. Then I added a bit of pink ink and rubbed it lightly over the whole surface.


I took one of the circle Morifs and cut it in half. I positioned the pieces on the edges of the layout. They look like 2 different pieces. I only used 1 piece, and there are 3 pieces in the set.

                                                             
                                                                   Blooming Flourish

                                                                        Circle Motifs
                                                                    
Thank you for taking the time to stop by and check out my creations this week. I surely had a wonderful time with my Blue Fern Studios chip board pairing it with 7 Dots Studios. Be sure to check back here on the Blue Fern Studios Blog often as the designers share their work and techniques. You are sure to be inspired.