Showing posts with label Fancy Birdcage. Show all posts

Saturday, March 28, 2015

March projects from Bente.

Hello all you friends of Blue Fern Studios.!
We have already reached the end of March and it's my turn to share a few of my projects 
showcasing some BFS awesomeness :-)

I have used lots of chipboards to make three very different pages and also used 
three different paper collections.
Hope you like it!!

My first one is with a photo of my dear sister snuggling one of our small nephews.
I used one of my absolute favourite sheets from the Sanctuary collection.


Below is a close up of the painted 'Flutter page dangle' with some added glass beads for texture.


And here you see some leftover bits from thelarge  chicken wire panel as a  goldpainted accent.


Lots of stamping, painting and misting on the background here and a fun paper rolling technique.


(I used the Flutter Page Dangle, Arrow Words, Graduated Squares, Layering Stems, 
Sanctuary collection) 

My second page uses the recently released Love Story collection together with a varied selection of Blue Fern Studios chipboards.


  I painted my chipboards using a red colour. Once dry it turned out much darker than I had expected so I used some gesso to tone it down a few notches. Aftercreating a photo mat with some layers of different pp's I used one of the stamps around the edge of the top layer. Then lastly I glued down the painted frame on top.


I cut out the word 'Sweet' from one of the patterned papers.


(For this page I used: Floral Medley Frame, Fancy Birdcage, Love Story paper collection, and the Love Story Stamps Forever set) 


And finally a page using one of the stunningly beautiful papers from the Ombre Dreams collection.
Each and every one of those patterned papers inspire me immensly!


This paper has a blue and purple background that is very helpful if you want to do some mixed media work on top. The work is half done for you so to speak:-) I used some of the new stamps from the Love Story collection here as well. I used them around the edges and in the center. Stamps are
perfect for creating a beautiful setting for your photo.


I painted the chipboard pieces yellow here to match my DD's jacket. 
I used the top of a glue stick to stamp the round shapes and filled them in rather haphazardly with some more of the yellow acrylic paint.


Below you get a closer look at how I used the stamps.


 (For this page I used: Love Story Stamps set one, Love Story Stamps set two, Manor Hinges,  
Ombre Dreams paper collection, Arrow words set)

Thanks for looking !


Sunday, July 20, 2014

July Projects with Rae

Hello! Rae with you today to share my latest projects made with an array of Blue Fern papers and chippies.


Sparkle Card

First up, I have this card I made with the Ombre Dreams paper.


I used two pieces of chipboard on this card, and here's a close up that shows the details. The "Sparkle" piece is from the "Winter Titles" set. I used some metallic stain by sponging it on the raw piece for a toned down metal look. Sponging it on also gives some bubbles on the piece that adds a slight touch of dimension.

For the "Treasured Floral Frame," I primed it with gesso, then used some shimmery watercolors in two different colors in random spots, leaving some of the gesso exposed.

Timeless Beauty Altered Mailbox

I altered this paper mache mailbox with papers from the Blue Fern Garden line. 


This is the back view, showcasing my favorite piece of paper from the line. :)


In this close up, you can see how I line the inside of the mailbox, and stuffed it full of various flowers.

I used the "Blooming Flourishes." Two pieces come in the set.

Here's a closeup to see the details of the flourishes. I ran them through my die cut machine with a script embossing folder, then primed them with gesso, and while still wet, added some dry green milk paint. It left a grainy and chalky surface, which I love. After it was dry, I used green and brown distress inks to change the color in a way that complimented the papers better.


Beautiful Layout

I really loaded up on the chipboard in this layout!


For the "Beautiful" title piece, I ran a chalk ink pad over it, being sure to get an uneven coat. 


For both the "Fancy Bird Cage" and the "Shabby Brick Bits," I used the same technique, which is simple: I grazed each of the pieces with brown archival ink, being sure to leave a lot exposed, then using distress ink with a blending tool to get that definition that you can see on the bird cage.
 And, here's a closeup that shows the finish on the "Roman Clock Set" (Large). I used white chalk ink and then misted it with light brown, dark brown, and gold inks.

For the "Corner Flourish," I primed it with gesso, then painted it with three coats of three different green paints.


Thanks for checking out my projects today!


Rae

Wednesday, May 14, 2014

2 Projects by Evgenia Petzer

Hello dear BFS friends! Its Evgenia Petzer with you today with my 2 May shares.

First i have got a feminine card, that also uses BFS papers

Blue Fern Studios products used: Grande Cages, Organic Vine Corner Large, Blue Fern Garden papers

And some close ups:
 The cage and the large organic vine corner (i have used only one third of it on this card) are coverd with tattered angels glimmer glam.


And second is the fabric notebook


Blue Fern Studios products used: Fancy Birdcage, Vintage Keys
 The cage is covered with 2 colors of acrylic paint, the glossy accent over it and sprinkled with some microbeads

 The hand-died in coffee sheets  that ive more vintage look to it.
I hope I have inspired you a little bit:) Have a good and crafty day everyone.

Evgenia.

Wednesday, March 26, 2014

2 layouts Blue Fern Garden by Yuko


Hello! it's Yuko.

2 layouts are useing Blue Fern Garden Paper
and beautiful chipboards.


【sweet】
It is a photograph of when I went to Strawberry Picking with my daughter( 2-year-old) .
I like the look Zany her!:)


The chipboard of the heart(Heart Set) attached the texture with modeling paste, 
after ink colored. 

 The very lovely heart was made (my favorite♥). 


"Sweet" word of the title( Valentine's words) after having painted the gesso,

Was loaded partially gesso and colored with brown ink.


<Blue Fern studios products>
Blue Fern Garden : In Bloom
Jeweled Trinkets
Heart Set  
 Veranda Cage Set   
Turkish Bits
Valentine's Word Set


【place】
This photos taken with trip the other day.
Morning, in the hotel lobby. 
The morning sun shone in and it was a very wonderful place.


 The background used modeling paste.
And I was colored with ink stamp.


glitteringly -- imagining the shining morning sun,

I was attached spangle


This uses the part of the Fancy Birdcage chip board.

It was colored with ink stamp after having painted  gesso.


<Blue Fern studios  products>
Blue Fern Garden  :Timeless
                                   Signature
Fancy Birdcage
Shabby Brick Bits
Magical Monarchs
Good Vibes


Please visit my blog !
Thanks for looking♥


Yuko


Friday, October 11, 2013

Something old & something new


Hi everyone! 
Kristine here to share with you some September projects! 

"So happy"
I don't know about you but I always find new pictures more inspiring then older pictures.
So every time I take a picture that I really like, I have to scrap it right away ;) ...
 On this layout I painted all the chipboard black. I needed a contrast-color against the craft background, and all the different colors on the pattern paper. The background is made with stamps, and india ink. 

I have used these chipboard pieces: 
                                
                                         Bits of honey                                        Fancy birdcage


 "Master of disguise"
...But sometimes I like to dig into the photo pile and use some pictures I have not seen in a while!
It always bring back memories and awesome moments!
Like these photos used on this layout!
When my son was about 1 year old, his favorite game to play was hide and seek.
It was not very hard to find him ;) 
The background is made with stencil, distress ink pad, india ink and black dabber.
I used a stencil, and modeling paste on the "bits of honey" and "sunglass" chipboards, and white dabber on the "master of disguise" chipboard. 

On this layouts I have used: 

                                           Bits of honey                                     Mister stuff

I hope you found some inspiration here today, and thank you for visiting the Blue Fern Studios blog!

Kristine Henanger


Wednesday, October 9, 2013

Glittery Christmas Cards with Yana Smakula

Hello everyone! While folks around here are barely seeing the first signs of Fall I've entered the phase of holiday card making. I try to prepare myself and my home for Christmas ahead of time and this means making lots of holiday cards in the preceding month of October and November. 

Today I'd like to share some of my first holiday cards this year. For some reason, I'm all about using glitter in my projects and today's cards are no exception.

I don't yet have any of the new Blue Fern Studios fabulous holiday chipboard so I decided to challenge myself to use what I had on hand - regular non holiday shapes and incorporate them into festive holiday cards. To achieve the look on my cards below I simply covered all of the chipboard pieces with embossing powder with a mixture of glitter. I used regular embossing powder with silver glitter and chunky white with a bit of gold embossing powder and some glitter. Both powders are from Stampendous and work great for project like this.

Believe in the miracle:


Chipboard used:
Petite Boutique Frames
Blooming Foliage

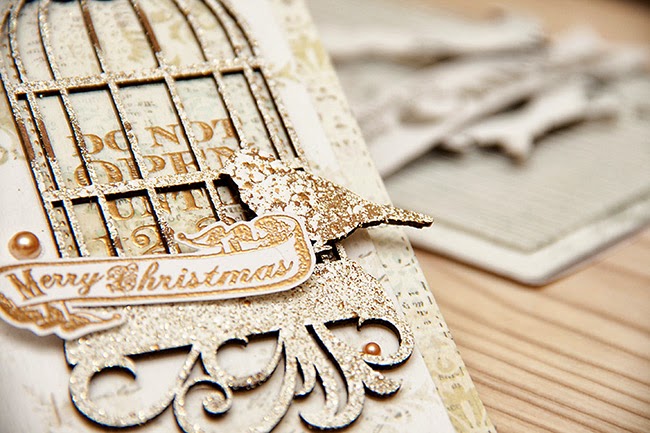
Merry Christmas:


Chipboard used:
All Natural Set
Fancy Birdcage

Wishing You Holiday Cheer:


Chipboard used:
Petite Boutique Frames
Icons Set Three
Thanks for stopping by!