Saturday, August 10, 2013

Cluster Layouts by Kristine Henanger


Hi everyone! 
Kristine Henanger here with you today to show
 you some projects I have been working on this month!
I hope you enjoy :)

"Boys will be boys"

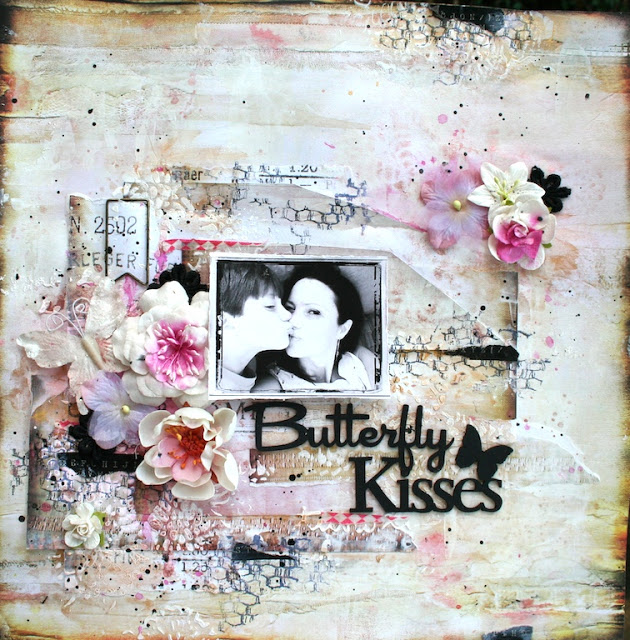
There is endless ways to use or decorate your chipboard pieces, and one of my favorit way to do it, is to layer the piece with many layers of paint, ink, stamping, crackle paint, glitter, embossing and so on. 
On this page I started of by putting gesso on all the pieces. Then I used the same glimmermist as on the background, and finger painted the chipboard, to give it a random look.
I put some more gesso on, allso using my fingers, to make the white more visible again.
Then I used some stamps and just put it all over, before I finished of by putting some ink on the edges to create shadows.

 On this layout I have used following chipboard pices from Blue Fern Studios

                                        " Boys will be boys"                         "petite boutique frames"

"picture perfect"


"Today"

I am all about the cluster style, details, layers and colors (especially turquoise)... 
But sometimes I like to create a "clean and simple" cluster pages, like this one.
To make the chipboard match my page I put gesso and ink on all the pieces.
To give it a random look I always use my fingers to paint with
(it is a bit messy, so you can use gloves if you like).
On the skies I used sandpaper to create a worn/aged look.
 On this layout I have used following chipboard pices from Blue Fern Studios:

                                    " Brigitte Butterfly set"                                 " widgetworks"

                                                                      "cloudy skies"

Thank you for stopping by! I hope you found some inspiration here today :)


Kristine Henanger


Thursday, August 8, 2013

Yana Smakula August post

Hello everyone!

Yana is here and today I'm sharing a few of my newest projects created with Blue Fern Studios Chipboard. To tell you the truth - I'm having a blast making clean and simple cards using chipboard pieces from BFS. For this post I also decided to show you something extra - I'll be showing you my very first shadow box! I hope you'll enjoy and will be inspired to create something wonderful with chippies from Blue Fern Studios.

Lets start with a clean card "An Awesome Day":


For this card I used just one chipboard piece from Blue Fern Studios:
 Mister Stuff
I also have a quick video to show you how the card came together:

My next card is also a very simple one, and once again it uses only one chipboard piece which serves as the main element and holds the sentiment:

Chipboard piece used for this project came from the Picture Perfect set:
Picture Perfect
Finally, my main project for this month features several chipboard pieces which create a dimensional scene. All chipboard pieces used for this project were painted with different paints and inks, some were embossed a few times:


Chipboard pieces used for this project are:
Garden Gate
Fancy Birdcage
Organic Vine
Tweet Friends
This is all from me for today! Be sure to stop by my blog to see some some projects using chipboards from Blue Fern Studios!

Tuesday, August 6, 2013

Projects by Yvonne Yam


Hello there! It's Yvonne here to share my projects for August. First up is this lace tag. The base is a red tag which I covered with lace and then added some embroidered black blooms for added texture.


The dressform chipboard was painted with gold paint then topped with gold mica and then "dressed" up with pearls, ribbon and a bead.


I used the Miss Tailor set.


My second project is an 8x8 canvas. A little mixed media background with washes, paints and stamps.


For the Garden Gate and Country Picket Fence (I cut it to fit my canvas) chipboard, I spritzed with black mist, then added black lava medium for really cool texture and sparkle.

For the Follow Your Bliss chipboard, I painted with white gesso and then topped with clear glitter.


Hope I've inspired you to use your Blue Fern Studios chipboard. :)

Sunday, August 4, 2013

July Sketch Challenge WINNER & Top 3 Features!

Good morning, Blue Fern Studios fans! It's time to announce the WINNER of our July Sketch Challenge, and also share with you our TOP 3 Features! And I must say- you did NOT make it an easy month for us to choose, that's for sure! We had the most amazing entries- thank you to all of you who participated! We always love to see how our chipboard can be used, and we truly appreciate everyone who entered :).

SO...first item of business is to announce the randomly drawn WINNER of the July Sketch Challenge prize!

CONGRATS to....................Carrie Sedack!!!!!!!!!
 
She shared such an ADORABLE entry with us this month:

We can't wait to get your prize pack sent off to you, Carrie! Please contact me at:
to claim your prize!!
 
And NOW...on to our TOP 3 Features!!
As mentioned, it was seriously NOT easy to narrow down our amazing entries this month to a Top 3. Such a talented group! But here we go...
 
The first talent we'd love to feature is:
Lisa Griffith
Lisa, there is just so much we love about this gorgeous layout! Your details are astounding- but what we love most is how your commanding title takes the stage here- just the right amount of black to pull the entire project together. We're so happy that Blue Fern Studios could lend a hand in making this stunning page SHINE!
 
Next, we have the very talented:
Elizabeta Dimitrova
Oh, how we love this beautiful, sweet layout! The Brigitte Butterflies blend perfectly- with just a hint of sparkle, they are the perfect accents to your lovely clusters. Congrats to you on this well-deserved feature!

And finally we have the wonderful:
Debby
We sure love the natural, raw chipboard look- and Debby has pulled it off perfectly with this here layout! Our pretty and popular Doily Bunting was easily straightened and added as a perfect linear accent to D's sweet photo. What a great take on the sketch too- thanks so much for creating such an inspiring, beautiful layout!

And thankYOU once again to everyone who took the time to partake in our July Sketch Challenge! We truly enjoy each and every entry that comes in- so please consider our current August Sketch Challenge- we'd love to feature you here! Or maybe you will be the lucky winner of our prize package! Either way, we love to see our pieces in action, so do share with us here :)

See you soon!

Saturday, August 3, 2013

Getting Krafty, and take a walk through the daisy's with Blue Fern Studios!!

Hey there Blue Fern Studio Fans, Lisa here.  The month of July, just came and went. So here we are at the peak of summer and I was feeling kind of Krafty again this week...So, Using Kraft paper once again, I decided to color it up a bit this time and adorn it with some fabulous heat embossed chip board!! It amazes me on how many ways you can use chip board. And how many ways you can adorn it.


This time I decided to use embossing medium and embossing powder on my chip board pieces. I heat embossed the chip board and then used a white color wash over the embossed pieces. I love the new fancy words that Blue Fern Studios is creating!! My biggest difficulty in creating pages is the title and journaling. These words make the best titles and make it so easy for me!!


Love, love the Bits Of Honey chip board. You get  6 pieces in the set. And I only used 1 for this one and snipped it apart to create 2 smaller pieces. That still leaves me 5 great pieces left in the package!!


 Here is just another view of the page to show dimension. I put bits of pop dots under the Born To Be Wild chip board piece to lift it off of the page.


I added the other piece to the opposite side of the photo. My daughter is sweet as honey, with a wild streak in her.  These pieces were perfect for my layout!


                                           Bits Of Honey                             Born To Be Wild


 I often dream of old iron gates that have been aged and show there patina finish well. On this layout I aged the gate in a fine Patina using only embossing powder. And in a future post, I will show you how I did it with a tutorial.


 I used 3 different embossing powders to create the color on the Tweet Friends piece. The little birds on the branch are just so sweet.


 Here is a close up of the gate. I only used 1 side of the gate as I used the other one in another project.
You can see the fine faux Patina finish.


I heat embossed the Sunshine word with yellow. It shines in real life and looks like sunshine.


                                           Garden Gate                                    Tweet Friends

                                                               The Optimist Word Set

 Thank you for coming to visit with us today. Keep coming back as the Blue Fern Studio Designers show you their fabulous creations to start those creative juices flowing!! Till next time.... xo