Showing posts with label Rose Frame. Show all posts

Thursday, January 5, 2017

January projects by Tartine Peluche

Hi everyone!
I'm so excited to share with you my first projects for Blue Fern Studios;
such an honor and a pleasure to be a part of this fabulous team.
So let me introduce myself.
My name is Melanie, Tartine Peluche on social media. I'm 34 years old and I live Quebec in Canada.
I do principally layouts, sometime cards and canvas. I've been scrapbooking for several years, starting with cards. Since a year I've changed for layouts and I really love that. My style is mostly shabby but I like touch everything and discover new techniques.
What is sure, my style is very detailed and full of flowers.

This is me

My works are always evolving and that's one of things why I love this art.
You can find me on:


I hope to inspire you all year long.

===============

My First layout: I'm dreaming of a white Christmas.
I used the back of " Wonderland " paper from the Vintage Christmas collection for the background.
I simply put some texture paste and added a little brown ink and I finished with crackles textures stamps that I emboss with snow embossing powder
and grungy grid stamp emboss with ginger embossing powder.


The main chipboard of this layout is Snowflake Frame-Square. I started by embossing it in snow embossing powder. Then I used crackles textures stamp with brown ink pad and finish with grungy grid stamp emboss with ginger embossing powder.
To add contrast to the main chipboard I used Shabby Flakes. I made a mix of snow embossing powder and vintage gold glitter that I used to emboss the flakes.
Under the flakes I used two pieces of kit Mini Flourishes. I simply embossed with Ginger Embossing powder to bring out the flakes.

I used two deer from the kit Winter Deer also embossed in Ginger Embossing Powder.
I added dimensional paint for simulate snow.


You can better see the effect of mixing glitter and embossing powder on snowflakes here and dimension of white paint on deer.
You can see also the shinning of background create with stamps and embossing powder.

I kept the most beautiful for the end. These flowers are so beautiful. They are perfect!
I add a few micro beads on the pistils.


And a small snowflake to decorate the metallic golden deer.
Love this.

Blue Fern Studios products I've used:
Paper:
- Wonderland - Vintage Christmas
Chipboards:
- Snowflake Frame-Square
- Shabby Flakes
- Mini Flourishes
- Winter Deer
Embossing Powder:
- Ginger
- Snow
Glitter:
- Vintage Gold
Stamps:
- Grungy Grid
- Crackles Textures
Flowers:
- Late Winter Lilies

===============

My second project is " Follow your heart "
I use the " Love Song Serenade " paper from the Heartland collection as my background paper.
I added white gesso, a doily stencil and just a little bit of teal ink.

I covered the chipboard "Follow Your Heart " with black gesso and give some shinning with pigment ink silver. I added some small details with teal wire thread.
I cut the chipboard Rose Frame and after putting white gesso I added a small layer of metallic teal paint. Some flowers and beads added the final touch of the top part.

Here I used the same procedure on another piece of chipboard Rose Frame
and completed with flair. Still some beads and small
piece of cheesecloth and this part is finished.

This is my favorite part of my layout.
I covered with white gesso and emboss with Snow embossing powder
I decided to customize my chipboard Treasured Floral Frame with flowers and wire thread, exactly like the chipboard. I really love the result.
Under This chipboard I added other pieces of Rose Frame chipboard,
still altered with white gesso and metallic paint.

Then I used the white flowers Christmas Blossom and coated the center of Caribbean glitter.

Some beads ans stars sequins to add a littles details .


Blue Fern Studios products I've used:

Paper:
Heartland - Love song serenade
Chipboard:
- Rose Frame
- Treasured Floral Frame
- Follow Your Heart
Imagine ink Embossing Powder
- Snow
Glitter
- Caribbean
Stamps
-Grungy Grid
Flowers
-Heartland Roses and Blooms
- Christmas Blooms

===============

My last layout " These moment "
 I used the back of  " Love Blooms " paper from the HEARTLAND collection. I love this blue!
I slightly bleached the paper with white gesso, I used crackle textures stamp with black ink pad then I applied with texture paste. To finish the background I added a little bit of spray ink with a brush.

I used the chipboards Heartland XOXO, the bird of chipboard Spirit of Heartland
and one heart of  Heart Set. I first applied white gesso and I painted all the chipboards
 in the same way, with metallic
watercolor paint teal, white and blue.

You can see more the shinning of the paint on this picture on the chipboard with this picture.

I really love the lilies flowers of Blue Fern Studios. For this projet I chose to use the light blue of kit Spring Lilies. They are so beautiful and really perfect for my layout.

To finish I simply added several small details
everywhere on my creation: pearls, sequins and brads.

Blue Fern Studios products I've used:

Paper:
Heartland -  Love Blooms
Chipboards:
Heartland XOXO
Spirit of Heartland
Heart Set
Stamps:
Crackle Textures
Flowers:
Spring Lilies===============

Thank you for stopping by!
See you soon.
Tartine xxx

Thursday, May 12, 2016

May Inspiration with Sandi Clarkson

Hello, Blue Fern Studios fans!

Sandi here with you today sharing 3 projects using 3 different collections. Because I work ahead, only one of these is done using our newest Tranquility collection. However, that gave me a chance to catch up on some faves. 
This month it seemed that "my jam" was using a mix of embossing powders and glitters on a single chipboard piece. So fun!


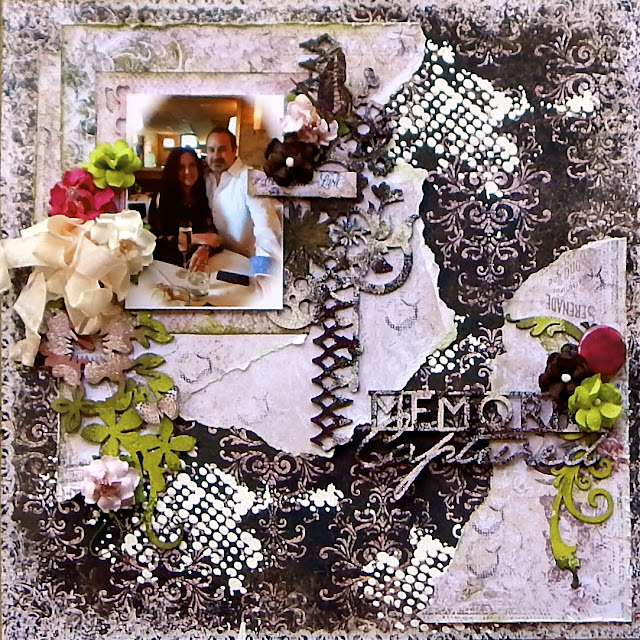
"Memories Captured"

My new favorite! This is one of those projects that is so sparkly in real life but is hard to capture with the camera. I've used the gorgeous Serendipity papers and layered and stamped them to create a unique effect. The darker pattern is Reminisce, side B. It provides such a dramatic backdrop.


The Deja Vu Atelier chipboard, as well as the Captured Words title chipboard were altered with black gesso as a primer and then glammed with Oatmeal, Garnet and Cotton Candy Embossing Powders along with some Dusty Rose glitter.


The contrast of the Oatmeal Embossing Powder on the blackened chipboard almost gives a silvery sheen. I love experimenting with different combinations! Here I've added a fussy cut butterfly and some of the Courtship Lane Roses and Blooms. I used the Courtship Lane branding strip as a subtitle.  Off to the right you can spy some of the Halftone stamping. 


The title is from the Captured Words set and is treated the same as the Atelier chipboard. To the right and under it, I've layered in a Whimsy Flourish that was colorized with a gelato and then enhanced with some random embossing using Lime Embossing Powder. Again, some Courtship Lane blooms were added. 


The Aloha Flower chipboard was primed with white gesso, then colored with gelato and and again randomly embossed. For consistency, I've used Lime on the stem and leaves, Cotton Candy on the flower itself. 

Blue Fern Studios products used:
Paper: Serendipity Contemplation, Reminisce, Anticipation and Calling Cards, Courtship Lane branding strip
Chipboard:  Captured Words, Deja Vu Atelier Chippie, Aloha Flowers, Whimsy Fourishes
Stamps: Halftone
Embossing Powder: Oatmeal, Garnet, Cotton Candy, Lime
Glitters: Dusty Rose
Flowers: Courtship Lane Roses, Courtship Lane Blooms

***


"Dream Big"

This next layout was so fun for me because it's a little different from my usual style. But with a photo this cute, you just have to let it inspire you!
 This is my sweet granddaughter MacKayla and her new foal.

Since this girl loves going to the barn, I thought this particular paper from Autumn Anthology (Cottage) might fit the bill. I used a few others for layers and stamped the background with the Dreamy stamp.
I grabbed some of the older Chicken Wire chipboard, inked it and tucked it in.


The right corner flourish you see is actually a trimmed corner from the Rose Frame chipboard piece which is almost 11x11 inches. Once again I went with priming with black gesso and adding a combination of fun Embossing Powders. This  time I've used a combination of the paper and the photo for my inspiration.  So, first, Seven Seas, then Tangerine and lastly Honey Embossing Powder. At the end of my composition, I dabbed with white gesso. A couple of Courthsip Lane blooms and that part was done! The little left hand corner piece was treated the same.

Since the Pretty Weeds flowers are right there to the left, let's talk about them. The flowers were embossed with Bonny Blue Embossing Powder while the stems were inked. Love how they brighten things up! 


I needed my title chipboard "Dream Big" (from the Optimist Set) to be light in  color, so I used the Bonnie Blue Embossing Powder again. Then later dabbed with white gesso. Here you can also see that left hand piece of the Rose Frame and more of the Pretty Weeds. And of course, good old Chicken Wire! All that was left was to add some more of the Courtship Blooms.


One more Pretty Weed over to the right of the little house image … which I'm imagining as a barn! 

Blue Fern Studios products used:
Paper: Autumn Anthology Cottage, Mercantile, Newsworthy, Calling Cards
Chipboard: Chicken wire, Rose Frame, Pretty Weeds, The Optimist Word Set
Stamps: Dreamy
Embossing Powder: Bonny Blue, Seven Seas, Honey, Tangerine
Flowers: Courtship Lane Blooms

***


"Blissful" 

Last but not least is my example for the Tranquility Reveal. 
My primary background paper is the B side of the Hushed paper. More Hushed paper was utilized as torn photo layers to help build the background along with a Calling Card. I've done some stenciling and added some random mist colors from my stash. 

All my chipboard pieces were treated the same to create a cohesive look. I've again done multiple embossing powder over clear gesso. 


Some Organic Coins were used as a photo layer and embossed with In the Navy, Nutmeg and Garnet Embossing Powder.  Fool's Gold Glitter was also added in for sparkle. The Scalloped Border chipboard is just barely peeking out on each side of the photo. My Blissful title was treated the same as well. 
I enjoyed using the new Tranquility Flowers on this page, so added them generously! 


A better look at that Scalloped Border chipboard and Blissful title. 
You can see bits of the Making Plans stamping that was done as I was preparing my background. I've used black splattered paint as a finishing touch. I also added some black dots to my lilies to make them more life-like. 


Just wanted to share one more image of these gorgeous Tranquility Roses and Lilies. 

Blue Fern Studios products used:
Paper: Tranquility Hushed and Calling Cards
Chipboard: Organic Coins, Blissful, Jubilation, Patience set, Scalloped Border
Stamp: Making Plans
Embossing Powder: In The Navy, Nutmeg, Garnet
Glitter: Fool's Gold
Flowers: Tranquil Blooms, Tranquil Roses and Lilies

That's it for this month! 
I hope you've found something to inspire you! 
Sandi

Tuesday, September 2, 2014

September Sketch with Jelissa and a Start to Finish Video

Hello there friends!

We're in September, and how fast time has past! Today I'm sharing with you my take on Blue Fern Studios' September sketch challenge as part of my video education post.

Here is the wonderful sketch by Michelle:


And my interpretation of it:


That's my cat again as I realised I havn't scrapped much photos of my pets. I have lots of my children though and to many, they are one and the same. I've used the beautiful papers from Ombre Dreams, as well as some lovely chipboards like the Jeweled Frame, Framed Trinkets, a corner from the Rose Frame and a piece of the Lace Rounds.

Some closeups:


Here's the video of how I put this page together, on the Blue Fern Studios Youtube channel. 


I hope you've enjoyed watching the video. And remember to subscribe to our Youtube channel and also drop again by the Blue Fern Studios blog for more inspiration from the rest of the lovely DT.

Blue Fern Products used:
Susan's Dreams
Shannon's Dreams
Dream Cards
Jeweled Frame
Framed Trinkets
Rose Frame
Lace Rounds

Until then,
happy scrapping!

Sunday, March 23, 2014

New Products from Blue Fern Studios!

Today we would like to share with you the new releases for March! With spring upon our part of the world, you are sure to love the new seasonally appropriate designs. And as always, we have a variety of other items in the mix too. 

Take a look:

Bunny Basket Set

Cosmos Basket

Little Baskets

Mixed Chains

Pipeworks

Rose Basket

Rose Frame

Rugged Chains

Spring Trinkets

Twilight Garden Frame

Working Parts

We hope you love our latest designs!
{Which are YOUR favorites??}